background image

Page 5

For technical questions, please call 1-888-866-5797.

Item 63445 
        

S

AFET

y

Op

ERA

TION

M

AINTENAN

c

E

S

ETU

p

12.  Stay alert, watch what you are doing and use 

common sense when operating a power tool.  
Do not use a power tool while you are tired or 
under the influence of drugs, alcohol or medication.  
A moment of inattention while operating power 
tools may result in serious personal injury.

13.  Industrial applications must follow OSHA guidelines.
14.  Maintain labels and nameplates on the tool.  

These carry important safety information.  
If unreadable or missing, contact 
Harbor Freight Tools for a replacement.

15.  Avoid unintentional starting.   

Prepare to begin work before turning on the tool.

16.  People with pacemakers should consult their 

physician(s) before use.  Electromagnetic fields in 
close proximity to heart pacemaker could cause 
pacemaker interference or pacemaker failure.

17.  WARNING: The cord of this product contains 

lead and/or di (2-ethylhexyl) phthalate (DEHP), 
chemicals known to the State of California 
to cause cancer, and birth defects or other 
reproductive harm. Wash hands after handling.  
(California Health & Safety Code § 25249.5, 

et seq.

)

18.  WARNING: Some dust created by power sanding, 

sawing, grinding, drilling, and other construction 
activities, contains chemicals known to the State 
of California to cause cancer and birth defects or 
other reproductive harm.  Some examples of these 
chemicals are: 
•  Lead from lead-based paints 
•  Crystalline silica from bricks and cement or other 
masonry products 
•  Arsenic and chromium from chemically treated 
lumber 
Your risk from these exposures varies, depending 
on how often you do this type of work.  To reduce 
your exposure to these chemicals: work in a well 
ventilated area, and work with approved safety 
equipment, such as those dust masks that are 
specially designed to filter out microscopic particles.  
(California Health & Safety Code § 25249.5, 

et seq.

)

19.  WARNING: This product contains di (2-ethylhexyl) 

phthalate (DEHP), a chemical known to the State 
of California to cause cancer and birth defects 
or other reproductive harm.  (California Health 
& Safety Code § 25249.5, 

et seq.

)

20.  The warnings, precautions, and instructions 

discussed in this instruction manual cannot cover all 
possible conditions and situations that may occur.   
It must be understood by the operator that 
common sense and caution are factors 
which cannot be built into this product, 
but must be supplied by the operator.

Vibration Safety

This tool vibrates during use.  Repeated or 
long-term exposure to vibration may cause 
temporary or permanent physical injury, 
particularly to the hands, arms and shoulders.  
To reduce the risk of vibration-related injury:
1.  Anyone using vibrating tools regularly or for an 

extended period should first be examined by a 
doctor and then have regular medical check-ups 
to ensure medical problems are not being caused 
or worsened from use.  Pregnant women or 
people who have impaired blood circulation to 
the hand, past hand injuries, nervous system 
disorders, diabetes, or Raynaud’s Disease should 
not use this tool.  If you feel any medical or 
physical symptoms related to vibration (such as 
tingling, numbness, and white or blue fingers), 
seek medical advice as soon as possible.

2.  Do not smoke during use.  Nicotine reduces 

the blood supply to the hands and fingers, 
increasing the risk of vibration-related injury.

3.  Use tools with the lowest vibration when there 

is a choice between different processes.

4.  Include vibration-free periods each day of work.
5.  Grip workpiece as lightly as possible (while still 

keeping safe control of it).  Let the tool do the work.

6.  To reduce vibration, maintain the tool as 

explained in this manual.  If any abnormal 
vibration occurs, stop use immediately.

 SAVE THESE INSTRUcTIONS.

Specifications

Electrical Rating

120VAC / 60Hz / 15A

Motor No Load Speed

n0: 17500/min

Maximum Cutting Depth

3/32"

V-Belt

135J

3092372

Summary of Contents for 1621e-b

Page 1: ...nce When unpacking make sure that the product is intact and undamaged If any parts are missing or broken please call 1 888 866 5797 as soon as possible Copyright 2016 by Harbor Freight Tools All rights reserved No portion of this manual or any artwork contained herein may be reproduced in any shape or form without the express written consent of Harbor Freight Tools Diagrams within this manual may ...

Page 2: ...INFORMATION General Tool Safety Warnings Read all safety warnings and instructions Failure to follow the warnings and instructions may result in electric shock fire and or serious injury Save all warnings and instructions for future reference 1 KEEP GUARDS IN PLACE and in working order 2 REMOVE ADJUSTING KEYS AND WRENCHES Form habit of checking to see that keys and adjusting wrenches are removed f...

Page 3: ...hen practical It s safer than using your hand and it frees both hands to operate tool 13 DON T OVERREACH Keep proper footing and balance at all times 14 MAINTAIN TOOLS WITH CARE Keep tools sharp and clean for best and safest performance Follow instructions for lubricating and changing accessories 15 DISCONNECT TOOLS before servicing when changing accessories such as blades bits cutters and the lik...

Page 4: ...5 VAc and up to 15 A 7 This tool is intended for use on a circuit that has an outlet that looks like the one illustrated above in 125 VAc 3 prong plug and Outlet The tool has a grounding plug that looks like the plug illustrated above in 125 VAc 3 prong plug and Outlet 8 The outlet must be properly installed and grounded in accordance with all codes and ordinances 9 Do not use an adapter to connec...

Page 5: ...pic particles California Health Safety Code 25249 5 et seq 19 WARNING This product contains di 2 ethylhexyl phthalate DEHP a chemical known to the State of California to cause cancer and birth defects or other reproductive harm California Health Safety Code 25249 5 et seq 20 The warnings precautions and instructions discussed in this instruction manual cannot cover all possible conditions and situ...

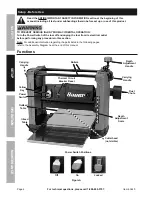
Page 6: ...ATION Turn the power Switch of the tool off and unplug the tool from its electrical outlet before performing any procedure in this section Note For additional information regarding the parts listed in the following pages refer to the Assembly Diagram near the end of this manual Functions power Switch Infeed Table Outfeed Table Depth Adjustment Handle Thermal circuit Breaker Reset Dust chute Depth ...

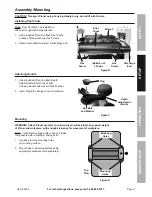
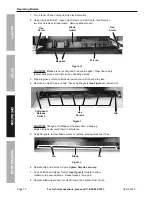
Page 7: ...rs not shown Figure B Attaching Handle 1 Using included Wrench attach Depth Adjustment Handle to top of right Carrying Handle with Hex Bolt and Washer 2 Insert Plug into opening to cover hardware Hex Bolt and Washer Depth Adjustment Handle plug Figure c Mounting WARNING Attach planer securely to solid and level surface that can support weight of planer and workpiece with enough clearance for movem...

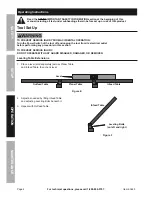
Page 8: ...TION Turn the power Switch of the tool off and unplug the tool from its electrical outlet before performing any procedure in this section TO pREVENT SERIOUS INJURy DO NOT OpERATE WITH ANy GUARD DISABLED DAMAGED OR REMOVED Leveling Table Extensions 1 Place a level sold separately across Planer Table and Infeed Table then check level Level Infeed Table Outfeed Table planer Table Figure E 2 Adjust as...

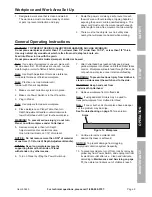
Page 9: ...to measure workpiece 4 Place workpiece on Planer Table then turn Depth Adjustment Handle counterclockwise to lower Cutterhead until it just touches workpiece WARNING To prevent serious injury do not turn planer on with workpiece under cutterhead 5 Remove workpiece then turn Depth Adjustment Handle counterclockwise One full turn will remove 1 16 of material NOTIcE Do not remove more than 3 32 of ma...

Page 10: ...s when handling a blade 3 Wearing gloves rotate Cutterhead toward you until it locks into place 4 Remove six Hex Screws on Gib then using Magnets see Figure H remove Gib Hex Screws cutterhead Release Switch Gib Figure I cAUTION Change both Blades at the same time Changing Blades individually could result in imbalance 5 Using Magnets remove Blade rotate or replace placing holes over Tabs Tab Tab Bl...

Page 11: ...and Lubrication 1 BEFORE EAcH USE inspect the general condition of the tool Check for loose hardware misalignment or binding of moving parts cracked or broken parts damaged electrical wiring and any other condition that may affect its safe operation 2 pERIODIcALLy wear ANSI approved safety goggles and NIOSH approved breathing protection and blow dust out of the motor vents using dry compressed air...

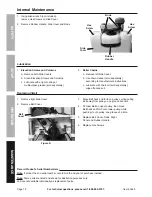
Page 12: ...ion 1 Elevation Screws and columns a Remove both Side Covers b Clean Elevation Screws and Columns c Lubricate with a light coating of multipurpose grease sold separately 2 Roller chains a Remove left Side Cover b Use chain cleaner sold separately according to manufacturers instructions c Lubricate with chain oil sold separately wipe off excess oil Replacing V Belt 1 Remove right Side Cover 2 Remov...

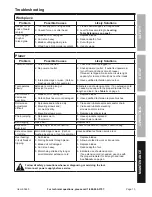
Page 13: ... proper diameter for its length and load See Table A on page 3 Performance decreases over time 1 Blades dull or damaged 2 Carbon brushes worn or damaged 1 Replace blades 2 Have qualified technician replace brushes Roller case adjustment difficult 1 Sprockets and or chain dirty 2 Elevating screws and or columns dirty 3 Elevating screws worn 1 Clean and lubricate sprockets and or chain 2 Clean and l...

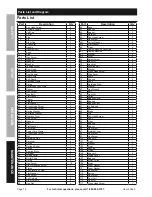
Page 14: ...2 51 Hex Screw 12 52 Right Elevating Screw 1 53 Platen 1 54 Left Elevating Screw 1 55 Flat Washer 1 56 Hex Screw 1 57 Left Column 2 58 Right Column 2 59 Hex Nut 4 part Description Qty 60 Base 1 61 Bearing 2 62 Spacer 2 63 Retainer 2 64 Pan Head Screw 2 65 Hex Screw 2 65 1 Spring Washer 2 65 2 Flat Washer 2 66 Gear 4 67 Table Extension Assembly 2 67 1 Table Extension 2 67 2 Bracket 4 67 3 Rivet 12 ...

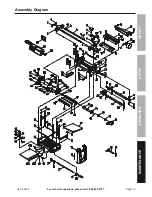
Page 15: ...Page 15 For technical questions please call 1 888 866 5797 Item 63445 SAFETy OpERATION MAINTENANcE SETUp Assembly Diagram ...

Page 16: ... alterations outside our facilities criminal activity improper installation normal wear and tear or to lack of maintenance We shall in no event be liable for death injuries to persons or property or for incidental contingent special or consequential damages arising from the use of our product Some states do not allow the exclusion or limitation of incidental or consequential damages so the above l...

Reviews: