background image

Page 11

For technical questions, please call 1-888-866-5797.

Item 64121 
        

S

AFET

y

Op

ERA

TION

M

AINTENAN

c

E

S

ETU

p

Workpiece and Work Area Set Up

1.  Designate a work area that is clean and well lit.  

The work area must not allow access by children 
or pets to prevent distraction and injury.

2.  Route the power cord along a safe route to reach 

the work area without creating a tripping hazard or 
exposing the power cord to possible damage.  The 
power cord must reach the work area with enough 
extra length to allow free movement while working.  

3.  Secure loose workpieces using a vise or clamps 

(not included) to prevent movement while working.

4.  There must not be objects, such as utility lines, 

nearby that will present a hazard while working.

General Operating Instructions

WARNING!


TO pREVENT SERIOUS INJURy: 

Wear ANSI approved safety glasses with side shields during use.  Do not wear gloves. 
Hold Drill securely using both hands to control drill reaction to bit binding.  Brace drill if practical. 
Keep all body parts clear of any fixed objects which could be crushed during drill reaction to bit binding. 
Use a scaffold when drilling overhead, do not use a ladder.  


Only use sharp bits, use the proper bit for the job.  Set Speed Switch to proper setting


for bit being used. 

Avoid drilling into knotty, warped, pitchy or wet workpieces or 
workpieces that may have nails or other hidden objects in them.  

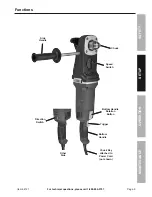
1.  Make sure that the Trigger is in the 

off-position, then plug in the tool.

2.  Secure Drill:

a.  Hold securely using both hands.  Use one 

hand to hold Bottom Handle and the other 
hand to hold the Top or Side Handle, or

b.  if practical, brace Drill against a solid fixed 

object in addition to holding securely.  

3.  Touch Drill bit lightly against the 

workpiece and squeeze the Trigger. 

4.  While the Drill is running, apply light pressure to 

the Drill.  Allow the tool to work at its own pace. 

5.  After the Drill bit cuts through the workpiece, 

remove it while the Drill is still running.  This 
prevents the Drill bit from binding.  

cAUTION!

  If the Drill bit binds in the workpiece, 

the Chuck will stop rotating and:

•  if the drill is set to High speed, 

the Drill 

will suddenly twist in the opposite 
direction of bit rotation with force 
capable of causing serious injury.

•  if the Drill is set to Low speed, a mechanical 

clutch will disengage the bit from the gears 
and a clicking sound will be heard.  

6. 

IF THE BIT STARTS TO BIND, RELEASE 
TRIGGER


IMMEDIATELy! 

7.  Allow Drill to come to a full stop, then unplug Drill.  

8.  Set Drill to Reverse direction and Low speed, plug 

Drill back in, and reverse bit out of workpiece.  

9.  To prevent accidents, turn off the tool and 

unplug it after use.  Clean, then store the 
tool indoors out of children’s reach.  

Summary of Contents for 1695E-B

Page 1: ...rence 17j When unpacking make sure that the product is intact and undamaged If any parts are missing or broken please call 1 888 866 5797 as soon as possible Copyright 2017 by Harbor Freight Tools All rights reserved No portion of this manual or any artwork contained herein may be reproduced in any shape or form without the express written consent of Harbor Freight Tools Diagrams within this manua...

Page 2: ...on which if not avoided could result in minor or moderate injury Addresses practices not related to personal injury IMpORTANT SAFETy INFORMATION General power Tool Safety Warnings Read all safety warnings and all instructions Failure to follow the warnings and instructions may result in electric shock fire and or serious injury Save all warnings and instructions for future reference The term power...

Page 3: ...f position before connecting to power source picking up or carrying the tool Carrying power tools with your finger on the Trigger or energizing power tools that have the Trigger on invites accidents 4 Remove any adjusting key or wrench before turning the power tool on A wrench or a key left attached to a rotating part of the power tool may result in personal injury 5 Do not overreach Keep proper f...

Page 4: ...arts can grab the surface and pull the tool out of your control 8 When using a handheld power tool maintain a firm grip on the tool with both hands to resist starting torque 9 Do not leave the tool unattended when it is plugged into an electrical outlet Turn off the tool and unplug it from its electrical outlet before leaving 10 This product is not a toy Keep it out of reach of children 11 Do not ...

Page 5: ...the user 4 Use tools with the lowest vibration when there is a choice 5 Include vibration free periods each day of work 6 Grip tool as lightly as possible while still keeping safe control of it Let the tool do the work 7 To reduce vibration maintain the tool as explained in this manual If any abnormal vibration occurs stop use immediately SAVE THESE INSTRUcTIONS ...

Page 6: ... to carry electricity away from the user reducing the risk of electric shock See 3 prong plug and Outlet 2 The grounding prong in the plug is connected through the green wire inside the cord to the grounding system in the tool The green wire in the cord must be the only wire connected to the tool s grounding system and must never be attached to an electrically live terminal See 3 prong plug and Ou...

Page 7: ...rked with the suffix W A W in Canada to indicate it is acceptable for outdoor use 7 Make sure the extension cord is properly wired and in good electrical condition Always replace a damaged extension cord or have it repaired by a qualified electrician before using it 8 Protect the extension cords from sharp objects excessive heat and damp or wet areas TABLE A REcOMMENDED MINIMUM WIRE GAUGE FOR EXTE...

Page 8: ...city 6 4 Setup Before Use Read the ENTIRE IMpORTANT SAFETy INFORMATION section at the beginning of this manual including all text under subheadings therein before set up or use of this product TO pREVENT SERIOUS INJURy FROM AccIDENTAL OpERATION Release the Trigger and unplug the tool from its electrical outlet before assembling or making any adjustments to the tool Note For additional information ...

Page 9: ...ease call 1 888 866 5797 Item 64121 SAFETy OpERATION MAINTENANcE SETUp Functions Side Handle Bottom Handle chuck Key attached to power cord not shown Other Side Trigger Bottom Handle Rotation Button Speed Switch chuck Direction Switch ...

Page 10: ...ckwise until Chuck s jaws are open enough for the bit to fit between jaws 2 Use a bit designed for the workpiece type Place bit into the drill inside the Chuck s Jaws 3 Turn the Key clockwise until the bit is held securely in place centered between the Chuck s Jaws NOTIcE Use sharp bits Dull bent or damaged bits may cause binding and put stress on the drill and or bit Setting Speed NOTIcE Make sur...

Page 11: ...eing used Avoid drilling into knotty warped pitchy or wet workpieces or workpieces that may have nails or other hidden objects in them 1 Make sure that the Trigger is in the off position then plug in the tool 2 Secure Drill a Hold securely using both hands Use one hand to hold Bottom Handle and the other hand to hold the Top or Side Handle or b if practical brace Drill against a solid fixed object...

Page 12: ... section TO pREVENT SERIOUS INJURy FROM TOOL FAILURE Do not use damaged equipment If abnormal noise or vibration occurs have the problem corrected before further use cleaning Maintenance and Lubrication 1 BEFORE EAcH USE inspect the general condition of the tool Check for loose hardware misalignment or binding of moving parts damaged cord electrical wiring cracked or broken parts and any other con...

Page 13: ...s needed use one with the proper diameter for its length and load See Extension Cords in Grounding section on page 6 Performance decreases over time 1 Carbon brushes worn or damaged 1 Bit dull or damaged 1 Have qualified technician replace brushes 2 Keep bits sharp Replace as needed Excessive noise or rattling Internal damage or wear Carbon brushes or bearings for example Have technician service t...

Page 14: ... 1 16 M5 x 28 Pan Screw 2 17 Gearcase 1 18 Retaining Ring 1 19 Shifting Disk Assembly 1 20 Torsion Spring 1 21 O Ring 1 22 Steel Ball 2 23 Detent Spring 2 24 Shift Knob 1 25 Retaining fork 1 26 Needle bearing 3 27 Plane bearing 2 28 High Speed Gear 1 29 Low Speed Gear 1 30 Cylindrical Pin 3 31 Large Gear 1 32 O Ring 1 33 Cylindrical Pin 2 34 Middle Cover 1 35 E Ring 1 36 Retaining Ring 1 37 Clutch...

Page 15: ...61 62 6 7 6 7 63 64 68 68 65 65 66 70 70 70 71 72 73 74 66 65 67 69 75 76 77 78 79 80 81 82 83 69 57 37 35 26 36 38 39 39 40 41 42 44 44 45 46 30 47 48 49 50 51 43 20 19 18 26 26 27 27 31 21 84 Record product s Serial Number Here Note If product has no serial number record month and year of purchase instead Note Some parts are listed and shown for illustration purposes only and are not available i...

Page 16: ...w the exclusion or limitation of incidental or consequential damages so the above limitation of exclusion may not apply to you THIS WARRANTY IS EXPRESSLY IN LIEU OF ALL OTHER WARRANTIES EXPRESS OR IMPLIED INCLUDING THE WARRANTIES OF MERCHANTABILITY AND FITNESS To take advantage of this warranty the product or part must be returned to us with transportation charges prepaid Proof of purchase date an...

Reviews: