background image

Page 7

For technical questions, please call 1-888-866-5797.

Item 58671 


SA

FETY

OPERA

TI

O

N

MAINTENANCE

SETUP

Operating Instructions

Read the ENTIRE IMPORTANT SAFETY INFORMATION section at the beginning of this manual 

including all text under subheadings therein before set up or use of this product.

Battery Charging

Charge Battery after unpacking and before 

using this tool. Follow instructions included 

with battery charger (sold separately).

General Operation

1.  Before operating the gardening appliance, 

put on ANSI-approved safety goggles and 

other safety gear (sold separately).

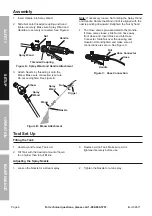
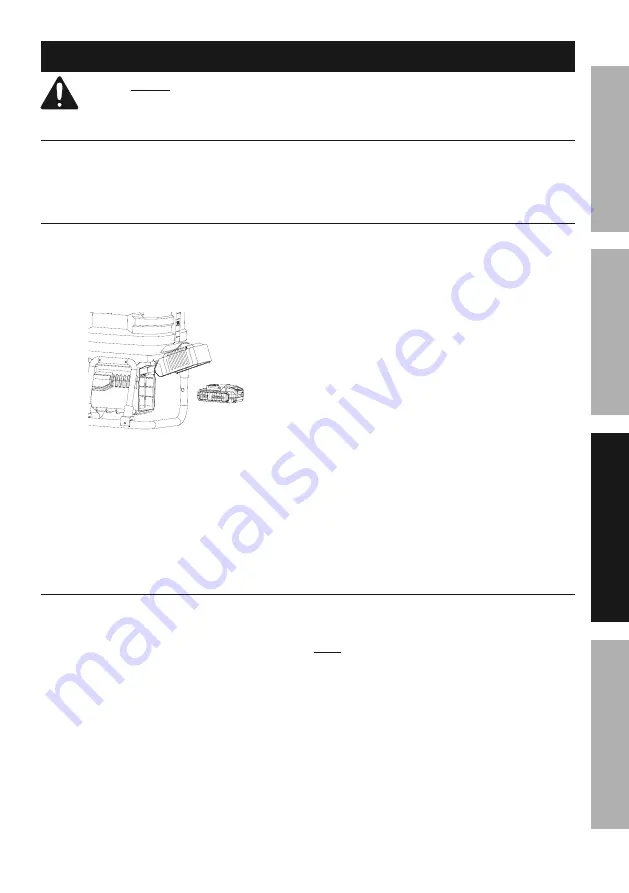
2.  To attach Battery Pack, raise the Battery Cover 

on the side of the Backpack. See Figure D.

Figure D:  Battery Pack Attachment

3.  Align the raised rib on the Battery Pack 

with the groove in the Battery Port and 

place the Battery Pack in the tool.

4.  Make sure the latches on the Battery Pack 

snap in place. Make sure the Battery Pack is 

secured in the tool before beginning operation.

5.  Lower the battery cover.

6.  To remove Battery Pack, press button on 

front of the Battery Pack to release the 

Battery and remove it from the tool.

7.  To turn the Sprayer on, turn Power 

Switch to the On Position. 

8.  To start the spray of liquid, squeeze the Trigger. 

Release the Trigger to stop the flow of liquid.

9.  To turn the Sprayer off, turn Power 

Switch to the Off Position.

10. When finished spraying:

a.  Point Wand in safe direction and depressurize 

the Tank by pressing down on the Trigger.

b.  Dispose of liquid according to 

manufacturer guidelines.

c.  Clean the Sprayer according to 

Maintenance Instructions.

d.  Store Sprayer in a safe, dry, clean location 

out of reach of children and out of sunlight.

11.  To prevent accidents, turn off the appliance 

and remove its Battery Pack after use.

Trigger Lock

1.  The lock-on feature is convenient when 

spraying for an extended period of time 

or when covering a large area.

2.  To engage the Trigger Lock, depress the 

Trigger and slide Trigger Lock forward.

3.  To release the Trigger Lock, depress the 

Trigger and slide Trigger Lock backward.

Note:

 Make sure the trigger lock is not engaged 

before inserting the battery pack into the sprayer.

Summary of Contents for 21505C-B

Page 1: ...al and the receipt in a safe and dry place for future reference 21h When unpacking make sure that the product is intact and undamaged If any parts are missing or broken please call 1 888 866 5797 as soon as possible Copyright 2021 by Harbor Freight Tools All rights reserved No portion of this manual or any artwork contained herein may be reproduced in any shape or form without the express written ...

Page 2: ...ted to personal injury IMPORTANT SAFETY INSTRUCTIONS When using electric gardening appliances basic safety precautions should always be followed to reduce the risk of fire electric shock and personal injury including the following READ ALL INSTRUCTIONS Battery Precautions 1 Do not charge appliance in rain or in wet locations 2 Do not use battery operated appliance in rain 3 Remove or disconnect ba...

Page 3: ...is off when plugging in 5 Do not Overreach Keep proper footing and balance at all times 6 Stay Alert Watch what you are doing Use common sense Do not operate appliance when you are tired Gardening Appliance Use and Care 1 Avoid Dangerous Environment Do not use appliances in damp or wet locations 2 Do not Use In Rain 3 Keep Children Away All visitors should be kept at a distance from work area 4 Wh...

Page 4: ...free periods each day of work 6 Grip appliance as lightly as possible while still keeping safe control of it Let the appliance do the work 7 To reduce vibration maintain the appliance as explained in this manual If any abnormal vibration occurs stop use immediately General Safety 1 Use only for water or water based fertilizers herbicides pesticides and sealers Do not use to spray combustible or co...

Page 5: ...ETY INSTRUCTIONS section at the beginning of this manual including all text under subheadings therein before set up or use of this product TO PREVENT SERIOUS INJURY FROM ACCIDENTAL OPERATION Make sure that the Power Switch Trigger is in the off position and unplug the tool from its electrical outlet before performing any procedure in this section Note For additional information regarding the parts...

Page 6: ...ssary loosen Nut holding the Spray Wand and Handle Rotate the Wand until it is aligned with the nozzle pointing downward Retighten the Nut by hand 4 The Hose comes pre assembled to the Handle If Hose comes loose slide Nut on hose away from Hose end Insert Hose end into Hose Connector Slide Nut over the opening and Hose End Hand tighten and make sure all connections are secure See Figure C Handle N...

Page 7: ...wer the battery cover 6 To remove Battery Pack press button on front of the Battery Pack to release the Battery and remove it from the tool 7 To turn the Sprayer on turn Power Switch to the On Position 8 To start the spray of liquid squeeze the Trigger Release the Trigger to stop the flow of liquid 9 To turn the Sprayer off turn Power Switch to the Off Position 10 When finished spraying a Point Wa...

Page 8: ...ken parts and any other condition that may affect its safe operation 2 AFTER USE clean external surfaces of the appliance with clean moist cloth 3 AFTER EVERY USE clean the Sprayer a Reinstall Battery Pack and Flush with water until Tank is empty b Clean Nozzle and Tank Strainer c Allow to air dry with the Tank open d After dry replace Strainer and Tank Lid Note Do not use flammable cleaners or ab...

Page 9: ...TS OF THE PRODUCT IN FACT THE MANUFACTURER AND OR DISTRIBUTOR EXPRESSLY STATES THAT ALL REPAIRS AND PARTS REPLACEMENTS SHOULD BE UNDERTAKEN BY CERTIFIED AND LICENSED TECHNICIANS AND NOT BY THE BUYER THE BUYER ASSUMES ALL RISK AND LIABILITY ARISING OUT OF HIS OR HER REPAIRS TO THE ORIGINAL PRODUCT OR REPLACEMENT PARTS THERETO OR ARISING OUT OF HIS OR HER INSTALLATION OF REPLACEMENT PARTS THERETO Re...

Page 10: ...r 6 5 4 Spray Wand Holder 2 5 5 Screw 4 5 6 Lower Bracket 1 6 Water Pump Assembly 1 6 1 Water Pump 1 6 2 Hose Clamp 1 Part Description Qty 6 3 Motor Press Plate 2 6 4 Screw 4 6 5 Hose Clamp 2 2 6 6 Duct 110 mm 1 6 7 Spring 1 6 8 Pressure Cap 2 7 Battery Enclosure Assembly 1 7 1 Shaft 1 7 2 Battery Cover 1 7 3 Screw 2 7 4 Flag shaped Spring 2 7 5 Flag shaped Spring Sheath 1 7 6 Wire 170 mm 1 7 7 Ba...

Page 11: ...Page 11 For technical questions please call 1 888 866 5797 Item 58671 SAFETY OPERATION MAINTENANCE SETUP Assembly Diagram Continued ...

Page 12: ...damages so the above limitation of exclusion may not apply to you THIS WARRANTY IS EXPRESSLY IN LIEU OF ALL OTHER WARRANTIES EXPRESS OR IMPLIED INCLUDING THE WARRANTIES OF MERCHANTABILITY AND FITNESS To take advantage of this warranty the product or part must be returned to us with transportation charges prepaid Proof of purchase date and an explanation of the complaint must accompany the merchand...

Reviews: