


Page 11
For technical questions, please call 1-888-866-5797.
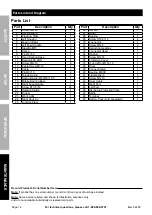
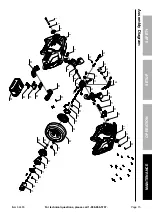
Item 64483
Sa
FE
ty
Op
E
ra
ti
O
n
Maint
E
nanc
E
S
E
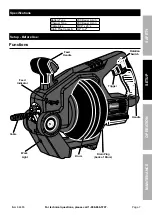
tup
cleaning the cable
1. Thoroughly flush Drain Cleaner Cable with
clean water after every use. Doing so will
help prevent the build-up of sediment and any
drain cleaning chemicals still in the cable.
2. Once Cable has been flushed, carefully
tip the Drain Cleaner forward to empty
out any remaining debris.
3. Rotate the Drum until the Drain Plug is visible.
4. Remove the Drain Plug and tilt the
Drain Cleaner backward to allow any
remaining fluid to drain out of the Drum.
5. Once the Cable is clean and dry,
pull the Cable from the Drum.
6. Lubricate with oily rag as you feed
Cable back into Drum.
WarninG! Do not pull a rotating cable.


