background image

3

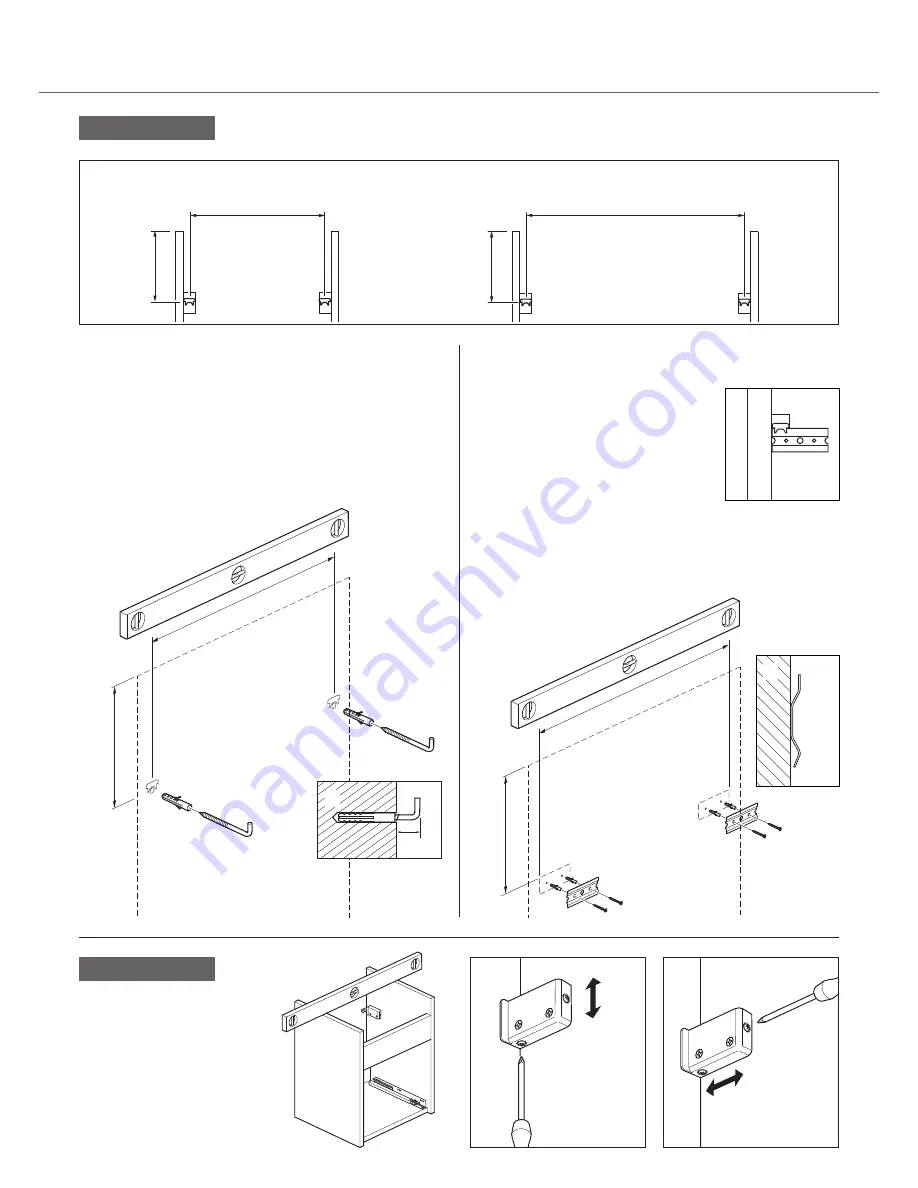
Option 1: ‘Hanging hooks’ 

Use the measurements above, to position the ‘hanging hooks’. 

a:

 Mark the fixing hole positions onto the wall. 

Drill Ø 8mm holes, insert the wall plugs and the ‘hanging hooks’. 

b: 

The ‘hanging hooks’ should protrude from the wall by 5-7mm.

Position the unit on the hanging hooks.

Important:

 If the basin unit and/or basin are not fitted level this 

may result on the basin not draining correctly.

Step 4

400 Single Drawer Basin Unit

310mm

175 

mm

175 

mm

510mm

600 Single Drawer Basin Unit

175 

mm

a

5-7mm

Option 2: ‘Wall brackets’ 

Use the measurement above, to position the ‘wall brackets’.

a: 

Important:

 The measurement given 

above is the maximum the brackets can 

be spaced apart, the brackets must fit 

within that measurement.

b:

 Mark the bracket fixing holes onto the 

wall. Drill Ø 8mm holes, insert the wall 

plugs and attach the brackets. 

c:

 Important:

 The brackets must be the  

correct way up, as shown.

Position the unit on the brackets.

Important:

 If the basin unit and/or basin are not fitted level this 

may result on the basin not draining correctly.

a

c

Top

b

b

175 

mm

Note:


The Basin Units can be hung using one of two options, ‘Hanging hooks’ or ‘Wall brackets’ depending 

on your requirements and wall structure. It is recommended to use the bracket option on non-solid walls.

Step 5

a:

 Check the unit is level.

If leveling is required: inside 

the unit, use a screwdriver to 

adjust the hanging position.

b:

 To lift or lower the unit 

adjust the screw shown.

c:

 To move the unit closer or 

further from the wall adjust the 

screw shown. 

b

c

a

Summary of Contents for ESSENCE 400

Page 1: ...ety guidelines It is recommended that 2 people carry out the installation of larger basin vanity units Warning Please check for any hidden pipes or electrical cables before drilling holes in the floor or walls When using power tools always follow the manufacturer s user instructions Always use the correct wall fixings for non solid walls not supplied Important pre installation notes The carcass on...

Page 2: ...gs supplied 2 Attached to the top of the basin unit using silicone 3 Both options 1 and 2 400 Basin Single Drawer Basin Unit 80mm 155 mm 155 mm 285mm 600 Basin Single Drawer Basin Unit Hanging Basin directly on wall Use the measurements above to position the basin on the wall a Mark the fixing hole positions onto the wall Drill Ø 12mm holes insert the wall plugs and screw in the fixing bolts b Pos...

Page 3: ...can be spaced apart the brackets must fit within that measurement b Mark the bracket fixing holes onto the wall Drill Ø 8mm holes insert the wall plugs and attach the brackets c Important The brackets must be the correct way up as shown Position the unit on the brackets Important If the basin unit and or basin are not fitted level this may result on the basin not draining correctly a c Top b b 175...

Page 4: ... manufacturing process Unlike machine finished products natural clay based products shrink and move during high temperature firing and because it is not possible to control this process absolutely minor variations in the dimensional tolerance form and surface of the finished products will occur Before installing a wooden bathroom into a new property extension or recently plastered room we strongly...

Reviews: