For any further information please contact
Bauhaus on:
0845 873 8840
Or visit our web-site at:
www.bauhaus-bathrooms.co.uk
The manufacturer reserves the right to make technical
modifications without prior notice.
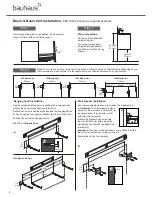
To move door up or down:
Loosen
screws shown and move door up or
down to suit. Re-tighten.
To move door in or out:
Loosen screw
shown and move door in or out to suit.
Re-tighten.
To move door left or right:
Loosen
screw shown and move door left or right
to suit. Re-tighten.
Step 3
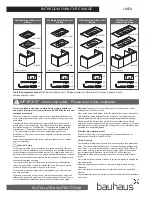
Check the unit is level. If levelling is
required: inside the unit, use a screwdriver
to adjust the hanging position.
a:
To lift or lower the unit, adjust the screw
shown.
b:
To move the unit closer or further from
the wall, adjust the screw shown.
c:
Once levelled, apply a bead of silicone
to the join between the unit and wall, on all
four sides.
Leave silicone, 24 hours to dry.
If the alignment of the door needs adjusting, follow the instructions below.
Important information
All ceramic sanitary ware is subject to the limitations of the
manufacturing process. Unlike machine finished products, natural
clay based products shrink and move during high temperature
firing and, because it is not possible to control this process
absolutely, minor variations in the dimensional tolerance, form
and surface of the finished products will occur.
Before installing a wooden bathroom into a new property,
extension or recently plastered room we strongly advise the
building/room is completely dry, well ventilated and adequately
heated.
Step 2
286mm
48
mm
Back of unit
a
a:
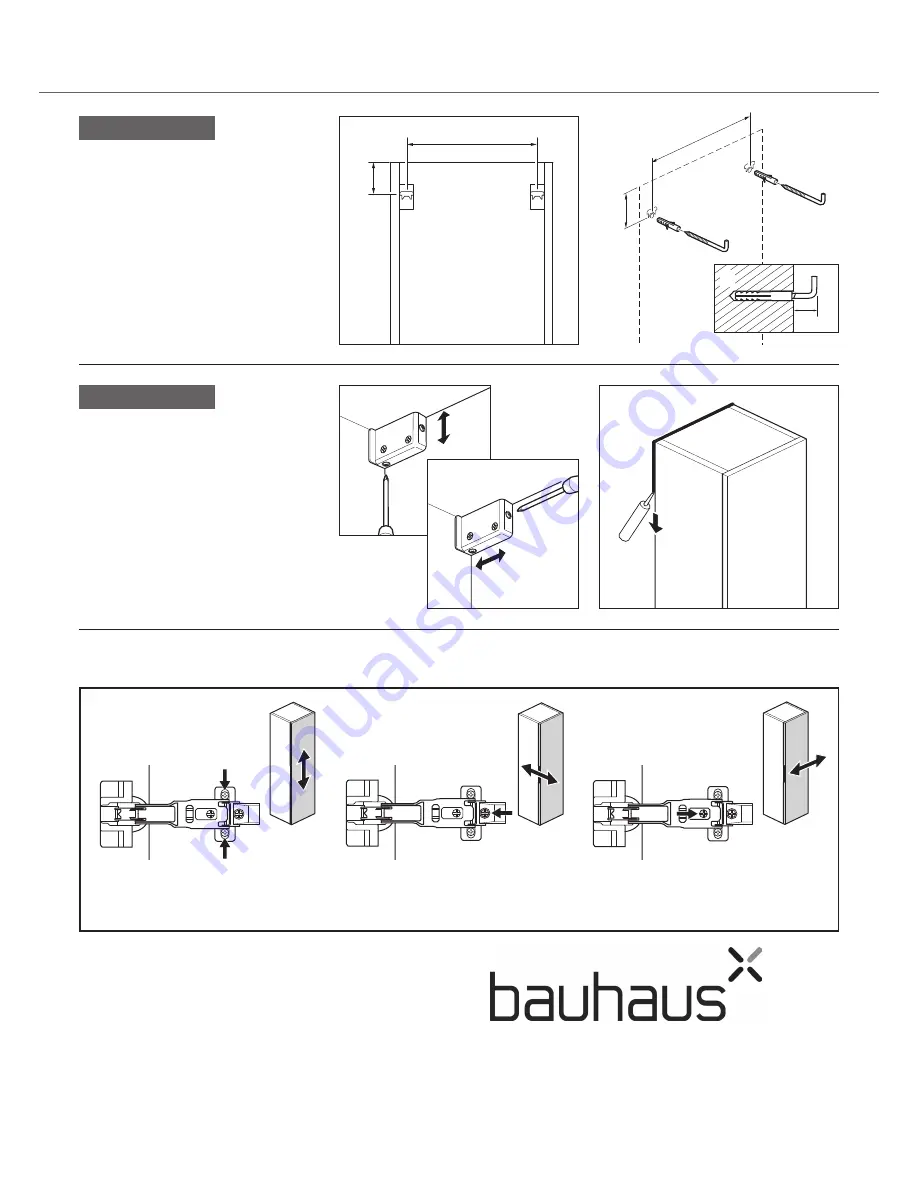
Use the measurements opposite, to
position the ‘hanging hooks’.
b:
Mark the fixing hole positions onto the
wall.
Drill Ø 8mm holes, insert the wall plugs
and the ‘hanging hooks’.
c:
The ‘hanging hooks’ should protrude
from the wall by 5-7mm.
Position the unit on the hanging hooks.
286mm
48
mm
b
5-7mm
c
c
Hinge adjustment
a
b


