13
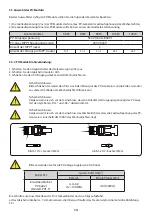
Vergewissern Sie sich, dass die Netzstromquelle getrennt ist, bevor Sie versuchen, sie mit dem
Gerät.
Um Fehlfunktionen zu vermeiden, dürfen Sie keine PV-Module mit möglichem Leckstrom an den
Wechselrichter anschließen. Beispielsweise verursachen geerdete PV-Module einen Leckstrom im
Wechselrichter. Wenn Sie PV-Module verwenden, stellen Sie bitte sicher, dass PV+ nicht geerdet
ist und PV- nicht geerdet ist.
Es wird empfohlen, eine PV-Anschlussdose mit Überspannungsschutz zu verwenden. Andernfalls
wird der Wechselrichter bei Blitzeinschlag in die PV-Module beschädigt.
- 08 -
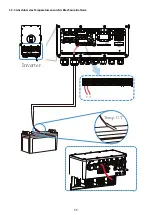
Please follow below steps to implement ba�ery connec�on:
1. Please choose a suitable ba�ery cable with correct connector which can well fit into the
ba�ery terminals. 2. Use a suitable screwdriver to unscrew the bolts and fit the ba�ery
connectors in, then fasten the bolt by the screwdriver, make sure the bolts are �ghtened
with torque of 24.5 N.M.
2. Nm in clockwise direc�on, make sure polarity at both the ba�ery and inverter is correctly
connected.
Connec�ng the ba�ery with a suitable cable is important for safe and efficient
opera�on of the system. To reduce the risk of injury, refer to Chart 3-2 for
recommended cables.
All wiring must be performed by a professional person.
3. In case of children touch or insects go into the inverter, Please make sure the inverter
connector is fasten to waterproof posi�on by twist it clockwise.
Before making the final DC connec�on or closing DC breaker/disconnect, be sure
posi�ve(+) must be connect to posi�ve(+) and nega�ve(-) must be connected to
nega�ve(-). Reverse polarity connec�on on ba�ery will damage the inverter.
Installa�on must be performed with care.
For 3.6KW/5KW model, ba�ery connector screw size: M6
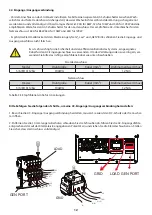
3. Führen Sie dann die AC-Ausgangsdrähte entsprechend der auf der Klemmleiste angegebenen Polarität ein und
ziehen Sie die Klemme fest. Achten Sie darauf, dass die entsprechenden N- und PE-Drähte ebenfalls an die entspre-
chenden Klemmen angeschlossen werden.
4. Stellen Sie sicher, dass die Drähte sicher angeschlossen sind.
5. Geräte wie z.B. Klimaanlagen benötigen mindestens 2-3 Minuten für den Neustart, da genügend Zeit benötigt
wird, um das Kältemittelgas im Kreislauf auszugleichen. Wenn ein Stromausfall auftritt und in kurzer Zeit wieder-
hergestellt wird, kann dies zu Schäden an den angeschlossenen Geräten führen. Um diese Art von Schäden zu ver-
meiden, prüfen Sie bitte vor der Installation, ob das Klimagerät mit einer Zeitverzögerungsfunktion ausgestattet
ist. Andernfalls löst der Wechselrichter einen Überlastungsfehler aus und schaltet die Leistung ab, um Ihr Gerät zu
schützen, aber manchmal führt dies trotzdem zu internen Schäden an der Klimaanlage.
3.5 PV-Anschluss
Bitte installieren Sie vor dem Anschluss an die PV-Module einen separaten DC-Trennschalter zwischen Wechsel-
richter und PV-Modulen. Für die Sicherheit des Systems und einen effizienten Betrieb ist es sehr wichtig, ein geeig-
netes Kabel für den Anschluss der PV-Module zu verwenden. Um das Verletzungsrisiko zu verringern, verwenden
Sie bitte die empfohlene Kabelgröße wie unten angegeben.
Model
Drahtgröße
Kabel (mm2)
5/6/8/10/12Kw
12AWG
4
Tabelle 3-4 Kabelgröße

