background image

10.

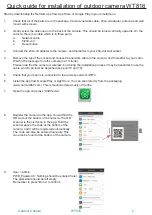
If you wish to use the camera wirelessly, the network cable

should be detached from both the router and the camera.

Thereafter, press “Add device”.

11.

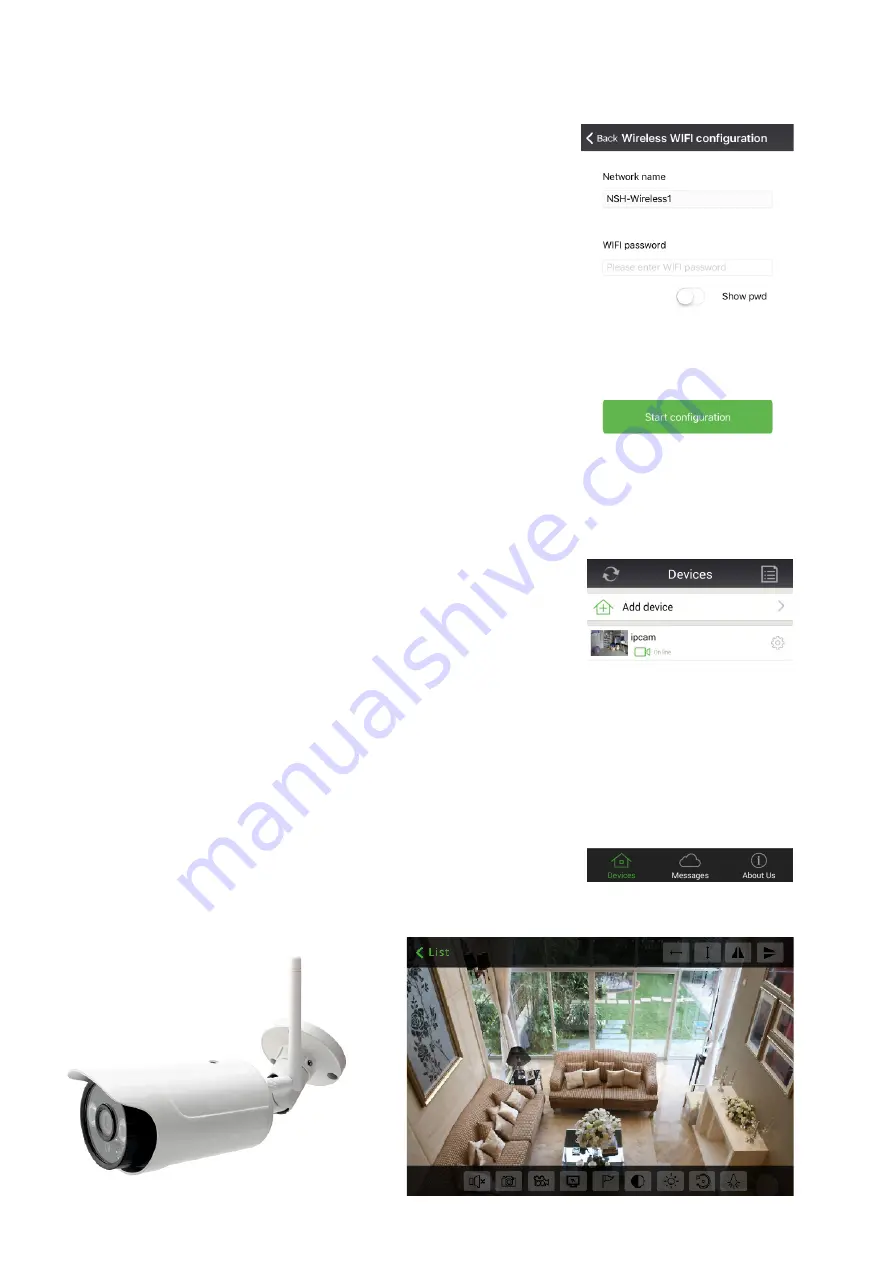
Use the icon at the bottom, called “Wireless WIFI configuration”.

Choose the “Camera” icon, press “Next”, check that your

network name is correct and add your WIFI password. Hold the

phone close to the camera and press “Start configuration” on

your phone. A tone will be heard, after which a voice will say

“Code success”. Press the camera icon when you are online

with our camera to see a live view on your smartphone. An

image of the area where your camera is placed will be shown.

Press this picture, and you will be able to see live pictures.

The bottom nine icons will give you further options for video,

snapshots, and more. If you wish to have an alarm, and to

have pictures sent to you, this can be enabled in the settings.

Use the “cogwheel” on the right of the camera on your app.

Choose “Alarm settings”. Here you can enable motion sensor,

which sends a picture to the app. You can find snapshots

under “Messages”.

12.

If the time is not correct, go to “Settings”, choose the

“Device time settings” icon and press “Mobile phone time

calibration”. This will automatically adjust the time correctly.

If you want the advanced user manual, it can be downloaded

from our website www.nshnordic.com. You will find it under

products, WT816.

Outdoor Camera

WT816

3

Summary of Contents for WT816

Page 1: ...WT816 QUICK GUIDE WIRELESS IP CAMERA OUTDOOR Language Page English 2 3 German 4 5 Danish 6 7 Swedish 8 9 Finnish 10 11 Table of contens...

Page 2: ...1 minute Please note that the camera is wireless but during the installation process it may be beneficial to use the cable which can later be detached see point 9 and 10 5 Check that your phone is co...

Page 3: ...camera is placed will be shown Press this picture and you will be able to see live pictures The bottom nine icons will give you further options for video snapshots and more If you wish to have an ala...

Page 4: ...e dass die Kamera zwar drahtlos ist es bei der Installation jedoch vorteilhaft sein kann das Kabel zu verwenden Siehe Punkte 9 und 10 5 Stellen Sie sicher dass Ihr Telefon mit dem drahtlosen Netzwerk...

Page 5: ...t Dr cken Sie auf dieses Bild und Sie sehen die Live Bilder Die 9 Symbole am unteren Rand der Anzeige geben Ihnen zus tzliche Optionen f r Video Snapshot usw M chten Sie Benachrichtigungen erhalten un...

Page 6: ...minut Bem rk dit kamera er tr dl st men ved installation kan det v re en fordel at benytte kablet som senere kan fjernes Se punkt 9 og 10 5 Kontroller at din telefon er tilsluttet det tr dl se netv r...

Page 7: ...meraet er placeret Tryk p dette billede og du har nu live billeder De 9 ikoner i bunden giver dig yderligere muligheder for video snapshot m m nsker du at f alarmer og tilsendt billeder kan du g re de...

Page 8: ...ked fr n kameran ca 1 minut Observera att din kamera r tr dl s men vid installationen kan det vara en f rdel att anv nda kabeln som senare kan tas bort se punkt 9 och 10 5 Kontrollera att din telefon...

Page 9: ...erad kommer visas Tryck p bilden s kan du se live bilder De nio nedersta ikonerna ger dig ytterligare m jligheter f r video snapshots m m Vill du f alarm och att bilderna skickas till dig kan du g ra...

Page 10: ...kamerasta merkki noin 1 minuutti Huomaa ett kamera on langaton mutta asennuksen aikana voi olla hy dyllist k ytt verkkokaapelia kytkettyn reitittimeen Kaapeli voidaan my hemmin irrottaa katso kohta 9...

Page 11: ...viin lis ikoneita joilla voi tallentaa videota ottaa yksitt isi kuvia ja paljon muuta Jos haluat h lytyksi kamerasta ja kuvia l hetettyn sovellukseesi t m n voi kytke p lle asetuksista Sovelluksessa o...

Reviews: