background image


18

o


When the connection is completed, no stray strands or cut wire 
should be present. The cord clamp must be secured over the 
outer sheath. 

 
Positioning 
 

o


It is advisable that your appliance is only installed in a location 
where the ambient temperature of the room, corresponds with 
the climate classification that is stated on the rating plate of your 
appliance. Your appliance may not function correctly if the 
ambient temperature falls outside of the following ranges. 


Climate classification  Appropriate ambient temperature 

SN 

+10°C to +32°C  

+16°C to +32°C  

ST 

+18°C to +38°C  

+18°C to +43°C  


o


Positioning the appliance requires two people in order to avoid 
injuries or damage to the appliance. 


o


Your appliance should not be located in direct sunlight or 
exposed to continuous heat or extremes of temperature (e.g. 
next to a radiator or boiler). If this is not feasible, then you 
should install an insulation plate between the appliance and the 
adjacent heat source. 


o


You should check whether there is an electrical socket available, 
which will be accessible after your appliance is installed. 


o


Place the appliance flatly and firmly on a solid base. The 
appliance is fitted with adjustable feet on the front side, which 
can be used to level the appliance. 


o


Anything positioned above the appliance must allow sufficient 
cooling of the condenser with an approximate gap of 3 cm. You 
must leave a 2 cm gap to the rear of the appliance and 2 cm 
either side of the appliance. 


o


If you are placing another cooling appliance next door to this 
product, then there must be a gap of at least 2 cm between the 
appliances. This will help to prevent condensation from forming. 


o


Be  sure  to  leave  enough  space  for the opening of the door, to 
avoid damage to the appliance or personal injury.  


Summary of Contents for BL550W

Page 1: ...BL550W Under counter larder fridge...

Page 2: ...ual contains important information including safety installation points which will enable you to get the most out of your appliance Please keep it in a safe place so that it is easily available for fu...

Page 3: ...10 Switching on the appliance and setting the thermostat 11 Arranging and storing food in the fridge section 12 13 Normal operating noises 13 Cleaning and maintenance 14 16 The defrost drain hole 15 R...

Page 4: ...le off directly behind the appliance to prevent misuse This should be undertaken by a competent person Disable the door lock to make sure that children cannot get stuck inside the appliance o The pack...

Page 5: ...ccept no liability for any damage that is caused o Altering the specification of the appliance must not be attempted for reasons of safety Before using your appliance o Check the appliance for any sig...

Page 6: ...efore cleaning the appliance or performing maintenance work ensure that the appliance has been disconnected from your mains supply o Never allow the back coils of the appliance to come into contact wi...

Page 7: ...t o Reversible door o Automatic defrost Dimensions of appliance Height 845 mm Width 553 mm Depth 574 mm Energy efficiency class Energy class A Please refer to the installation instructions for more sp...

Page 8: ...ription of the appliance 1 Top cover 2 Internal light thermostat dial 3 Safety glass shelves Salad crisper shelf 4 Salad crisper 5 Adjustable foot 6 Fixed foot 7 Bottle shelf 8 Door shelf x 2 9 Fridge...

Page 9: ...over o The crisper drawer is in the bottom of your refrigerator and there is a cover that goes over it o The cover helps to prevent fruit and vegetables from drying out prematurely 3 Upper door shelve...

Page 10: ...ed in lukewarm water The interior and accessories should be thoroughly dried after the cleaning process has been completed o There can be an odour when you first switch on the appliance It will lessen...

Page 11: ...on 6 will give you a lower temperature inside the fridge o Ideally the thermostat dial should be set to position 3 o The fridge can maintain a temperature of between 4 6 degrees centigrade o IMPORTANT...

Page 12: ...se completely Particular attention should be given to bottles that may protrude when placed on shelves inside the main section of the refrigerator o Some organic solutions such as the oils in lemon or...

Page 13: ...ort cracking noise o Can be heard when the thermostat turns the compressor on and off Compressor noise o There will be an operating noise when the compressor is running o After installation the compre...

Page 14: ...tment should be cleaned periodically using a solution of bicarbonate of soda and lukewarm water o Clean the accessories separately with soap and water Do not clean them in a dishwasher o Do not use ab...

Page 15: ...be left in position permanently Otherwise this may prevent the defrost water from entering the drain hole o You can also pour a small amount of water down the drain hole to clean the defrost drainage...

Page 16: ...nt light bulb with a new one The replacement bulb should not have a greater rating than 15 W o Replace the light cover and after waiting five minutes reconnect your plug to your mains supply Prolonged...

Page 17: ...connected by a qualified electrician who is a member of the N I C E I C and who will comply with the I E E and local regulations o Your refrigerator comes supplied with a 13 amp plug fitted If in futu...

Page 18: ...xtremes of temperature e g next to a radiator or boiler If this is not feasible then you should install an insulation plate between the appliance and the adjacent heat source o You should check whethe...

Page 19: ...the fridge to take some weight off the levelling foot This makes it easier to adjust the levelling foot Reversing the door IMPORTANT BEFORE COMMENCING THE DOOR REVERSAL PROCESS THE APPLIANCE MUST BE...

Page 20: ...block piece to the opposite side to their original positions also 5 Carefully remove the appliance door placing it gently on a cushioned surface so that it doesn t get damaged 6 Carefully tilt the ap...

Page 21: ...n you should either 1 Use a warm damp cloth and manipulate the seal until it does adhere to the cabinet properly all the way around the door OR 2 Use a hair dryer on its lowest heat setting and lightl...

Page 22: ...on the rating plate of your appliance My fridge appears to be performing poorly o Check that the appliance isn t overloaded and that food hasn t been packed too tightly into it o The thermostat settin...

Page 23: ...ct is under guarantee and finds that the problem is not the result of an appliance fault then you may be liable for the cost of the call out charge The appliance must be accessible for the engineer to...

Page 24: ...o BC003 Ceramic Hob Cleaner 250 ml o BC004 Oven Cleaner 250 ml o BC005 Stainless Steel Cleaner and Protector 250 ml o BC007 E Cloth General Purpose Cloth o BC008 Microwave Cover To order a Baumatic c...

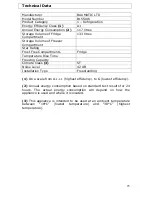
Page 25: ...rtments Fridge Temperature Rise Time Freezing Capacity Climate Class 3 ST Noise Level 42 dB Installation Type Freestanding 1 On a scale from A highest efficiency to G lowest efficiency 2 Annual energy...

Page 26: ...baumatic co uk Facebook www facebook com baumatic uk Republic of Ireland Service Telephone 1 890 812 724 Spares Telephone 091 756 771 Czech Republic Baumatic CR s r o L pov 665 460 01 Liberec 4 Czech...

Page 27: ...27...

Page 28: ...28...

Reviews: