background image


30 


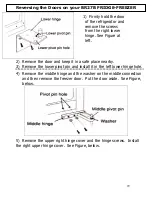
6)


Fix the left upper hinge to the left side and then the left upper hinge 

cover.  See above Figure. 


7)


Mount the refrigerator door to the left of the housing with the 

middle hinge connected.   See Figure, below. 


8)


Mount the refrigerator door with the bottom left hole going onto the 

lower pivot pin of the middle hinge. See Figure, above. 


Reversing the Doors on your BR27B FRIDGE-FREEZER 

Summary of Contents for BR27B

Page 1: ...BR27B Built in Combi Fridge Freezer...

Page 2: ...REEZER NOTE This User Instruction Manual contains important information including safety installation points which will enable you to get the most out of your appliance Please keep it in a safe place...

Page 3: ...YOUR FRIDGE FREEZER 7 11 ARRANGING FOOD IN YOUR FRIDGE FREEZER 12 14 NOTES ON USE 15 STORAGE GUIDE FOR YOUR FRIDGE FREEZER 16 18 CLEANING AND MAINTENANCE 19 21 TIPS FOR SAVING ENERGY 21 INSTALLING YOU...

Page 4: ...Free function Rated B for energy efficiency Dimensions mm H x W x D 1775 x 540 x 545 To fully enjoy using your appliance long into the future please firstly familiarise yourself with the specificatio...

Page 5: ...to come into contact with the elements Do not pull out or insert the plug with wet hands Before any cleaning or maintenance work ensure that the appliance has been disconnected from the power supply...

Page 6: ...5 Your BR27 Built in Combi Fridge Freezer...

Page 7: ...ttle SITUATING YOUR FRIDGE FREEZER CAUTION DO NOT PLACE THE APPLIANCE NEAR HEAT SOURCES FOLLOW THE INSTALLATION ADVICE SHOWN ON PAGE 22 FOR FULL INSTALLATION ADVICE PLEASE SEE PAGE 22 MAKE A NOTE OF T...

Page 8: ...lamp 4 illuminate K KE EY Y 1 1 T TE EM MP PE ER RA AT TU UR RE E S SE ET TT TI IN NG G Fridge Freezer Thermostat setting Turning the knob setting clockwise from a smaller dot to a larger dot will mak...

Page 9: ...l ld d t th he e p po ow we er r b be ec co om me e i in nt te er rr ru up pt te ed d i in n a an ny y w wa ay y u un np pl lu ug gg gi in ng g b bl lo ow wn n f fu us se e b bl la ac ck ko ou ut ts s...

Page 10: ...th he e f fr re ee ez ze er r T Th he e r re ed d w wa ar rn ni in ng g l la am mp p w wi il ll l b bl li in nk k i if f p pr ro ob bl le em ms s o oc cc cu ur r w wi it th h t th he e a ap pp pl li i...

Page 11: ...the coldest Different foods should be placed in different areas according to their properties 1 Eggs and Butter 2 Canned food and seasonings 3 Beverages and bottled food 4 Pickled food 5 Wheat based f...

Page 12: ...unit If the appliance is switched off then switched back on again after a short period the compressor will start up again after approximately half an hour This is part of the normal operation of the a...

Page 13: ...tely Be especially wary of protruding items such as bottles between shelves and the inside of the door NEVER place warm food inside your refrigerator or freezer Warm food must be allowed to cool at ro...

Page 14: ...emove quickly perishable articles of food from your fridge before you go and dispose of them Always be mindful of the storage life of foods you are going to be freezing for a long time Although the te...

Page 15: ...ry to leave gaps between your packages for better storage results Do not place food too closely to the interior walls items put too close to the walls may freeze to them If you place vegetables with t...

Page 16: ...process ALWAYS Cover and wrap foods especially if they are PUNGENT DO NOT place paper or plastic on the shelves which would block the flow of air through the grids NOTE At the maximum cold setting wi...

Page 17: ...ectricity will be off If the failure is not going to be for any longer than 12 hours leave the food in the freezer and keep the door closed If the POWER FAILURE is going to last longer than 12 hours a...

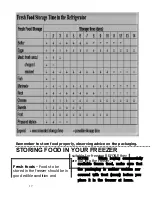
Page 18: ...ods Foods to be stored in the freezer should be in good edible condition and suitable for freezing BEFORE they are put into the freezer NOTE When buying commercially available frozen food make sure th...

Page 19: ...o be sufficiently cooled at least to room temperature before being inserted in the freezer compartment The amount of fresh foods that can be loaded into the freezer within 24 hours is indicated on the...

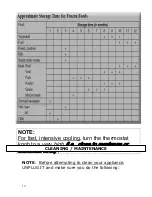
Page 20: ...cooling turn the thermostat knob to a very high i e close to maximum or maximum itself position for some 24 hours NOTE Before attempting to clean your appliance UNPLUG IT and make sure you do the foll...

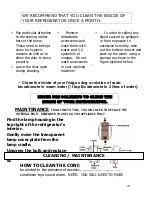
Page 21: ...up the water using a sponge as shown in the figure pictured below Y 9 Clean the inside of your Fridge using a solution of soda bicarbonate in warm water 1 tbsp Bicarbonate to 2 litres of water NEVER U...

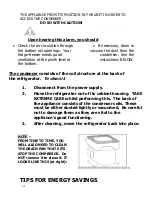
Page 22: ...ure at the back of the refrigerator To clean it 1 Disconnect from the power supply 2 Move the refrigerator out of its cabinet housing TAKE EXTREME CARE whilst performing this The back of the appliance...

Page 23: ...if essential and not for constant long term use 9 Before loading the appliance with packages of fresh foods ensure they are cooled to an ambient temperature except in the case of soup 9 If the door s...

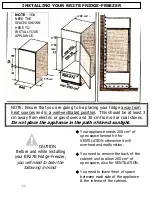
Page 24: ...ing your BR27B Fridge Freezer you will need to bear the following in mind Your appliance needs 200 cm of open space beneath it for VENTILATION otherwise it will overheat and malfunction You need to re...

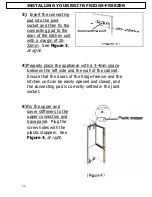
Page 25: ...t sockets to the freezer and fridge doors using the provided screws See Figure 1 at left 2 Move the appliance into the kitchen unit ensuring the left side of the panel of the refrigerator is as close...

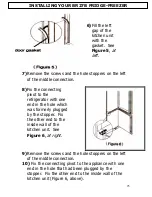
Page 26: ...4mm space between the left side and the wall of the cabinet Ensure that the doors of the fridge freezer and the kitchen unit can be easily opened and closed and the connecting pad is correctly settle...

Page 27: ...he hole which was formerly plugged by the stopper Fix the other end to the inside wall of the kitchen unit See Figure 6 at right 9 Remove the screws and the hole stoppers on the left of the middle con...

Page 28: ...are that the Fitting Bar is not attached to the appliance and needs to be secured during installation Install the Fitting Bar shown in the picture below so that it attaches to the top of the appliance...

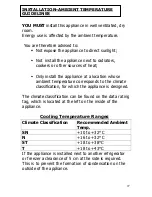
Page 29: ...climate classification for which the appliance is designed The climate classification can be found on the data rating tag which is located at the left on the inside of the appliance Cooling Temperatur...

Page 30: ...your floor surface NOTE The height MUST be adjusted before the appliance is built into the unit space designated for it DO NOT MOVE THE FRIDGE WHEN THE FEET ARE EXTENDED HIGH Reversing the swing of t...

Page 31: ...3 Remove the lower pivot pin and install it in the left lower hinge hole 4 Remove the middle hinge and the washer on the middle connection and then remove the freezer door Put the door aside See Figur...

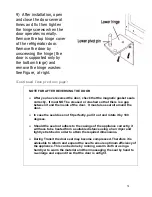
Page 32: ...ove Figure 7 Mount the refrigerator door to the left of the housing with the middle hinge connected See Figure below 8 Mount the refrigerator door with the bottom left hole going onto the lower pivot...

Page 33: ...there is a gap between it and the inside of the door It must also seal all around the door In case the seal does not fit perfectly pull it out and rotate it by 180 degrees Should the seal not adhere t...

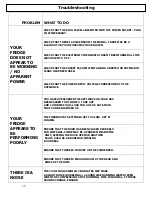
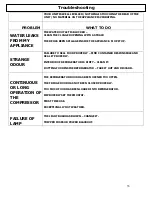
Page 34: ...ANCE OR FOOD HAS BEEN PACKED TOO TIGHTLY TAKE OUT AND CONSUME FOOD LOOK FOR OUT OF DATE FOOD THAT CAN BE DISPOSED OF THE THERMOSTAT SETTING IS SET TOO LOW SET IT HIGHER ENSURE THAT THE DOOR HAS BEEN C...

Page 35: ...OOD PROPERLY FIND CONTAINER RESPONSIBLE AND SEAL IT PROPERLY INTERIOR OF REFRIGERATOR IS DIRTY CLEAN IT ROTTING FOOD INSIDE REFRIGERATOR TAKE IT OUT AND DISCARD CONTINUOUS OR LONG OPERATION OF THE COM...

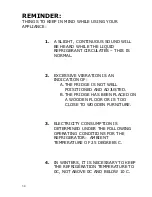
Page 36: ...INDICATION OF A THE FRIDGE IS NOT WELL POISITIONED AND ADJUSTED B THE FRIDGE HAS BEEN PLACED ON A WOODEN FLOOR OR IS TOO CLOSE TO WOODEN FURNITURE 3 ELECTRICITY CONSUMPTION IS DETERMINED UNDER THE FO...

Page 37: ...ll not be offered The guarantee for any replacement will only be for the remainder of the guarantee on the original product purchased This guarantee does not cover x Sinks and taps X Failure to comply...

Page 38: ...hire RG2 0QX United Kingdom Sales Telephone 44 118 933 6900 Sales Fax 44 118 931 0035 Service Telephone 44 118 933 6911 Service Fax 44 118 986 9124 Spares Telephone 44 118 933 6922 Technical Advice Te...

Page 39: ...37...
Reviews: