Instruction Manual
2
The user instructions apply to several models, for this reason
there may be some differences in the details given, according to
the type of the appliance.
1. Protecting of environment / advice for disposal
Packing
Serves to protect the appliance during transportation and
recyclable materials have been used for packaging. Corrugated
board/ cardboard (mainly from waste paper)
Shaped parts in PS( foamed CFE-free Polystyrene)
Foils and bags in PE (Polyethylene)
Strapping tapes in PP( Polypropylene)
Please hand over all packaging to the nearest official collection
point, so that all the different materials can be reused or recycled
as far as possible and any illegal depositing of such materials is
thus avoided.
2. Deciding where to locate your appliance
In order to avoid any damage or injury to persons or things, the
appliance should be unpacked by two people and placed in the
chosen location. Before positioning it, check that your new
appliance has no visible outer damager. On no account should
you start up your appliance if it is damaged. Check the appliance
carefully for:
Damage to the packaging which might indicate that
the appliance has been mishandled during
transportation.
Damage to the outer case.
Any visible damage to the cable / plug.
If in any doubt let the customer service department to check the
appliance. It must be at all costs be avoided,that any
environmentally damaging refrigerant leaks out by starting up
the appliance.
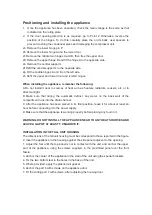
3. Installing your appliance
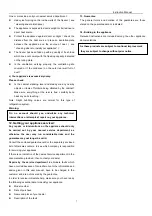
a) Unpack the appliance
b) In order to unnecessary waste raw materials, the handles
have not been mounted on to the separate part of the
appliance. Mount the door handles and at the same time
any other enclosed parts according to the relevant
instructions enclosed.
c) Remove any objects from inside the appliance
d) Carefully remove all film and adhesive tape from the case.
e) Remove any polystyrene pieces from around the
compressor(if it exists)
f) Remove all documents and accessories inside
g)
Clean the inside of the appliance with lukewarm water and
vinegar and dry it thoroughly with a soft cloth.
Make sure that the pipes for the circulation of the
refrigerant are not damaged in any way during installation.
The appliance must only be used for the purpose for which
it is intended.
The appliance must be placed on a firm, level surface. This
is the only way to ensure that the refrigerant can circulate
freely and thus ensure that your appliance will work
efficiently.
If possible, place your appliance in a cool, well aired dry
room.
Do not place your appliance in direct sunlight, nor in a room
at high temperature.
Do not place your appliance in the vicinity of any sources of
direct heat such as heating, ovens, cooking stove etc.
If installation near a direct heat source can not be avoided, we
recommend fitting a suitable distance from the heat source
From cooker: 3cm
From Oven: 30cm
Never obstruct the ventilation
Always pull out the plug, not pull the cable when cutting the
appliance off from the mains supply.
Warning: Leave the appliance standing in its final position
for at least 2 hours before switching it on, so that the
circulation of the refrigerant stabilizes and no operation
problem occur.
Before connecting up the appliance, make sure that it is
absolutely dry inside.
Any inexpert interference might well create a fire hazard.
Make sure nothing mechanically effects the circulation of
the refrigerant, nor in particular the accessible parts around
the compressor.
Warning: Depending on its composition , the refrigerant can
be easily inflammable, the refrigerant circuit has been
hermetically sealed and has been tested many times for
possible leaks.
Only professional expert should intervene on the
refrigerating system. Any refrigerant spilling out can injure
your eyes .In the event of eye contact with the refrigerant,
wash your eyes instantly with plenty of water and consult a
doctor immediately.
The appliance according to its climate category, is meant for use
at certain room temperatures lower than 38
℃
Summary of Contents for BRCIF5050
Page 1: ...BRCIF5050 Built in combi frost free fridge freezer ...
Page 12: ......
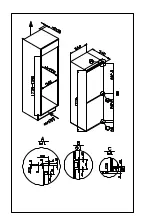
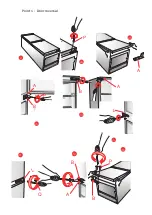
Page 14: ...12 2d P 2 2a 2b 2c 2d 2e A A B P B A L 1a Q 2f L 2g 2h A B B P Point 1 Door reversal ...
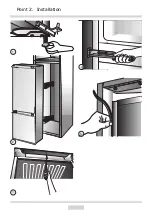
Page 15: ...3 4 5 2 1 Point 2 Installation ...
Page 16: ...6 ...
Page 20: ...40 ...


