background image

Daily Use

Daily Use

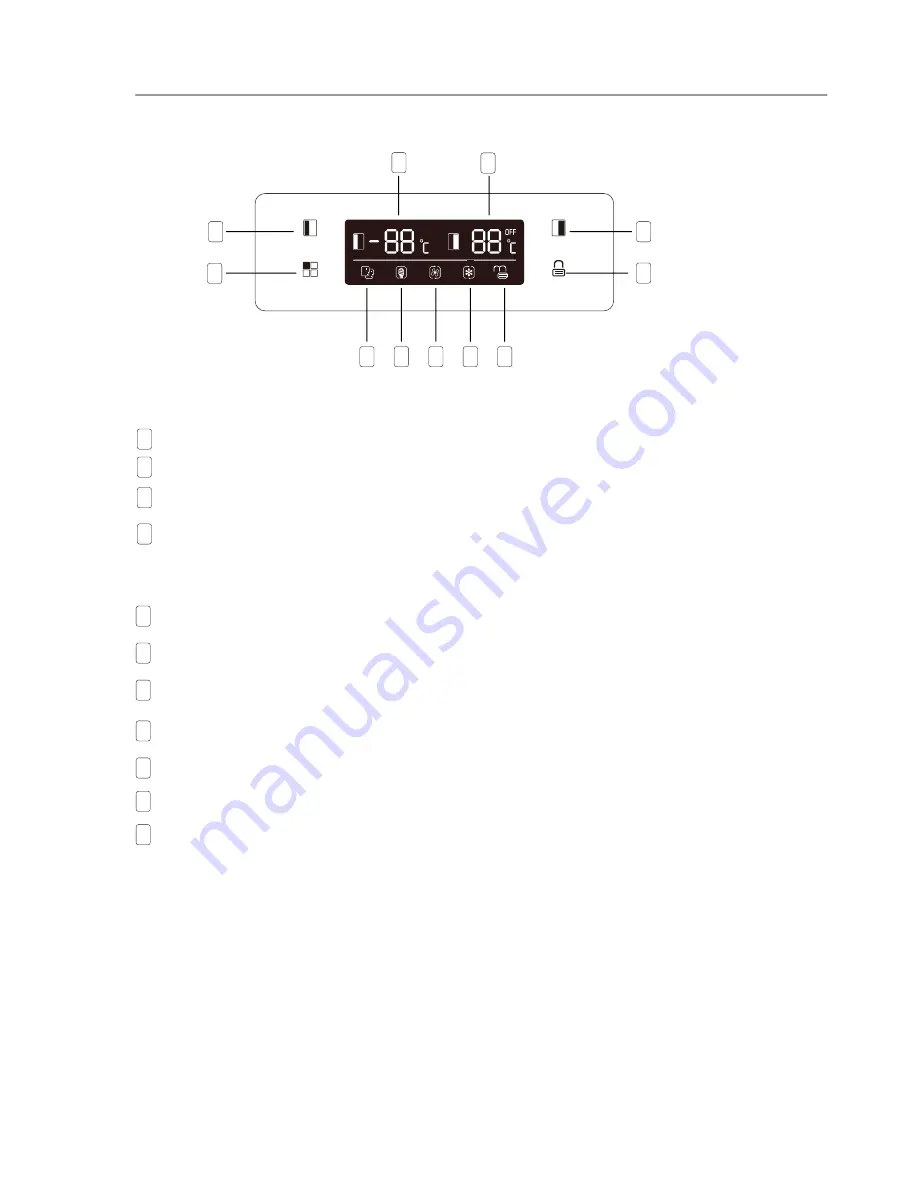
Using the Control Panel

FRZ. TEMP

REF. TEMP

MODE

REF. TEMP

3 SEC.

A

C

B

D

6

7

1

2

3

4

5

A

o

o

Press to adjust temperature of freezer compartment (left side) from -14 C to -22 C. 

Buttons

B

o

o

Press to adjust temperature of fridge compartment (right side) from 2 C to 8 C. 

C

Press to select running mode from 

SMART

ECO

SUPER COOLING

SUPER FREEZING

 and USER’S 

SETTING (no symbol in display). 

D

Press 

3 SEC. 

button and hold for 3 seconds to lock other three bottons. 

Press it and hold for 1 second to unlock other three bottons. 

Display

SMART

 mode, the refrigerator sets the temperature of two compartments automatically according to 

internal temperature and ambient temperature. 

1

ECO

 mode, the refrigerator runs in lowest energy consumption setting. 

2

SUPER COOLING

  cools the fridge compartment to the lowest temperature for approx. 2 hours. Then 

the temperature set before super mode is automatically restored.

3

SUPER


FREEZING

 cools the freezer compartment to the lowest temperature for approx. 6 hours. Then 

the temperature set before super mode is automatically restored.

4

LOCK

, the symbol will light on if buttons are locked.


5

Display the setting temperature of freezer compartment.

6

Display the setting temperature of fridge compartment.

7

9

Summary of Contents for BSBS550

Page 1: ...User Instruction Side by Side Refrigerator Freezer BSBS550 Content 1 Safety Information Page 1 4 2 Overview Page 5 3 Installation Page 6 8 4 Daily Use Page 9 12 ...

Page 2: ...tand the hazards involved Children should be supervised to ensure that they do not play with the appliance Cleaning and user maintenance shall not be made by children unless they are aged from 8 years and above and supervised Keep all packaging well away from children There is risk of suffocation If you are discarding the appliance pull the plug out of the socket cut the connection cable as close ...

Page 3: ...onments bed and breakfast type environments catering and similar non retail applications WARNING Do not use other electrical appliances such as ice cream makers inside of refrigerating appliances unless they are approved for this purpose by the manufacture WARNING Any electrical components plug power cord compressor and etc must be replaced by a certified service agent or qualified service personn...

Page 4: ...appliance Use a 1 plastic scraper Regularly examine the drain in the refrigerator for defrosted water If necessary clean the drain If the drain is blocked water will collect in 2 te bottom of the appliance Installation Important For electrical connection carefully follow the instructions given in specific paragraphs Unpack the appliance and check if there are damages on it Do not connect the appli...

Page 5: ...don t open the door s Don t open the door s frequently Don t keep the door s open for too long time Don t set the thermostat on exceeding cold temperatures Some accessaries such as drawers can be removed to get larger storage volume and lower energy consumption The symbol on the product or on its packaging indicates that this product may not be treated as household waste Instead it should be taken...

Page 6: ...Overview 5 Note Above picture is for reference only Real appliance probably is different Freezer Balconies Freezer Shelves Freezer Drawer s Fridge Balconies Fridge Shelves Fridge Drawer s Leveling Feet ...

Page 7: ...ace for the refrigerator doors to open easily Select a location with level or nearly level flooring Allow sufficient space to install the refrigerator on a flat surface Allow clearance to the right left back and top when installing This will help reduce power consumption and keep your energy bills lower Doors Clockwise rotate feet to heighten them by hand Anticlockwise rotate feet to lower them by...

Page 8: ...urate leveling is ensured by one or more adjustable feet at the base of the cabinet Location Warning It must be possible to disconnect the appliance from the mains power supply the plug must therefore be easily accessible after installation Before plugging in ensure that the voltage and frequency shown on the rating plate correspond to your domestic power supply The appliance must be earthed The p...

Page 9: ...d black 3 Connect the wire coloured brown to the terminal either marked with the L or coloured red 4 Check that no cut or stray strands of wire is present and the cord clamp is secure over the outer sheath 5 Make sure the electricity supply voltage is the same as that indicated on the appliance rating plate 6 Switch on the appliance The appliance is supplied with a 13 amp plug fitted In the event ...

Page 10: ...e bottons Display SMART mode the refrigerator sets the temperature of two compartments automatically according to internal temperature and ambient temperature 1 ECO mode the refrigerator runs in lowest energy consumption setting 2 SUPER COOLING cools the fridge compartment to the lowest temperature for approx 2 hours Then the temperature set before super mode is automatically restored 3 SUPER FREE...

Page 11: ...rtant In the event of accidental defrosting for example the power has been off for longer than the value shown in the technical characteristics chart under rising time the defrosted food must be consumed quickly or cooked immediately and then re frozen after cooked Thawing Deep frozen or frozen food prior to be used can be thawed in the freezer compartment or at room temperature depending on the t...

Page 12: ... not store warm food or evaporating liquids in the refrigerator Do cover or wrap the food particularly if it has a strong flavour Hints for refrigeration Useful hints Make all types wrap in polythene bags and place on the glass shelves above the vegetable drawer For safety store in this way only one or two days at the most Cooked foods cold dishes etc these should be covered and may be placed on a...

Page 13: ...g another part of the appliance or the wall If necessary carefully bend the component out of the way Door seal is not air tight Heavy build up of frost on the door seal Carefully warm the leaking sections of the door seal with a hair dryer on a cool setting At the same time shape the warmed door seal by hand such that it sits correctly Temperature is not properly adjusted Please look in the initia...

Page 14: ......

Reviews: