background image

Defrosting the 


freezer compartment 


Your appliance is frost free, so you should not need to manually 
defrost the freezer section.  
 
However if for example the door is left open for a prolonged period of 
time or the door gasket is not sealing correctly, then you could get ice 
building in the freezer section.  If this occurs, then you should follow 
the steps below. 
 

o


The day before you defrost, you should select the 

SUPER 

FREEZER 

option; this will make sure that the food contained in 

the compartment is frozen properly. 


o


Whilst defrosting the appliance, the food should be removed 
from the compartment and wrapped in several layers of paper 
and stored in a cool place. The foods rise in temperature will 
shorten its storage life and therefore the food should be used 
within a relatively short period of time. 


o


DO NOT PLACE FOOD BACK IN THE FREEZER 
COMPARTMENT THAT HAS STARTED TO THAW.


o


Turn the appliance off by turning off the power supply to the 
fridge freezer. 


o


Remove the drawers and shelves from the freezer section and 
leave the door to the freezer compartment open. You can place a 
bowl of warm water inside the freezer compartment to speed up 
the defrost process. 


o


You can use a sponge to mop up the defrost water that will run 
into the bottom of the freezer section. 


o


IMPORTANT: 

You should place some old towels on the flooring 

that is immediately in front of the appliance. In case any defrost 
water comes out of the freezer section and onto the floor. 


o


Once all the ice that has built up has melted, then the inside of 
the freezer compartment should be dried thoroughly. Failure to 
do this will result in immediate ice build when the appliance is 
turned back on. 

o


With dry hands, reconnect your appliance to your mains supply. 
You should select the 

SUPER FREEZER 

option for a 24 hour 

period, before returning it to the normal temperature setting of 
at least -18°C 


o


You should not attempt to freeze fresh food inside the freezer 
compartment until this 24 hour time period has elapsed. 


26

Summary of Contents for TITAN4

Page 1: ...TITAN4 Stainless steel side by side frost free fridge freezer...

Page 2: ...Instruction Manual contains important information including safety installation points which will enable you to get the most out of your appliance Please keep it in a safe place so that it is easily...

Page 3: ...freezing 18 Activating the child lock 18 The dispenser 19 22 Before first use 19 Using the dispenser 19 The ice maker 20 Dispenser and ice maker warnings 20 21 Locking the ice maker 21 Removing and re...

Page 4: ...Environmental note o The packaging materials that Baumatic uses are environmentally friendly and can be recycled o Please discard all packaging material with due regard for the environment 4...

Page 5: ...caused o Altering the specification of the appliance must not be attempted for reasons of safety Before using your appliance o Check the appliance for any signs of transport damage If you notice any d...

Page 6: ...e back coils of the appliance to come into contact with the wall surface o Always ensure that the location where you are installing your appliance is free of stored items such as papers and other flam...

Page 7: ...capacity freezer 179 litres Specifications of the appliance o Frost free fridge and freezer o Turbo cooling system o Digital control panel o Ice maker o Water dispenser o 2 x Adjustable safety glass s...

Page 8: ...eed to open the door of your appliance to be able to find it The rating plate will indicate the ambient temperature range that your appliance will function correctly within Description of the applianc...

Page 9: ...the items that are stored on the shelf that you want to remove Then lift the front of the shelf and carefully pull it out of the grooves Freezer section door storage compartments o The top door storag...

Page 10: ...as long as possible o Care should be taken when storing tropical fruit bananas and pineapples etc and tomatoes As these types of items can easily deteriorate in a lower temperature Dispenser o Will di...

Page 11: ...iance should be cleaned with a solution of sodium bicarbonate dissolved in lukewarm water The interior and accessories should be thoroughly dried after the cleaning process has been completed o There...

Page 12: ...hold for three seconds to reset or after filter exchange 3 Alarm display An alarm may sound if the temperature abnormally rises due to a power cut for example To turn an alarm off press the lock butt...

Page 13: ...er section o The temperature that you have selected will show in the digital display next to the FREEZER SET selection button o The temperature shown in the display will count through in the sequence...

Page 14: ...he desired temperature appears on the digital display release the REFRIGERATOR SET selection button after a few seconds the temperature will be selected o On the maximum setting 2 C the fridge section...

Page 15: ...only be used prior to and when freezing fresh food You should not run the appliance in super freezer mode for prolonged periods Turning on the super refrigerator option This setting should be used if...

Page 16: ...should be given to bottles that may protrude when placed on shelves inside the main section of the refrigerator o Some organic solutions such as the oils in lemon orange peel and acid in butter can ca...

Page 17: ...od should be allowed to cool down before you attempt to freeze it If you place warm food in the freezer compartment then the increased humidity will cause quicker ice formation and increase the amount...

Page 18: ...l help the food to freeze more easily o Flat packages freeze more easily o If you are freezing liquid then do not fill the container to the brim Liquids will expand when being frozen o Do not place bo...

Page 19: ...select what you want the dispenser to produce o Place a cup against the pad in the dispenser and push it after a few seconds it will dispense water or cubed ice What comes out of the dispenser will de...

Page 20: ...our then you should regularly remove the ice from the ice cube storage case o If you have not dispensed ice for a period of time then clear all of the ice out of the ice cube storage case and let the...

Page 21: ...ube storage case o Pull the storage case forwards to remove it from the freezer o To put the storage case back into position locate it into the side grooves of the cabinet and push it back into place...

Page 22: ...it will take approximately 30 minutes for the compressor to start running again Saving energy when using your fridge freezer Installing o Install the appliance in a cool position If it is placed in d...

Page 23: ...turn off the appliance empty and clean it and leave the door ajar o If you have a second appliance that is not used make sure that it is stored with the power off and the door left ajar until it is ac...

Page 24: ...then reconnect the plug to your mains supply IMPORTANT Before attempting any of the cleaning steps shown below you should remove all items from the shelves and compartments that you are cleaning Fridg...

Page 25: ...tergent and wipe around the door seal Rear grill 1 At least once a year remove any dust that has gathered on the grill at the rear of the appliance using a vacuum cleaner Dispenser shelf 1 Take out th...

Page 26: ...iance off by turning off the power supply to the fridge freezer o Remove the drawers and shelves from the freezer section and leave the door to the freezer compartment open You can place a bowl of war...

Page 27: ...water filter locking cap o Carefully turn the water filter clockwise and remove it from the appliance o A replacement water filter is available from the Baumatic Spares Department o The water filter s...

Page 28: ...I C and who will comply with the I E E and local regulations o Your refrigerator comes supplied with a 13 amp plug fitted If in future you need to change the fuse in this plug then a 13 amp ASTA appr...

Page 29: ...n you should install an insulation plate between the appliance and the adjacent heat source o You should check whether there is an electrical socket available which will be accessible after your appli...

Page 30: ...moving the freezer door If the front bottom cover has already been attached then it should be removed before attempting to remove the door 1 Push down the left hand collar of the coupling first and wh...

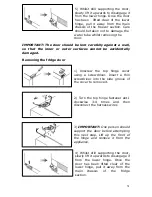
Page 31: ...amaged Removing the fridge door 1 Unscrew the top hinge cover using a screwdriver Insert a thin screwdriver into the side groove of the cover to remove it 2 Turn the top hinge fastener anti clockwise...

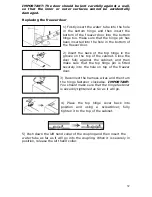
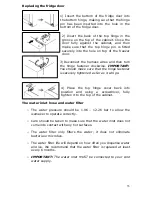
Page 32: ...on the top of the cabinet Close the door fully against the cabinet and then make sure that the top hinge pin is fitted securely into the hole on top of the freezer door 3 Reconnect the harness wires a...

Page 33: ...hinge fastener is securely tightened as far as it will go 4 Place the top hinge cover back into position and using a screwdriver fully tighten it to the top of the cabinet The water inlet hose and wa...

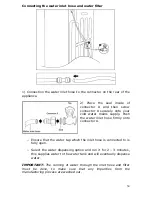
Page 34: ...upply Push the water inlet hose firmly onto connector A o Ensure that the water tap which the inlet hose is connected to is fully open o Select the water dispensing option and run it for 2 3 minutes t...

Page 35: ...may find it difficult to open the doors Levelling the freezer door o Insert a flat tipped screwdriver into the groove of the left hand front wheel o Turn the screwdriver clockwise to raise the freezer...

Page 36: ...sn t been packed too tightly into it o The thermostat setting is too low you should turn the thermostat up higher o Ensure that the door is closing properly and that the door has not been opened for a...

Page 37: ...not indicate an appliance fault The front and side of my fridge freezer feels warm or hot o There are pipes placed beneath the surface to prevent moisture from forming on it The doors do not open eas...

Page 38: ...will be caused to the appliance or your kitchen then he will not complete a repair This includes situations where appliances have been tiled in sealed in with sealant have wooden obstructions placed...

Page 39: ...w baumatic co uk Republic of Ireland Service Telephone 1 890 812 724 Spares Telephone 091 756 771 Czech Republic Baumatic CR spol s r o Pr myslov z na Sever 696 460 11 Liberec 11 Czech Republic 420 48...

Page 40: ......

Reviews: