background image

105.5

MB072T2 - 11070661

  Baumer_HOG11-HOG11G-T2_II_DE-EN (17A2) 

22

6.1.3


Option Erdung  


(74568)

6.1.4


Option G: Zwillingsgeber HOG 11 G  


(74567)

6.1.3


Option earthing  


(74568)

6.1.4

  Option G: Twin encoder HOG 11 G  


(74567)

All dimensions in millimeters (unless otherwise stated)

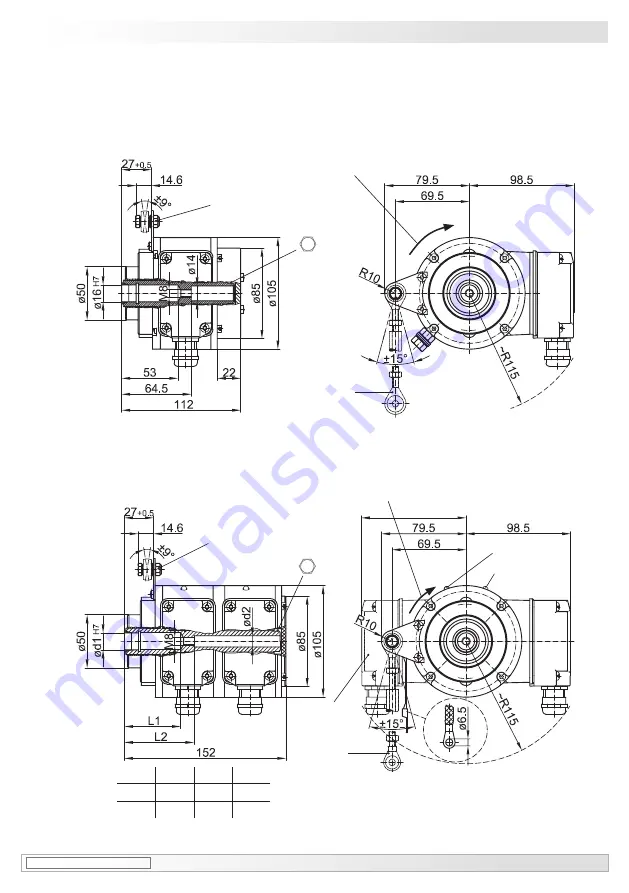
 Abmessungen

 / Dimensions 

6

ød1

H7

L1

L2

ød2

16

53

65.5

14

20

35

51.5

14

Positive Drehrichtung

Positive rotating direction

Positive Drehrichtung

Positive rotating direction

Um 90° versetzt gezeichnet

Drawing 90° rotated

Um 90° versetzt gezeichnet

Drawing 90° rotated

Zubehör

Accessory

Zubehör

Accessory

17 mm

17 mm

LED

 3)

LED

 8)

Option M: 

redundant

3) 

Option EMS

8) 

Option M + EMS

Summary of Contents for HOG 10 G

Page 1: ...OG 11 HOG 11 G Inkrementaler Drehgeber Zwillingsgeber mit radialem Klemmenkasten Incremental encoder Twin encoder with radial terminal box Option M redundant Option EMS LED Option Heizung Option heating Option Erdung Option earthing Option G Option M redundant Option EMS LED Option EMS LED Option G Option EMS LED Option G ...

Page 2: ...ermeidung von Messfehlern 16 5 8 Schritt 6 17 5 9 Montagehinweis 17 5 10 Schritt 7 18 5 11 Schritt 8 und 9 Klemmenkasten 18 5 12 Schritt 10 Klemmenkasten 19 5 13 Schritt 11 Klemmenkasten 19 5 14 Schritt 12 Klemmenkasten 20 6 Abmessungen 21 6 1 Einseitig offene Hohlwelle 21 6 2 Konuswelle 23 7 Elektrischer Anschluss 25 7 1 Beschreibung der Anschlüsse 25 7 2 Ausgangssignale 26 7 3 Klemmenbelegung 26...

Page 3: ...rors 16 5 8 Step 6 17 5 9 Mounting instruction 17 5 10 Step 7 18 5 11 Step 8 and 9 Terminal box 18 5 12 Step 10 Terminal box 19 5 13 Step 11 Terminal box 19 5 14 Step 12 Terminal box 20 6 Dimensions 21 6 1 Blind hollow shaft 21 6 2 Cone shaft 23 7 Electrical connection 25 7 1 Terminal significance 25 7 2 Output signals 26 7 3 Terminal assignment 26 7 4 Option EMS Enhanced Monitoring System Status ...

Page 4: ...cht 1 5 Der Lagertemperaturbereich des Gerätes liegt zwischen 15 C bis 70 C 1 6 Der Betriebstemperaturbereich des Gerätes liegt zwischen 40 C bis 100 C 3072 Impulse pro Umdrehung 25 100 C Option Heizung 50 100 C einge schränkt im Ex Bereich siehe Abschnitt 2 am Gehäuse gemessen 1 7 EU Konformitätserklärung gemäß den europäischen Richtlinien 1 8 Das Gerät ist zugelassen nach UL gilt nicht für Einsa...

Page 5: ...he device is between 40 C and 100 C 3072 pulses per revolution 25 100 C option heating 50 100 C restricted in potentially explosive environments see section 2 measured at the housing 1 7 EU Declaration of Conformity meeting to the European Directives 1 8 The device is UL approved not applicable for operation in potentially explosive atmospheres 1 9 We grant a 2 year warranty in accordance with the...

Page 6: ...on 5 mm nicht überschreitet gemäß EN 60079 14 2 3 Eine gegebenenfalls an anderen Stellen aufgeführte UL Listung gilt nicht für den Einsatz im Ex Bereich 2 4 Das Gerät darf nur in Betrieb genommen werden wenn die Angaben auf dem Typenschild des Gerätes mit dem zulässigen Ex Einsatzbereich vor Ort übereinstimmen Gerätegruppe Kategorie Zone Temperaturklasse bzw maximale Oberflächentemperatur die Anga...

Page 7: ...does not exceed a thickness of 5 mm in accordance with EN 60079 14 2 3 An UL listing that may be stated elsewhere is not valid for use in explosive environ ments 2 4 Operation of the device is only permissible when the details on the type label of the device match the on site conditions for the permissible Ex area in use group of equipment equipment category zone temperature class or maxi mum surf...

Page 8: ...halten 3 4 Zerstörungsgefahr durch mechanischen Schock Starke Erschütterungen z B Hammerschläge können zur Zerstörung der Abtastung führen Niemals Gewalt anwenden Bei sachgemäßer Montage lässt sich alles leichtgängig zusam menfügen Für die Demontage geeignetes Abziehwerkzeug benutzen 3 5 Zerstörungsgefahr durch Verschmutzung Schmutz kann im Gerät zu Kurzschlüssen und zur Beschädigung der Abtastung...

Page 9: ...es are observed 3 4 Risk of destruction due to mechanical shock Violent shocks e g due to hammer impacts can lead to the destruction of the sensing system Never use force Mounting is simple when correct procedure is followed Use suitable puller for dismounting 3 5 Risk of destruction due to contamination Dirt penetrating inside the device can cause short circuits and damage the sensing system Abso...

Page 10: ...G 11 G 2 Option M Redundante Abtastung HOG 11 M 3 Option EMS HOG 11 2 1 Housing 2 Blind hollow shaft or cone shaft with spanner flat 17 mm a f 3 Clamping element only for blind hollow shaft 4 Support plate for torque arm 5 Hexagon screw M6x18 mm ISO 4017 A2 10 mm a f 6 Washer B6 4 ISO 7090 A2 7 Self locking nut M6 ISO 10511 A2 10 mm a f 8 Cover with o ring 9 Ejot hexagon socket screw M4x14 mm 10 E...

Page 11: ...7 3 11e Torx Schlitzschraube M3x10 mm A2 11f D SUB Stecker am Gerätegehäuse 1 Option G Zwillingsgeber HOG 11 G 2 Option M Redundante Abtastung HOG 11 M 11a Terminal box cover 11b Torx slotted screw M4x32 mm A2 11c Cable gland M20x1 5 for cable ø5 13 mm 11d Connecting board see section 5 12 and 7 3 11e Torx slotted screw M3x10 mm A2 11f D SUB connector male on the device housing 1 Option G Twin enc...

Page 12: ...be B6 4 ISO 7090 Ms für Erdungsband 19 Montage Demontageset als Zubehör erhältlich Bestellnummer 11077087 bestehend aus 19a Federring 6 DIN 7980 19b Zylinderschraube M6x30 ISO 4762 A2 4 Kürzbar auf 71 mm 5 Kürzbar auf 131 mm 16 Torque arm available as accessory Order number Length L version 11043628 67 70 mm standard 11004078 125 5 mm 4 standard 11002915 440 20 15 mm 5 standard 11054917 67 70 mm i...

Page 13: ... 7436 5 8 Vzk 19d Cylinder screw M8x45 ISO 4762 A2 4 4 Zur Demontage erforderlich nicht im Lieferumfang enthalten 4 4 Required for dismounting not included in scope of delivery 4 5 Erforderliches Werkzeug nicht im Lieferumfang enthalten 4 5 Required tools not included in scope of delivery 20 Werkzeugset als Zubehör erhältlich Bestellnummer 11068265 20 Tool kit available as accessory order number 1...

Page 14: ...2 5 Montage In den Bildern am Beispiel des HOG 11 Stan dard Gleiche Montageschritte bei allen anderen Versionen 5 1 Schritt 1 5 Mounting Pictures showing type standard HOG 11 as example Same mounting steps for all versions 5 1 Step 1 Siehe Seite 7 oder 9 See page 7 or 9 16 7 6 8 9 5 10 mm 10 mm 3 mm ...

Page 15: ...chen Vibratio nen die die Lebensdauer des Gerätes verkürzen können The drive shaft should have as less runout as possible because this can otherwise result in an angle error see section 5 7 Runouts can cause vibrations which can shorten the service life of the device M6 ød1 ød h6 L 53 mm 35 mm bei at ød 19 20 mm 16 mm 3 2 Siehe Seite 7 See page 7 L ø d h6 Zentrierbohrung Center hole DIN 332 D M6x1...

Page 16: ... aufwei sen da dieser zu einem Winkelfehler führen kann siehe Abschnitt 5 7 Rundlauffehler verursachen Vibratio nen die die Lebensdauer des Gerätes verkürzen können The drive shaft should have as less runout as possible because this can otherwise result in an angle error see section 5 7 Runouts can cause vibrations which can shorten the service life of the device 20 mm 1 10 Zentrierbohrung Center ...

Page 17: ...Schritt 4 5 5 Step 4 Siehe Seite 9 See page 9 Zul Anzugsmoment einseitig offene Hohlwelle Max tightening torque blind hollow shaft Mt 6 Nm Zul Anzugsmoment Konuswelle Max tightening torque cone shaft Mt 3 4 Nm 19b 19a 18a 18e 18b 18b 16 21b 18c 18b 18d 18c 17 mm 5 mm 10 mm 1 6x8 mm ...

Page 18: ...ielfrei erfolgen Ein Spiel von beispielsweise 0 03 mm entspricht einem Rundlauffehler des Gerätes von 0 06 mm was zu einem großen Winkel fehler führen kann siehe Abschnitt 5 7 The torque arm should be mounted free from clearance A play of just 0 03 mm results in a runout of the device of 0 06 mm That may lead to a large angle error see section 5 7 15 15 9 9 9 9 L1 L2 L1 ...

Page 19: ...n Hotline 49 0 30 69003 111 i 5 7 How to prevent measurement errors To ensure that the device operates cor rectly it is necessary to mount it accurately as described in section 5 1 to 5 6 which in cludes correct mounting of the torque arm The radial runout of the drive shaft should not exceed 0 2 mm 0 03 mm recom mended if at all possible to prevent an angle error An angle error may be reduced by ...

Page 20: ...chritt 6 5 8 Step 6 Siehe Seite 7 See page 7 Wir empfehlen das Gerät so zu mon tieren dass der Kabelanschluss kei nem direkten Wassereintritt ausge setzt ist i i It is recommended to mount the de vice with cable connection facing downward and being not exposed to water 9 8 Zul Anzugsmoment Max tightening torque Mt 2 3 Nm 3 mm ...

Page 21: ...nd 9 Terminal box 5 10 Schritt 7 5 10 Step 7 Siehe Seite 8 oder 9 See page 8 or 9 75 mm 11b 11a 11c 11e 11d 16 TX 20 22 mm TX 10 11c Zur Gewährleistung der angegebenen Schutzart sind nur geeignete Kabel durchmesser zu verwenden To ensure the specified protection of the device the correct cable diameter must be used ø5 13 mm ...

Page 22: ... 13 Schritt 11 Klemmenkasten 5 13 Step 11 Terminal box Siehe Seite 8 oder 9 See page 8 or 9 Kabelschirm Cable shield Ansicht X siehe Abschnitt 7 3 View X see section 7 3 11d 11e 11c 17 TX 10 22 mm D SUB Buchse zum Anschluss an Gerätegehäuse siehe Abschnitt 5 14 D SUB connector female for connecting to device housing see section 5 14 ...

Page 23: ...age des Klemmenka stendeckels prüfen ob die Klemmen kastendeckeldichtung unbeschädigt ist Check that the seal of the terminal box is not damaged before mounting the terminal box Großer um 180 wendbarer Klemmenkasten Big terminal box turn by 180 11b 11a 11b 11a Zul Anzugsmoment Max tightening torque Mt 2 3 Nm Zul Anzugsmoment Max tightening torque Mt 2 3 Nm TX 20 TX 20 ...

Page 24: ...nsions in millimeters unless otherwise stated Stromanschluss siehe Abschnitt 7 4 Power supply see section 7 4 6 Abmessungen Dimensions ødH7 L1 L2 16 53 65 5 20 35 50 Positive Drehrichtung Positive rotating direction Positive Drehrichtung Positive rotating direction Um 90 versetzt gezeichnet Drawing 90 rotated Um 90 versetzt gezeichnet Drawing 90 rotated Zubehör Accessory Zubehör Accessory 17 mm 17...

Page 25: ...mensions in millimeters unless otherwise stated Abmessungen Dimensions 6 ød1H7 L1 L2 ød2 16 53 65 5 14 20 35 51 5 14 Positive Drehrichtung Positive rotating direction Positive Drehrichtung Positive rotating direction Um 90 versetzt gezeichnet Drawing 90 rotated Um 90 versetzt gezeichnet Drawing 90 rotated Zubehör Accessory Zubehör Accessory 17 mm 17 mm LED 3 LED 8 Option M redundant 3 Option EMS 8...

Page 26: ...11 G und Option Erdung 74570 6 1 5 Option G Twin encoder HOG 11 G and option earthing 74570 17 mm Zubehör Accessory 6 2 Konuswelle 6 2 1 Standard 74553 6 2 Cone shaft 6 2 1 Standard 74553 Positive Drehrichtung Positive rotating direction Um 90 versetzt gezeichnet Drawing 90 rotated Zubehör Accessory 17 mm Option M redundant LED 3 LED 8 All dimensions in millimeters unless otherwise stated 3 Option...

Page 27: ... otherwise stated Stromanschluss siehe Abschnitt 7 4 Power supply see section 7 4 Positive Drehrichtung Positive rotating direction Um 90 versetzt gezeichnet Drawing 90 rotated Zubehör Accessory 17 mm 6 2 3 Option Erdung 74576 6 2 3 Option earthing 74576 Positive Drehrichtung Positive rotating direction Um 90 versetzt gezeichnet Drawing 90 rotated Zubehör Accessory 17 mm ...

Page 28: ...annung für das Gerät Voltage supply for the device GND 0V Masseanschluss für die Signale Ground for the signals Erdungsanschluss Gehäuse Earth ground housing K1 A A Ausgangssignal Kanal 1 Output signal channel 1 K1 A A Ausgangssignal Kanal 1 invertiert Output signal channel 1 inverted K2 B B Ausgangssignal Kanal 2 90 versetzt zu Kanal 1 Output signal channel 2 offset by 90 to channel 1 K2 B B Ausg...

Page 29: ...sgefahr Spannungsabfälle in langen Leitungen berücksichtigen Ein und Ausgänge Do not connect voltage supply to outputs Danger of damage Please beware of possible voltage drop in long cable leads inputs and outputs Zwischen und besteht keine Verbindung There is no connection between and Max 1 5 mm2 Max AWG 16 Ansicht X Anschlussklemmen siehe Abschnitt 5 12 View X Connecting terminal see section 5 1...

Page 30: ...en Fehlerausgang LOW Grünblinkend Gerät o k drehend Fehlerausgang HIGH Grün Gerät o k Stillstand Fehlerausgang HIGH Flash light red 9 Error of signal sequence zero pulse or pulses Error output HIGH LOW change Red Overload output transistors Error output LOW No light No voltage supply connection or wrong connection Error output LOW Flash light green Device o k rotating Error output HIGH Green Devic...

Page 31: ...chwarz Black Err 3 Violett Violet 3 7 6 Sensorkabel HEK 8 Zubehör Es wird empfohlen das Baumer Hübner Sensorkabel HEK 8 zu verwenden oder ersatzweise ein geschirmtes paarig ver seiltes Kabel Das Kabel sollte in einem Stück und getrennt von Stromkabeln verlegt werden Kabelabschluss HTL 1 3 kΩ TTL 120 Ω 7 6 Sensor cable HEK 8 accessory Baumer Hübner sensor cable HEK 8 is recommended As a substitute ...

Page 32: ...chselt werden damit weiterhin ein einwandfreier Betrieb gewährleistet ist 8 Operation and maintenance 8 1 Option earting Replace of the carbon brush When the minimum carbon brush length L of 5 3 mm is reached the carbon brushes should be replaced in order to en sure perfect operation Siehe Seite 7 See page 7 15 1 Stück Kohlebürste als Zubehör erhältlich Bestellnummer 11058991 15 1 piece carbon bru...

Page 33: ...rn am Beispiel des HOG 11 Standard Gleiche Demontageschritte bei allen anderen Versionen 9 1 Schritt 1 und 2 9 Dismounting Pictures showing type standard HOG 11 as example Same dismounting steps for all versions 9 1 Step 1 and 2 Siehe Seite 8 oder 9 See page 8 or 9 11d 11e 11b 11a 17 11c TX 10 TX 20 22 mm ...

Page 34: ..._DE EN 17A2 MB072T2 11070661 9 Demontage Dismounting 9 3 Schritt 4 9 3 Step 4 9 2 Schritt 3 9 2 Step 3 9 4 Schritt 5 9 4 Step 5 18d 18e 18b 18c 18a 9 8 19a 19b 10 mm 1 6x8 mm 3 mm 17 mm 5 mm 16 Siehe Seite 7 oder 9 See page 7 or 9 ...

Page 35: ...2 11070661 Baumer_HOG11 HOG11G T2_II_DE EN 17A2 32 Demontage Dismounting 9 9 5 Schritt 6 9 5 Step 6 9 7 Schritt 8 9 7 Step 8 9 6 Schritt 7 9 6 Step 7 19c 19c 19d 0 8x4 mm 17 mm 6 mm Siehe Seite 10 See page 10 ...

Page 36: ... ø105 mm Wellenart ø12 20 mm einseitig offene Hohlwelle ø17 mm Konuswelle 1 10 Zulässige Wellenbelastung 450 N axial 600 N radial Schutzart DIN EN 60529 IP67 Betriebsdrehzahl 6000 U min mechanisch Betriebsdrehmoment typ 6 Ncm Trägheitsmoment Rotor 340 gcm2 Werkstoffe Gehäuse Aluminium Druckguss Welle Edelstahl Betriebstemperatur 40 100 C 25 100 C 3072 Impulse pro Umdrehung 50 100 C Option Heizung ...

Page 37: ...20 mm blind hollow shaft ø17 mm cone shaft 1 10 Admitted shaft load 450 N axial 600 N radial Protection DIN EN 60529 IP67 Operating speed 6000 rpm mechanical Operating torque typ 6 Ncm Rotor moment of inertia 340 gcm2 Materials Housing aluminium die cast Shaft stainless steel Operating temperature 40 100 C 25 100 C 3072 pulses per revolution 50 100 C option heating Restricted in potentially explos...

Page 38: ...Unterschrift Name Funktion Daniel Kleiner Place and date Signature name function Head of R D Motion Lieu et date Signature nom fonction Control Baumer Group Baumer_HOGx_OGx_POGx_FOGx_HMI_DE EN FR_CoC_81201236 docm kwe 1 1 Baumer Hübner GmbH P O Box 126943 D 10609 Berlin Max Dohrn Str 2 4 D 10589 Berlin Phone 49 0 30 69003 0 Fax 49 0 30 69003 104 info baumerhuebner com www baumer com Sitz der Gesel...

Page 39: ...s EN 50581 2012 Norme s Klicken Sie hier um Text einzugeben Ort und Datum Berlin 31 03 2016 Unterschrift Name Funktion Daniel Kleiner Place and date Signature name function Head of R D Motion Lieu et date Signature nom fonction Control Baumer Group Baumer_Geber_mit_Erdungsbürste_oder_Heizung_DE EN FR_CoC_81201634 docm kwe 1 1 Baumer Hübner GmbH P O Box 126943 D 10609 Berlin Max Dohrn Str 2 4 D 105...

Page 40: ...077197 Sensor cable for encoders HEK 8 Mounting and dismounting kit order number 11077087 Tool kit order number 11068265 1 piece carbon brush order number 11058991 Digital converters HEAG 151 HEAG 154 Fiber optic links HEAG 171 HEAG 176 Digital speed switch DS 93 Analyzer for encoders HENQ 1100 12 Zubehör Drehmomentstütze Größe M6 Bestellnummer siehe Abschnitt 4 3 Montageset für Drehmoment stütze ...

Reviews: