Bäumr-AG Petrol Powered Lawn Mowers
E&OE
©2017 Bäumr-AG
8
Before Use Checklist
Ensure that you carry out all procedures below before starting the engine or operating the
equipment. All procedures described are generic in nature and slight variations between
different models may exist.
Failure to follow the checklist and carry out the procedures correctly may
result in making the product warranty void
. The product is NOT supplied with engine oil, although traces
of oil from the manufacturing process may be present. It is essential to add adequate engine oil of the correct
type to the engine before use – see
Checking and Changing Engine Oil
Failure to add engine oil will void
the product warranty
.
Assembly
Typically, the lawn mower requires minimal assembly. Prior to assembly, unpack all components and check
that all items have been received.
Handle
The handle comes assembled, however, must be attached to the lawn mower handle mounting brackets.
Note that the following procedure is typical and that there may be slight differences between models; for
example, on some machine the handle is attached using 2 screws and nuts per side.
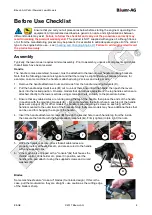
1. Remove the handle attachment nuts and screws from the handle mounting brackets (
C
).
2. Pull the handle adjustment levers (
D
) out to unlock them and unfold the handle, then push the levers
back into the locked position. On some models that do not have adjustment, the top handle sections are
attached directly to the lower sections using screws and nuts, similarly to the procedure below.
3. Ensure that any cables/wires are running along the top of the handle, then place the ends of the handle
in position with the mounting brackets (
E
) – for some models, the bottom hole in each leg of the handle
goes over a spigot (
F
); for other models the handle is secured using 2 screws on each leg, with the
handle mounted to the outer face of the brackets. Note that some models may have additional holes that
can be used for changing the angle of the handle.
4. Insert the handle attachment screws (
B
) through the second hole in each handle leg from the inside,
then secure the handle with the handle attachment nuts (
A
). Firmly tighten (rotate right) the nuts.
5. Once the handle is secure, check that all cable/wires are
properly routed, without kinks etc, and are secured to the handle
with any supplied clips.
6. If the machine is equipped with a "console" (
G
) that houses the
throttle control, drink holder etc, place it in position over the
handle rails, and attach it using the supplied screws and curved
washers (
H
).
Blades
Some machines feature "cross-cut" blades (four-blade design). If this is the
case, pull them outward so they are straight – use caution as the cutting edge
of the blade is sharp.
B
A
D
E
F
G
H

