background image

  If petrol is spilled, do not attempt to start the engine but move the product 

away from the area of spillage and avoid creating any source of ignition 

until petrol vapours have dissipated.  

  Replace all fuel tank and container caps securely. 

4. Replace faulty silencers.
5. Before using, always visually inspect to see that the cutting devices, cutting

device bolts and cutter assembly are not worn or damaged. Replace worn or

damaged cutting devices and bolts in sets to preserve balance.

6. On multi-bladed machines, take care as rotating one cutting device can cause

other cutting devices to rotate.

7. CAUTION! Do not touch rotating cutting device.

3. Operation

1. Do not operate the engine in a confined space where dangerous carbon

monoxide fumes can collect.

2. Mow only in daylight or in good artificial light.
3. Avoid operating the product in wet grass, where feasible.
4. Always be sure of your footing on slopes.
5. Walk, never run.
6. Mow across the face of slopes, never up and down.
7. Exercise extreme caution when changing direction on slopes.
8. Do not mow excessively steep slopes.
9. Use extreme caution when reversing or pulling the product towards you.
10. Stop the cutting device(s) if the product has to be tilted for transportation

when crossing surfaces other than grass, and when transporting the product

to and from the area to be mowed.

11. Never operate the product with defective guards, or without safety devices,

for example deflectors and/or grass catchers, in place.

12. Do not change the engine governor settings or overspeed the engine.
13. Disengage all cutting device and drive clutches before starting the engine.
14. Start the engine or switch on the engine carefully according to instructions

and with feet well away from the cutting device(s).

Summary of Contents for 660EX

Page 1: ...SAFETY AND OPERATING MANUAL THIS PRODUCT IS NOT FOR PROFESSIONAL USE WARNING Read the instructions before using the product 6 7 ...

Page 2: ...G GUIDE CONNECT HANDLE BARS 140cm3 PETROL LAWNMOWER WR65170A 17 Tighten using the knobs and ensure the wires are on the upper side of the handle bars FOLD BLADES OUTWARDS IMPORTANT Pull the blades to the right as the blade is very sharp on one side ADD ENGINE OIL Fill on a flat surface to the indicated level ADD FUEL ...

Page 3: ...2 18 15 16 12b 10c 10b 10a 6 7 Use the primer if equipped when starting the product with a cold engine BRAKE BAR 2 Push the brake bar 2 if equipped down towards the handle and hold it in position when starting RECOIL STARTER Pull on the handle to start the engine ...

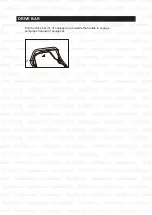
Page 4: ...DRIVE BAR Pull the drive bar 3 if equipped up towards the handle to engage self propel feature if equipped 3 ...

Page 5: ...roduct develops a fault within the guarantee period contact your retailer Please retain this handbook in case you need to refer to safety care or guarantee information in the future CONTENTS Introduction 2 Safety warnings 3 Product description 12 Technical data 14 Intended use 16 Set up 16 Product functions 22 Operation instructions 26 Maintenance and care 28 Trouble shooting 32 Guarantee 35 Decla...

Page 6: ...these instructions to use the product Local regulations can restrict the age of the operator 3 Never mow while people especially children or pets are nearby 4 Keep in mind that the operator or user is responsible for accidents or hazards occurring to other people or their property 2 Preparation 1 While mowing always wear substantial footwear and long trousers Do not operate the product when barefo...

Page 7: ...ght or in good artificial light 3 Avoid operating the product in wet grass where feasible 4 Always be sure of your footing on slopes 5 Walk never run 6 Mow across the face of slopes never up and down 7 Exercise extreme caution when changing direction on slopes 8 Do not mow excessively steep slopes 9 Use extreme caution when reversing or pulling the product towards you 10 Stop the cutting device s ...

Page 8: ...and operating the product if the product starts to vibrate abnormally check immediately 20 Stop the engine and disconnect the spark plug connector make sure that all moving parts have come to a complete stop and where a key is fitted remove the key whenever you leave the product before refuelling 21 Reduce the throttle setting during engine shut down and if the engine is provided with a shut off v...

Page 9: ...outdoors 9 Wear strong work gloves when removing and re assembling the cutting device 10 Always replace worn or faulty parts with the genuine parts 5 Fuel handling 1 Always switch the product off and let it cool down before refuelling it Petrol is highly flammable Never smoke when you are refuelling the product Do not refuel the product if there is an open fire in the vicinity 2 Always use suitabl...

Page 10: ...plication tools for the product and ensure they in good condition 4 Keep tight grip on the handles gripping surface 5 Maintain this product in accordance with these instructions and keep it well lubricated where appropriate 6 Plan your work schedule to spread any high vibration tool use across a longer period of time 7 Emergency Familiarise yourself with the use of this product by means of this in...

Page 11: ...operly maintained 2 Injuries and damage to property due to broken application tools or the sudden impact of hidden objects during use 3 Danger of injury and property damage caused by flying objects 4 Burns if touching hot surfaces WARNING This product produces an electromagnetic field during operation This field may under some circumstances interfere with active or passive medical implants To redu...

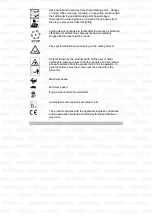
Page 12: ...d the instruction manual Wear hearing protection Wear eye protection Wear respiratory protection Wear protective gloves Wear safety footwear Wear tight fitted protective clothes Do not expose to rain or wet conditions Open flames in the work area around the product and in the vicinity of flammable materials are prohibited ...

Page 13: ... product is used improperly these fumes can lead to poisoning a loss of consciousness or death Only refuel unleaded petrol Add engine oil Check and refill oil Switch the engine off while you are refilling the tanks Switch the product off and disconnect the spark plug connector before assembly cleaning adjustments maintenance storage and transportation Mow across the face of slopes never up and dow...

Page 14: ...mpletely stopped before touching the product Pay special attention when working on the cutting device Objects thrown by the product could hit the user or other bystanders Always ensure that other people and pets remain at a safe distance from the product when it is in operation In general children must not come near the area where the product is Maximum speed Minimum speed Engine manual start Reco...

Page 15: ...PRODUCT DESCRIPTION 6 7 6 7 1 2 3 5 6 7 8 9 10 11a 12 13 18 19 20 20a 21 22 23 24 25a 26 14 15 16 17 12b 12a 10c 10b 10a 4 27 28 29 30 Appearance may differ slightly ...

Page 16: ...ive wire 8 Throttle wire 9 Lower handle bar 10 Mounting set x 2 a Knob b Washer c Bolt 11 Wire clip x 2 pre assembled a triplex clip 12 Mounting set x 2 a Knob b Bolt 13 Oil tank cap 14 Air vents 15 Muffler 16 Spark plug connector 17 Air filter case 18 Wheel 19 Primer 20 Fuel tank a Cap ...

Page 17: ...e support 22 Lever for cutting height adjustment 23 Recoil starter handle 24 Deflector guard 25 Grass catcher a Handle 26 Rope guide 27 Cutting device blade 28 Locking flange 29 Hex bolt 30 Rear discharge chute ...

Page 18: ...flat stable surface 2 Remove all packing materials and shipping devices if applicable 3 Make sure the delivery contents are complete and free of any damage If you find that parts are missing or show damage do not use the product but contact your dealer Using an incomplete or damaged product represents a hazard to people and property 4 Ensure that you have all the accessories and tools needed for a...

Page 19: ... 9 4 Lay the upper 5 and lower handle bar 9 on a stable even surface Tighten the locking knobs 10a 5 Align the lower handle bar 9 with the support 21 Make sure the holes in the lower handle bar are aligned with those in the support Fig 1 Fig 1b 6 For handle height adjustment there are three holes in the support Secure the lower handle bar with the mounting sets 12 according to your handle bar 12b ...

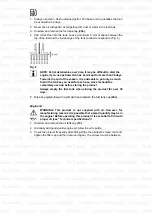
Page 20: ...6 7 8 with the wire clips 11a 11b to the lower handle bar 9 Fig 3 Fig 3 8 Grass catcher Open the deflector guard 24 hold it in position and align the hooks on the grass catcher 25 with the support to hang it onto it Fig 4 Fig 4 5 6 7 5 6 7 6 7 11a ...

Page 21: ...ace the product on a stable level surface We recommend laying a non flammable sheet under the product 2 Use proper funnels Avoid spilling and overfilling the tanks WARNING Fuel and oil are highly inflammable Fumes will explode if lit Ensure that there are no naked flames around the product Do not smoke while filling fuel and oil 3 Always dispose fuel used oil and objects contaminated with them in ...

Page 22: ... much fuel in the tank as you need for each use since it should be completely used up before storing the product Always empty the fuel tank when storing the product for over 30 days 5 Wipe any spilled fuel with a soft cloth and reattach the fuel tank cap 20a Engine oil WARNING This product is not supplied with oil However for manufacturing reasons it is possible that a small quantity may be in the...

Page 23: ...nd emptying it when it is half full NOTE A full grass catcher will reduce the performance of this product 1 Lift the rear deflector guard 24 and pull the grass catcher 25 off the rods to remove it 2 Empty the grass clippings onto a compost heap 3 Re fit the grass catcher 25 to the product WARNING Do not attempt to use the product without the grass catcher attached when collecting grass danger of f...

Page 24: ...er cutting height 1 Pull the lever 22 towards the wheel then move it forward or backward to adjust the cutting height Fig 8 Fig 8 WARNING Ensure that the lever engages between two of the prongs 3 Primer Use the primer 19 when starting the product with cold engine Fig 9 Fig 9 4 Recoil starter The recoil starter handle 23 is positioned at the rear of the engine 10 11a 12 13 18 19 20 14 15 16 17 12b ...

Page 25: ... 23 to start the engine Fig 11 Fig 11 WARNING Never twist the starter rope around your hand Only pull on the handle WARNING Do not suddenly release the recoil starter handle Allow the rope to return slowly and in a controlled manner each time it is pulled 5 Brake bar 1 Pull the brake bar 2 towards the handle 1 and hold it in position when starting the engine Keep it squeezed during operation Fig 1...

Page 26: ...y 1 Pull the drive bar 3 towards the handle 1 to engage the wheels 2 Release the drive bar 3 to disengage the wheels 7 Throttle lever The throttle lever 4 is located on the left side of the upper handle bar 5 It is used to control the engine speed 1 Move the throttle lever 4 downward for starting Fig 13 2 Move the throttle lever 4 upward to run position middle position of throttle control Fig 14 F...

Page 27: ...erheating and damage the product 6 Switch the product off immediately if you are disturbed while working by other people entering the working area Always let the product come to complete stop before putting it down 7 Do not overwork yourself Take regular breaks to ensure you can concentrate on the work and have full control over the product WARNING In some countries regulations define at what time...

Page 28: ...tart 1 Stand behind the handle 1 2 Pull the brake bar 2 against the handle 1 hold it in position during operation Fig 15 1 3 Move the throttle lever 4 downward to the start position Fig 15 2 4 Pull the recoil starter 23 lightly until you feel resistance then pull it quickly until the engine starts 5 Pull the drive bar 3 towards the handle 1 to use the self propelled function for assistance if requ...

Page 29: ...pping rows The most effective pattern for mowing lawns is straight lines along one of the sides This will keep the rows even and ensures that all the lawn is cut without missing any spots Fig 17 Fig 17 6 Circle around flower beds When reaching a flower bed in the middle of the lawn cut a row or two around the circumference of the bed 7 Pay special attention when changing direction 8 Empty the gras...

Page 30: ...you find broken and worn parts WARNING Only perform repairs and maintenance work according to these instructions All further works must be performed by a qualified specialist 1 General cleaning 1 Clean the product with a slightly damp cloth and mild soap Use a brush for areas that are hard to reach 2 In particular clean the air vents 14 after every use with a cloth and brush 3 Remove stubborn dirt...

Page 31: ...ly recommend jacking the product up when performing inspection and work on the cutting device Avoid tilting the product in order to prevent fuel and oil leakages 1 Keep the underbody and cutting device 27 clean and free of debris Remove clippings from the discharge chute 30 2 Check all nuts and bolts periodically for tightness before operation After prolonged use especially in sandy soil condition...

Page 32: ...f you find any damage 2 Clean the grass catcher 25 after operation using water and mild soap 3 Let the grass catcher dry thoroughly before storing to avoid mildew 4 Wires Check the performance of the wires 6 7 8 before each use Ask a qualified specialist to adjust it if necessary ...

Page 33: ... dry frost free place 3 Always store the product in a place that is inaccessible to children The ideal storage temperature is between 10 and 30 C 4 We recommend using the original package for storage or covering the product with a suitable cloth or enclosure to protect it against dust 5 Empty the tank if you are not going to use the product for an extended period of time more than 3 months and bef...

Page 34: ...te Dispose of oil contaminated items in accordance with the local guidelines and hand them in at recycling centres 3 The product comes in a package that protects it against damage during shipping Keep the package until you are sure that all parts have been delivered and the product is function properly Recycle the package afterwards TROUBLE SHOOTING Suspected malfunctions are often due to causes t...

Page 35: ...e blockage 3 1 Cutting device dull 3 1 Sharpen or replace the cutting device 3 2 Cutting material exceeds capacity 3 2 Only cut materials acc to the capacity of the product 3 Unsatisfactory result 3 3 Cutting height is incorrect 3 3 Adjust cutting height 4 1 Cutting device is dull damaged 4 1 Replace with a new one 4 2 Bolts nuts are loosen 4 2 Tighten bolts nuts 4 Excessive vibration noise or exh...

Page 36: ...en access to the product The product has been supplied by a general merchandise retailer that may not be familiar with your specific applic ation or your description of the application Be sure to attain third party approval for your application from a qualified specialist before use regardless of prior assurances by the retailer or its representatives This product is not intended for use where fai...

Reviews: