MC4 40V Battery Powered Brush Cutter
E&OE
©2018 Bäumr-AG
14
Attaching Cutting Tools
Do NOT attach or detach cutting tools when the engine is running. • Wear suitable gloves
when handling cutting devices. • Always check that the blades or cutting accessories are
undamaged, safe to use and are properly and securely fastened to the machine. • Ensure that brush cutter
and brush saw blades are installed so that they rotate in the direction of the cutting edges. • Do NOT use
cutting equipment that is cracked, bent, chipped or damaged in any way. Replace damaged parts. • The
toothed cutter and brush saw attachments are not designed to be re-sharpened.
Cutting tools may include the following types. Use the cutter appropriate for the job, type of grass/brush etc:
3-Blade Cutter
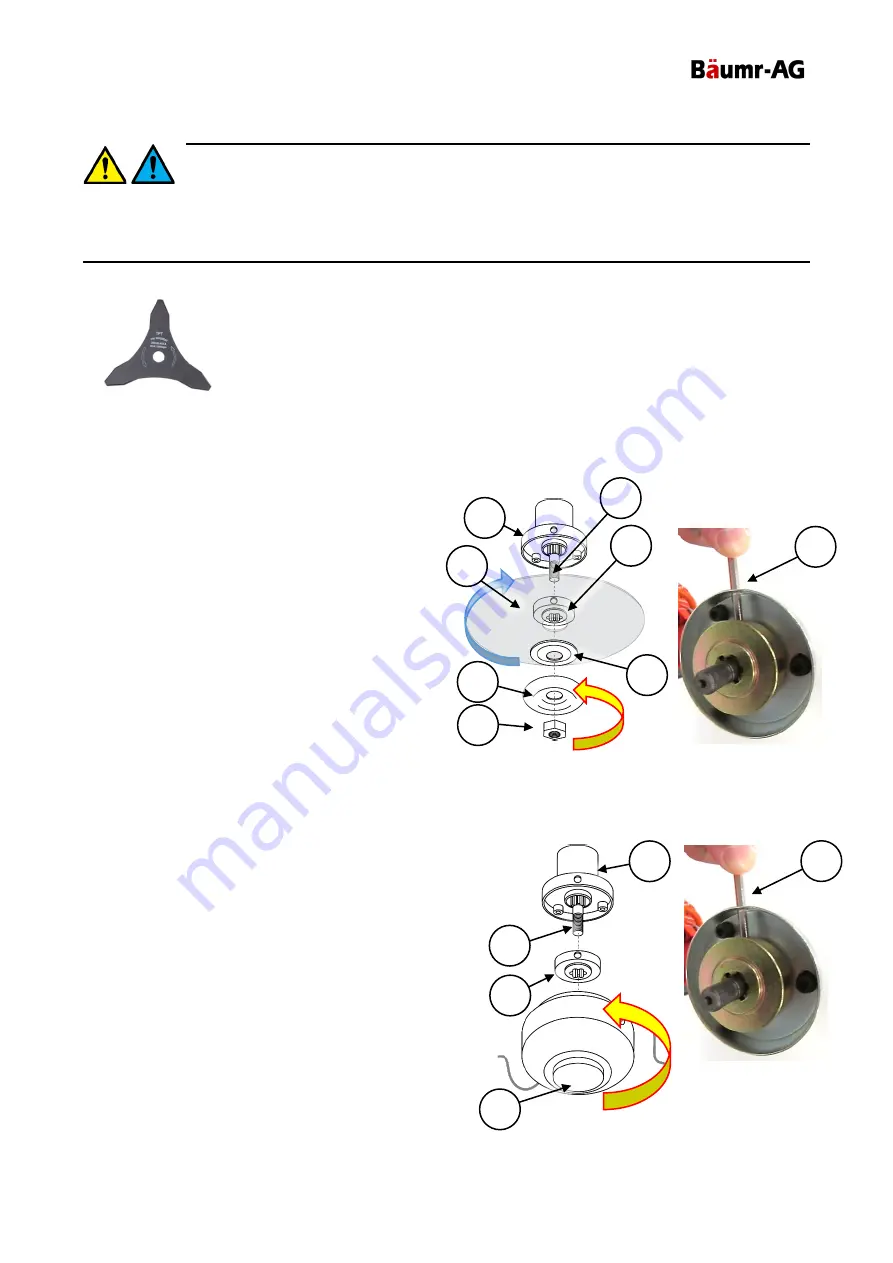
1. Place the drive washer (
A
) on to the drive shaft (
B
) protruding from the attachment head (
C
). Ensure that
the grooves in the washer align with the splines on the drive shaft.
2. Place the attachment on to the drive washer:
For the brush cutter and saw type attachments:
a. Place the cutter attachment (
D
) on to the
drive washer. Ensure that direction of the
cutting teeth or blades faces the direction
shown by the blue arrow. Ensure that the
hole in the centre of the attachment sits
squarely on the raised portion of the drive
washer.
b. Place the flange washer (
E
), then cup washer
(
F
) over the drive shaft, then secure the
assembly with the nut (
G
). The thread on the
drive shaft is "left-hand". This means that you
must rotate the nut to the left (anti-clockwise)
to screw it on as shown by the yellow arrow.
Firmly tighten the nut using the supplied spanner. To prevent the drive shaft from rotating as you
tighten the nut, insert a suitable object (
H
) (Allen key, screwdriver etc) through the hole in the
attachment head and into the hole in the drive washer when tightening – you may need to rotate
the drive washer until the holes are aligned. Remove the object when the nut is secured.
For grass cutting "bump" head:
a. Screw the grass cutting head (
I
) on to the drive
shaft. The thread on the drive shaft is "left-hand".
This means that you must rotate the grass cutting
head to the left (anti-clockwise) to screw it on as
shown by the yellow arrow. Firmly tighten the
grass cutting head by hand. To prevent the drive
shaft from rotating as you tighten the grass cutting
head, insert a suitable object (
H
) (Allen key,
screwdriver etc) through the hole in the
attachment head and into the hole in the drive
washer when tightening – you may need to rotate
the drive washer until the holes are aligned.
Remove the object when the grass cutting head is
secured.
I
H
H
A
D
C
F
G
B
A
B
C
E
BAUMR-AG BAUMR-AG BAUMR-AG BAU
MR-AG BAUMR-AG BAUMR-AG BAUMR-AG BAUMR-AG BAUMR-AG BAUMR-AG BAUMR-AG
BAUMR-AG BAUMR-AG BAUMR-AG BAU
MR-AG BAUMR-AG BAUMR-AG BAUMR-AG BAUMR-AG BAUMR-AG BAUMR-AG BAUMR-AG
BAUMR-AG BAUMR-AG BAUMR-AG BAU
MR-AG BAUMR-AG BAUMR-AG BAUMR-AG BAUMR-AG BAUMR-AG BAUMR-AG BAUMR-AG
BAUMR-AG BAUMR-AG BAUMR-AG BAU
MR-AG BAUMR-AG BAUMR-AG BAUMR-AG BAUMR-AG BAUMR-AG BAUMR-AG BAUMR-AG
BAUMR-AG BAUMR-AG BAUMR-AG BAU
MR-AG BAUMR-AG BAUMR-AG BAUMR-AG BAUMR-AG BAUMR-AG BAUMR-AG BAUMR-AG
BAUMR-AG BAUMR-AG BAUMR-AG BAU
MR-AG BAUMR-AG BAUMR-AG BAUMR-AG BAUMR-AG BAUMR-AG BAUMR-AG BAUMR-AG
BAUMR-AG BAUMR-AG BAUMR-AG BAU
MR-AG BAUMR-AG BAUMR-AG BAUMR-AG BAUMR-AG BAUMR-AG BAUMR-AG BAUMR-AG
BAUMR-AG BAUMR-AG BAUMR-AG BAU
MR-AG BAUMR-AG BAUMR-AG BAUMR-AG BAUMR-AG BAUMR-AG BAUMR-AG BAUMR-AG
BAUMR-AG BAUMR-AG BAUMR-AG BAU
MR-AG BAUMR-AG BAUMR-AG BAUMR-AG BAUMR-AG BAUMR-AG BAUMR-AG BAUMR-AG
BAUMR-AG BAUMR-AG BAUMR-AG BAU
MR-AG BAUMR-AG BAUMR-AG BAUMR-AG BAUMR-AG BAUMR-AG BAUMR-AG BAUMR-AG
BAUMR-AG BAUMR-AG BAUMR-AG BAU
MR-AG BAUMR-AG BAUMR-AG BAUMR-AG BAUMR-AG BAUMR-AG BAUMR-AG BAUMR-AG
BAUMR-AG BAUMR-AG BAUMR-AG BAU
MR-AG BAUMR-AG BAUMR-AG BAUMR-AG BAUMR-AG BAUMR-AG BAUMR-AG BAUMR-AG
BAUMR-AG BAUMR-AG BAUMR-AG BAU
MR-AG BAUMR-AG BAUMR-AG BAUMR-AG BAUMR-AG BAUMR-AG BAUMR-AG BAUMR-AG
BAUMR-AG BAUMR-AG BAUMR-AG BAU
MR-AG BAUMR-AG BAUMR-AG BAUMR-AG BAUMR-AG BAUMR-AG BAUMR-AG BAUMR-AG
BAUMR-AG BAUMR-AG BAUMR-AG BAU
MR-AG BAUMR-AG BAUMR-AG BAUMR-AG BAUMR-AG BAUMR-AG BAUMR-AG BAUMR-AG
BAUMR-AG BAUMR-AG BAUMR-AG BAU
MR-AG BAUMR-AG BAUMR-AG BAUMR-AG BAUMR-AG BAUMR-AG BAUMR-AG BAUMR-AG
BAUMR-AG BAUMR-AG BAUMR-AG BAU
MR-AG BAUMR-AG BAUMR-AG BAUMR-AG BAUMR-AG BAUMR-AG BAUMR-AG BAUMR-AG
BAUMR-AG BAUMR-AG BAUMR-AG BAU
MR-AG BAUMR-AG BAUMR-AG BAUMR-AG BAUMR-AG BAUMR-AG BAUMR-AG BAUMR-AG
BAUMR-AG BAUMR-AG BAUMR-AG BAU
MR-AG BAUMR-AG BAUMR-AG BAUMR-AG BAUMR-AG BAUMR-AG BAUMR-AG BAUMR-AG
BAUMR-AG BAUMR-AG BAUMR-AG BAU
MR-AG BAUMR-AG BAUMR-AG BAUMR-AG BAUMR-AG BAUMR-AG BAUMR-AG BAUMR-AG
BAUMR-AG BAUMR-AG BAUMR-AG BAU
MR-AG BAUMR-AG BAUMR-AG BAUMR-AG BAUMR-AG BAUMR-AG BAUMR-AG BAUMR-AG
BAUMR-AG BAUMR-AG BAUMR-AG BAU
MR-AG BAUMR-AG BAUMR-AG BAUMR-AG BAUMR-AG BAUMR-AG BAUMR-AG BAUMR-AG
BAUMR-AG BAUMR-AG BAUMR-AG BAU
MR-AG BAUMR-AG BAUMR-AG BAUMR-AG BAUMR-AG BAUMR-AG BAUMR-AG BAUMR-AG
BAUMR-AG BAUMR-AG BAUMR-AG BAU
MR-AG BAUMR-AG BAUMR-AG BAUMR-AG BAUMR-AG BAUMR-AG BAUMR-AG BAUMR-AG
BAUMR-AG BAUMR-AG BAUMR-AG BAU
MR-AG BAUMR-AG BAUMR-AG BAUMR-AG BAUMR-AG BAUMR-AG BAUMR-AG BAUMR-AG
BAUMR-AG BAUMR-AG BAUMR-AG BAU
MR-AG BAUMR-AG BAUMR-AG BAUMR-AG BAUMR-AG BAUMR-AG BAUMR-AG BAUMR-AG
BAUMR-AG BAUMR-AG BAUMR-AG BAU
MR-AG BAUMR-AG BAUMR-AG BAUMR-AG BAUMR-AG BAUMR-AG BAUMR-AG BAUMR-AG
BAUMR-AG BAUMR-AG BAUMR-AG BAU
MR-AG BAUMR-AG BAUMR-AG BAUMR-AG BAUMR-AG BAUMR-AG BAUMR-AG BAUMR-AG
BAUMR-AG BAUMR-AG BAUMR-AG BAU
MR-AG BAUMR-AG BAUMR-AG BAUMR-AG BAUMR-AG BAUMR-AG BAUMR-AG BAUMR-AG
BAUMR-AG BAUMR-AG BAUMR-AG BAU
MR-AG BAUMR-AG BAUMR-AG BAUMR-AG BAUMR-AG BAUMR-AG BAUMR-AG BAUMR-AG
BAUMR-AG BAUMR-AG BAUMR-AG BAU
MR-AG BAUMR-AG BAUMR-AG BAUMR-AG BAUMR-AG BAUMR-AG BAUMR-AG BAUMR-AG
BAUMR-AG BAUMR-AG BAUMR-AG BAU
MR-AG BAUMR-AG BAUMR-AG BAUMR-AG BAUMR-AG BAUMR-AG BAUMR-AG BAUMR-AG
BAUMR-AG BAUMR-AG BAUMR-AG BAU
MR-AG BAUMR-AG BAUMR-AG BAUMR-AG BAUMR-AG BAUMR-AG BAUMR-AG BAUMR-AG
BAUMR-AG BAUMR-AG BAUMR-AG BAU
MR-AG BAUMR-AG BAUMR-AG BAUMR-AG BAUMR-AG BAUMR-AG BAUMR-AG BAUMR-AG

