background image

Installation

Instruction handbook 

Control system


PCC-04

Document No.: 5.16002.03 

33

of 80

7

7.1.2

BoxPC Special (width 78 mm)

7.1.3

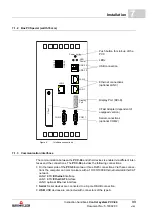
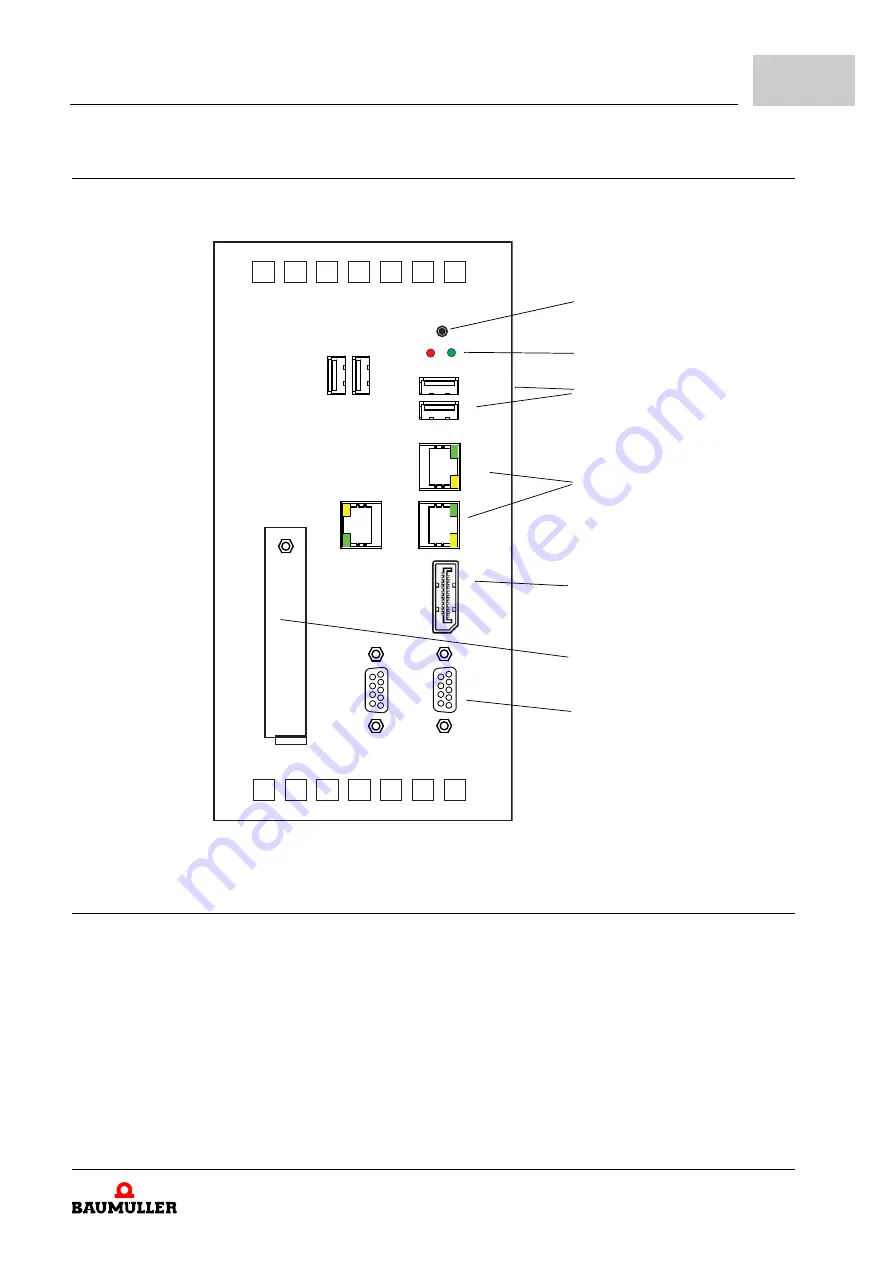
Communication interfaces

The communication between the 

PCC-04

 and other devices is enabled via different inter-

faces and the connections. The 

PCC-04

 provides the following connections: 

n

On the lower side of the 

PCC-04

 are two or three RJ45 connections. Via these connec-

tions the computer can communicate with a 10/100/1000 Ethernet network/EtherCAT 
network. 

LAN2: ETH: 

Ethernet

 interface 

LAN1: ETH: 

EtherCAT

 interface 

LAN3: optional Ethernet interface

n

Serial

: Serial devices are connected to a 9-pole D-SUB connection. 

n

USB

: USB devices are connected with connectors of the type A. 

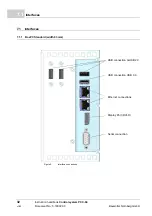
Figure 6:

Interface connections

Push button for start-up of the 
PCC

LEDs

USB connection

Ethernet connections
(optional LAN 3)

Display Port (DVI-D)

CFast Adapter (dependent of 
equipped version)

Serial connections
(optional COM 2)

4

8

7

6

1

3

2

9

5

4

8

7

6

1

3

2

9

5

Power button

LED
Power

USB 2.0

USB

2.0

USB

2.0

CFast

USB 3.0

LAN 2

LAN 1

COM 1

COM 2

Display
Port

LAN 3

Summary of Contents for PCC-04

Page 1: ...Instruction handbook Read the Instruction handbook before starting any work Language English Translation Document No 5 16002 03 Part No 462901 Status Nov 22 2018 Control system PCC 04 E 5 16002 03 ...

Page 2: ... comments so that we can take them into account and include them when transitioning from the preliminary information to the final information as reviewed by Baumüller The conditions stipulated in the following section under Obligatory are invalid in case of pre liminary information Obligatory This Instruction handbook are a part of the equipment machine This Instruction handbook must be available ...

Page 3: ...ibility of the operating company 12 2 5 Protective equipment 13 2 6 Training of the personnel 13 2 7 Fire fighting 14 2 8 Safety equipment 14 2 9 Behavior in hazardous situations or at accidents 14 2 10 Signs and labels 15 3 Technical Data 17 3 1 Dimensions Weight 17 3 2 Operating conditions 17 3 2 1 Power supply requirements 17 3 2 2 Required environmental conditions 18 3 3 Electrical data 18 3 4...

Page 4: ...t 52 8 3 6 Touchkit eGalaxTouch icon 52 8 4 Intel Graphics Control Panel user interface 55 8 4 1 User interface 55 8 4 2 Single Display configuration 56 8 4 3 Adjusting 3D operation 58 8 4 4 Configuration video overlay 59 8 4 5 Profiles 60 8 4 6 Hot Keys 61 9 Maintenance 63 9 1 PCC 04 components 64 9 1 1 BoxPC Standard width 93 mm 64 9 1 2 BoxPC Special width 78 mm 65 9 1 3 Real time clock battery...

Page 5: ...fied safety notes and procedural in structions Additionally the valid accident prevention regulations and general safety regulations ap plicable to the scope of application the device must be complied with Read this Instruction handbook particularly the safety notes chapter completely before beginning any work on the device This Instruction handbook is part of the product and must be kept accessib...

Page 6: ...er to prevent accidents personal injury and material damage Recommen dations DANGER this indicates a hazardous situation which if not avoided will result in death or se rious injury WARNING this indicates a hazardous situation which if not avoided could result in death or serious injury CAUTION this indicates a hazardous situation which if not avoided could result in minor or moderate injury NOTIC...

Page 7: ...ons referring to the dimensioning and protection of conductors grounding disconnectors overcurrent protection etc The person who carried out the mounting or installation is liable for any damage which incurred when assembling or connecting the device 1 4 Copyright protection EnDat is a registered trademark of Dr Johannes Heidenhain GmbH 83301 Traunreut Germany EtherCAT is a registered trademark of...

Page 8: ...See also ZDisposal on page 71 1 8 Guarantee provisions The guarantee provisions are stated in a separate document of the sales documents The devices described herein may only be operated in accordance with the stipulated methods procedures and conditions Anything else not presented here including the op eration of devices in mounted positions is not permitted and must be cleared with the plant on ...

Page 9: ...responsible contact persons is available at all times via telephone fax mail or the Internet 1 10 Terms used The term device is also used in this documentation for this Baumüller product Control system PCC 04 1 11 List of associated documentations Doc No Part No German Part No English Application handbook Control system PCC 04 5 16008 462103 462104 Application handbook EtherCAT 5 10030 440084 ...

Page 10: ...List of associated documentations Instruction handbook Control system PCC 04 Document No 5 16002 03 Baumüller Nürnberg GmbH 10 of 80 1 11 ...

Page 11: ...ho is tasked with performing work on or with the device must have read and understood the Instruction handbook before working with the device This also ap plies if the person involved with this kind of device or a similar one or has been trained by the manufacturer 2 2 Changes and modifications to the device In order to prevent hazards and to ensure optimum performance no changes additions or modi...

Page 12: ...ons in the use area of the device These must then be implemented in the form of operating instruction for operation of the device m This Instruction handbook must be kept accessible to personnel working with the de vice at all times in the immediate vicinity of the device m The specifications of the Instruction handbook must be adhered to completely and without exception m The device may only be o...

Page 13: ...training may only be performed by qualified personnel m Qualified personnel n Electrical engineers authorized by Baumüller Nürnberg GmbH and qualified electri cians of the customer or a third party who have learned to install and maintain Baumüller drive systems and are authorized to ground and identify electrical power circuits and devices in accordance with the safety engineering standards of th...

Page 14: ...measures m Evacuate persons from the danger zone m Notify the responsible persons of the site m Alarm medical personnel and or the fire department m Keep access routes clear for rescue vehicles DANGER Risk of fatal injury from electrical current There is a risk of electric shock if an electrically conductive fire extinguishing agent is used Therefore m Use the following fire extinguishing agent AB...

Page 15: ...fixed WARNING Risk of injury due to illegible symbols Over the course of time stickers and symbols on the device can become dirty or oth erwise unrecognizable Therefore m Maintain all safety warning and operating labels on the device in easily readable condition Electrical voltage Only qualified personnel may work in work areas that identified with this Unauthorized persons may not touch working m...

Page 16: ...Signs and labels Instruction handbook Control system PCC 04 Document No 5 16002 03 Baumüller Nürnberg GmbH 16 of 80 2 10 ...

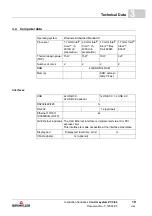
Page 17: ...order to make the required cut outs use the drawings in ZMounting from page 27 3 2 Operating conditions 3 2 1 Power supply requirements A power supply of 24 VDC is required for the PCC 04 This may be either a standard pow er supply or an uninterruptible DC power supply In the following table the presumable current ratings for different configurations are listed Processor Rated output current of po...

Page 18: ...0 2230 10 Operation climatic class EN 60721 3 3 3K2 Humidity operation EN 60721 3 3 relative humidity 5 to 95 no condensation Shock test according to IEC 60068 2 27 15g 11 ms pulse and 25g 6 ms pulse Resistance to vibration EN 60068 2 6 Frequency range 1 2 9 Hz Amplitude 3 5 mm Frequency range 2 9 200 Hz Acceleration 1 0g 3 3 Electrical data Rated voltage supply 24 VDC Voltage supply range 18 36 V...

Page 19: ...l Atom E3827 Thermal design power TDP 15 W 15 W 10 W 8 W Number of cores 2 2 4 2 RAM 4 GB DDR3L RAM Memory SSD extensi bility CFast Interfaces USB 2x USB 3 0 2x USB 2 0 optional 1x USB 3 0 3x USB 2 0 RS232 422 485 1x RS 232 1x optional Ethernet 10 100 1000 MBit s RJ45 2x 3rd Ethernet optional The third Ethernet interface is implemented via a mini PCI express card This Interface is made accessible ...

Page 20: ...Computer data Instruction handbook Control system PCC 04 Document No 5 16002 03 Baumüller Nürnberg GmbH 20 of 80 3 4 ...

Page 21: ...ctions and 2 USB 2 0 connections optional at Intel Core proces sors n 1 RS232 422 485 interface RS232 9 pole D SUB connector n 1 COM connection RS 232 9 pole D SUB connector optional n Two integrated 10 100 1000 Ethernet connections with independent MAC addresses n 1 additional Ethernet connection via a Mini PCI Express card optional n LEDs for the current supply PWR and Hard Disk access HDD n DVI...

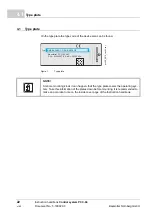
Page 22: ...ade in Germany Baumüller PCC 04 A4C S Nr S12345678 Art Nr 00123456 BMP 04 0000 CC 2 S5 00 12C0 Typ On the type plate the type code of the device also can be found Figure 1 Type plate NOTE At some mounting kinds it can happen that the type plate covers the operating sys tem Take this information of the plates down before mounting It is recommended to make an accordant note on the inside cover page ...

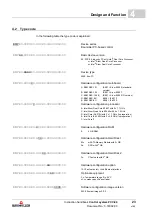
Page 23: ...908 i5 4300 BMP XX XXXX XX X XX XX XXXX XXXX XX Hardware configuration processor B Intel Atom Dual Core E3827 with 2 x 1 7 GHz C Intel Atom Quad Core E3845 with 4 x 1 9 GHz D Intel Core i3 4010U with 2 x 1 7 GHz in preparation E Intel Core i5 4300U with 2 x 2 9 GHz in preparation F Intel Core i7 BMP XX XXXX XX X XX XX XXXX XXXX XX Hardware configuration RAM 2 4 GB RAM BMP XX XXXX XX X XX XX XXXX X...

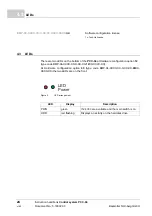
Page 24: ...MP 04 XXXX XX X XX XX 12XX XXXX XX At Hardware configuration option 00 type code BMP 04 XXXX XX X XX XX 00XX XXXX XX the two LEDs are on the front Figure 2 LED arrangement LED Display Description PWR green If 24 VDC are available and the main switch is on HDD red flashing Displays an activity on the hard disk drive BMP XX XXXX XX X XX XX XXXX XXXX XX Software configuration license 1x Tech Lib lice...

Page 25: ...lass 2 K 3 as per EN 60721 3 2 m Temperature range 25 C up to 70 C m Vibration shock continuous shock class 2M1 as per EN 60721 3 2 NOTICE Damage due to unauthorized transport Transport handled by untrained personnel can lead to a substantial amount of mate rial damage m The unloading of the packages upon delivery as well as the in house transport should only be done by trained personnel m Contact...

Page 26: ...ble representative of Baumüller Nürnberg GmbH 5 3 Unpacking After having received the packaged device h Avoid forceful transport agitation and hard jolts e g when putting an item down If no transport damage is visible h Open the packaging of the device h Verify the delivery scope based on the delivery note File a claim with the responsible Baumüller representative if the delivery is incomplete 5 4...

Page 27: ...OTE Mounting shall only be performed by employees of the manufacturer or by other qual ified personnel WARNING Danger as a result of mechanical effects Secure devices against falling down Therefore m Use appropriate means of transport NOTICE Danger due to electrostatic discharge The connecting terminals of the device are partially at risk due from ESD Therefore m Please heed the respective notes ...

Page 28: ...space all round the heatsink on the rear of the PCC 04 must be adequate and the air inlets as well as the air outlets must provide adequate cooling CAUTION Eye injury due to flung particles Metal particles are flung when making the drill holes and the cutout sections Therefore Wear safety goggles NOTICE PCC 04 must be installed with an adequate space around the heatsink so that the environmental t...

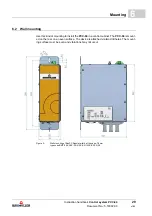
Page 29: ...mounting to install the PCC 04 in a control cabinet The PCC 04 is mount ed on the rear on an even surface The device is attached via two drill holes The mount ing surface must be even and vibrations may not occur Figure 3 Wall mounting of BoxPC Special width of the case 78 mm type code BMP 04 XXXX XX X XX XX 12XX XXXX XX ...

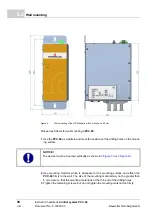
Page 30: ...the positions of the drilling holes on the mount ing surface 2 Use mounting material which is adequate for the mounting surface and attach the PCC 04 firmly to the wall The size of the mounting material may not be greater than 5 mm Assure that the mounting material is at the thin end of the drilling holes 3 Tighten the fastening screws but do not tighten the mounting material too firmly NOTICE The...

Page 31: ...fter mounting the PCC 04 the required cable connection must be made The cables are connected on the top side voltage supply and on the lower side interfaces of the PCC 04 Safety notes NOTE The installation may be performed by employees of the manufacturer or by other qualified personnel only ...

Page 32: ...CC 04 Document No 5 16002 03 Baumüller Nürnberg GmbH 32 of 80 7 1 7 1 Interfaces 7 1 1 BoxPC Standard width 93 mm Figure 5 Interface connections USB connection 3xUSB 2 0 USB connection USB 3 0 Ethernet connections Display Port DVI D Serial connection ...

Page 33: ... with a 10 100 1000 Ethernet network EtherCAT network LAN2 ETH Ethernet interface LAN1 ETH EtherCAT interface LAN3 optional Ethernet interface n Serial Serial devices are connected to a 9 pole D SUB connection n USB USB devices are connected with connectors of the type A Figure 6 Interface connections Push button for start up of the PCC LEDs USB connection Ethernet connections optional LAN 3 Displ...

Page 34: ...igure 6 on page 33 By using a suitable adapt er the DVI D connection can be adapted as well The types with Intel Core processors type key BMP 04 XXXX D and BMP 04 XXXX E are provided with a DVI D connection in preparation An EDID display extended display identification data transfers its performance features to the device driver which isn t the case at other devices In each case other settings can...

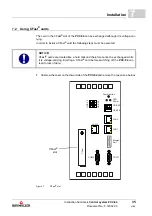
Page 35: ...ust be executed 1 Unscrew the cover on the lower side of the PCC 04 and remove the cover see below CFast slot 4 8 7 6 1 3 2 9 5 4 8 7 6 1 3 2 9 5 Power button LED Power USB 2 0 USB 2 0 USB 2 0 CFast USB 3 0 LAN 2 LAN 1 COM 1 COM 2 Display Port LAN 3 Figure 7 CFast slot NOTICE CFast cards are treated like a hard disk and therefore cannot be exchanged while it is voltage carrying Ejecting a CFast ca...

Page 36: ...nto the slot The card must be plugged in such a way so that the lip seal points towards the plug Plug the card in a straight line into the slot until it was correctly located 3 Then the cover can be remounted and screwed together again To remove a card from slot use a small pointed pliers and carefully pull the card straightly out of the slot ...

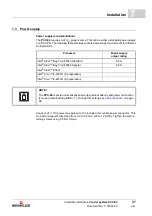
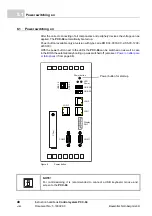
Page 37: ... below to the included removable power connector This connector supports wire sizes from 0 2 to 2 5 mm 24 to 12 AWG Tighten the wire re taining screws using 0 5 Nm torque Processor Power supply output rating Intel Atom Bay Trail E3845 Standard 5 8 A Intel Atom Bay Trail E3845 Special 5 8 A Intel Atom E3827 Intel Core i5 4300U in preparation Intel Core i3 4010U in preparation NOTE The PCC 04 is set...

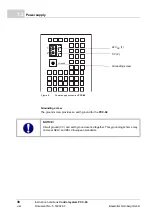
Page 38: ...mbH 38 of 80 7 3 Grounding screw The ground screw provides an earth ground for the PCC 04 Figure 8 Power supply connection PCC 04 24 VDC 1 0 V 2 Grounding screw Ground 1 2 NOTICE Circuit ground 0 V and earth ground are tied together This grounding scheme may not meet SELV and PELV European standards ...

Page 39: ...starting work assure that all covers and safety equipment is installed and operate properly m The control cabinet where the device was placed shall protect against touching of the conductive parts Keep all doors of the control cabinet shut during operation NOTICE The environmental conditions do not comply with the requirements Unspecified environmental conditions can cause material damage Therefor...

Page 40: ...code BMP 04 0000 CC 2 S5 00 12C0 2230 00 With the power button next to the LEDs the PCC 04 can be switched on as well in case in the BIOS the automatically booting up was switched off also see ZPower on after pow er fail options from page 66 Figure 9 Power button 4 8 7 6 1 3 2 9 5 4 8 7 6 1 3 2 9 5 Power button LED Power USB 2 0 USB 2 0 USB 2 0 CFast USB 3 0 LAN 2 LAN 1 COM 1 COM 2 Display Port LA...

Page 41: ...dates It s possible that from time to time updates of firmware and software are provided in the PCC 04 products From time to time Baumüller Nürnberg GmbH may make updates available for the firm ware and software utilities Automatically updates are switched off and may not made by the user 8 2 3 Start screen The PCC 04 boots after switching on the 24 VDC power supply First of all the BIOS is displa...

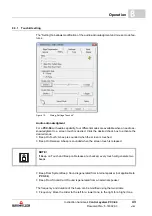
Page 42: ... and audio touch acknowledgment 1 To start Touchkit utility do one of the following n Double click the eGalaxTouch icon see ZTouchkit eGalaxTouch icon on page 52 n Click the Start key navigate to the All Programs eGalaxTouch folder and then click the Configure Utility icon 2 The dialog Touchkit USB Controller general is opened All installed Touchscreen controller are displayed 3 If multiple contro...

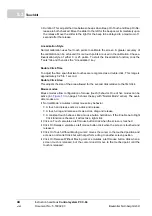
Page 43: ...he desired check box to activate the desired mode n Beep On Touch A beep is sounded when the screen is touched n Beep On Release A beep is sounded when the screen touch is released n Beep From System Beep Sound is generated from internal speaker not applicable to PCC 04 n Beep From Sound Card Sound is generated from an external speaker The frequency and duration of the beep can be modified using t...

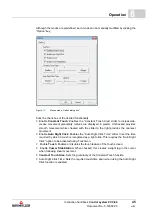
Page 44: ...usts the size of the area allowed for the second click relative to the first click Mouse modes Mouse modes allow configuration of mouse touch behavior One of five modes can be active in ZFigure 11 on page 45 shows the key with Normal Mode active The avail able modes are m Normal Mode emulates normal mouse key behavior n A touch and release acts as a click and release n A touch drag and release act...

Page 45: ...checked with the slider to the right provides the coarsest movement n Enable Auto Right Click Enables the Auto Right Click Time slider to set the time required by which a touch is recognized as a right click This requires the Auto Right Click option to be activated using Touchmon n Enable Touch Enables or disables the touch feature of the touch screen n Enable Cursor Stabilization When checked thi...

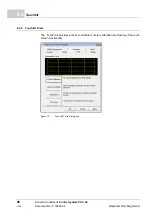
Page 46: ...system PCC 04 Document No 5 16002 03 Baumüller Nürnberg GmbH 46 of 80 8 3 8 3 2 Touchkit Tools The Tools tab provides access to multiple tools for calibration and testing of the touch screen functionality Figure 12 Touchkit Tools dialog box ...

Page 47: ...and Calibrate Click the Clear and Calibrate key to erase a linearization This also starts the 4 Points Calibration utility Always use this key if changing from a linearization to a calibration to ensure the linearization doesn t effect the calibration Linearization Linearization is another method of calibrating a touch screen It functions the same way as the 4 Points Calibration but uses more touc...

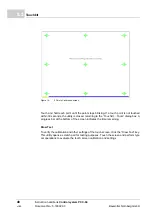
Page 48: ...is not touched within 30 seconds the utility is closed returning to the Touchkit Tools dialog box A progress bar at the bottom of the screen indicates the time remaining Draw Test To verify the calibration and other settings of the touch screen click the Draw Test key This utility opens a scratch pad for testing purposes Touch the screen and perform typi cal operations to evaluate the touch screen...

Page 49: ...9 of 80 8 Figure 15 Draw Test screen 8 3 3 Touchkit Edge Compensation The Edge Compensation tab sets the cursor overshoot and undershoot touch points along the edge of the screen This helps to compensate for the difficulty sometimes ex perienced in touching the edge of a screen ...

Page 50: ... box Individual adjustment can be made along each edge on a percentage basis 100 is at the edge of the screen 50 is approximately 0 5 in before an edge on the screen and 200 past an edge where the cursor is not visible In addition the cursor display position can be shifted along either the X or Y axis displayed by pixel Figure 17 Example Edge compensation ...

Page 51: ...click the 10 key Each successive click brings the edge in 10 To adjust all edges outward click the 10 key The relative position of each edge is shown on the sliders above To return all sliders to 100 click the De fault key 8 3 4 Touchkit Hardware The Hardware tab displays controller and firmware information about the touch screen This information may be required if problems occur Figure 18 Touchki...

Page 52: ...e from 0 to 2550 µs Click the Reset key to return the sensitivity and delay time values to the fac tory defaults 8 3 5 Touchkit About The About tab displays information concerning the touch screen driver 8 3 6 Touchkit eGalaxTouch icon Touchkit tools are also available as menu options from the notification area system tray icon n In Windows XP right click the Touchkit icon n In WIndows 7 right cli...

Page 53: ...ouchkit menu functions NOTE Multiple methods are available to emulate a right mouse click Menu Function Apply to Touchscreen Selects the touchscreen controller The PCC 04 uses a controller called USB Controller Mouse Mode Selects the mouse mode see ZMouse modes on page 44 Beep Selects the Beep mode see ZAudio acknowledgment on page 43 Auto Right Click When checked touch the screen for an extended ...

Page 54: ...ation Utility Opens the Touchkit USB Controller Tools dialog box see ZTouchkit Tools on page 46 Support Rotation When checked the touch screen orientation is corrected to match the display orientation Note that this must be active for the Auto Right Click function to work Exit Closes the Touchkit utility Menu Function ...

Page 55: ...multiple displays 8 4 1 User interface To access the video driver controls m right click the desktop move the pointer over Graphics Options and navigate to the desired option This provides a quick path to the required setting Figure 21 Graphic Media Accelerator direct select options m Click on the symbol Intel video driver in the information range system tray and then on the menu item Graphics Pro...

Page 56: ...splay settings The screen of the user interface can be divided into an upper and a lower range In the upper range the configuration possibilities are to be found The configurations can be saved as profiles The profiles can be called up again if they are required later Within the lower range are some additional tools as well as the buttons Save Profile Cancel and Apply NOTE A context sensitive help...

Page 57: ... the turning and the scaling of the screen is set Transit the parameterization via the Apply button to the selected display Color setting Click on the right side on the register card Color to receive setting options referring to the color brightness and contrast Figure 24 Color correction Accept the parameterization via the Apply button for the selected display ...

Page 58: ...Panel user interface Instruction handbook Control system PCC 04 Document No 5 16002 03 Baumüller Nürnberg GmbH 58 of 80 8 4 8 4 3 Adjusting 3D operation Click on the 3D button to configure the 3D settings Figure 25 Dialog 3D ...

Page 59: ... 5 16002 03 59 of 80 8 8 4 4 Configuration video overlay Click on the Video button to open the Video dialog Figure 26 Dialog Video Using the settings referring to the video overlay within an independent pop up window changes on a running video reporting can be made ...

Page 60: ... of a display is saved as profile 1 Carry out the relevant configuration settings 2 Enter a name in the field Current Settings 3 Click on the Save Profiles button to save the profile In the following is explained how to call up a saved scheme m Click on the symbol in the information range system tray in the task bar and then click on the menu point Select Profile m Go to the right mouse button on ...

Page 61: ...n Figure 28 Modification of hot key shortcuts 2 Set Manage Hot Keys menu option to Enable 3 Scroll down in the list till to the required action Write down the button combination of the hot key of the selected action 4 In order to change the button combination of the hot key in the accordant point enter the new button combination 5 Click on Apply button to save the new hot key combination in the cu...

Page 62: ...Intel Graphics Control Panel user interface Instruction handbook Control system PCC 04 Document No 5 16002 03 Baumüller Nürnberg GmbH 62 of 80 8 4 ...

Page 63: ... Improper maintenance can result to serious personal injury and property damage Therefore m Before starting ensure that there is sufficient room to carry out the work m Pay attention to order and cleanliness at the installation site Components that are loosely stacked or lying around can cause accidents NOTE To access components it may be necessary to remove cables connected to the PCC 04 ...

Page 64: ...C 04 Document No 5 16002 03 Baumüller Nürnberg GmbH 64 of 80 9 1 9 1 PCC 04 components 9 1 1 BoxPC Standard width 93 mm Figure 29 Interface connections USB connection 3xUSB 2 0 USB connection USB 3 0 Ethernet connections Display Port DVI D Serial connection ...

Page 65: ...ery usually is approx imately 10 plus minus 3 years In order to replace the battery the PCC 04 must be sent back to company Baumüller 9 1 4 Hard disk drive The hard disk drive was permanently fixed over the power supply unit in the housing If the hard disk drive is defect the PCC 04 must be send back to the company Baumüller in order to get replaced CFast slot Power button Status LEDs 4 USB connec...

Page 66: ...carry out a restart As soon as the first black screen with white text appears press the button Remove every second to start the BIOS setup program Aptio Setup Utility 2 Select Advanced 3 Select iSmart controller 4 Select Power On after Power failure 5 Select an option n Disabled This way the PCC 04 remains turned off The PCC 04 boots up not until the power button was pressed available only at vers...

Page 67: ...rt WARNING Risk of injury due to improper troubleshooting Therefore m Only qualified personnel may work on this device m The personnel working on the Industry PC must be familiar operating the device and of the safety instructions The user must know how to react on error displays and error states The user must have special knowledge of error displays reactions and of the error states ...

Page 68: ...Instruction handbook Control system PCC 04 Document No 5 16002 03 Baumüller Nürnberg GmbH 68 of 80 ...

Page 69: ...s the accessories and spare parts for the PCC 04 Our Product Manage ment is looking forward to inquiries and suggestions concerning spare parts 11 1 Video adapter DisplayPort to DVI D Delock Adapter Displayport 1 2 male connector DVI female connector 4K active black Art no 00463673 11 2 Cable strain relief Art no 00463672 ...

Page 70: ...Cable strain relief Instruction handbook Control system PCC 04 Document No 5 16002 03 Baumüller Nürnberg GmbH 70 of 80 11 2 ...

Page 71: ...liance with the health and safety regulations m Take heed of any special local regulations If you are unable to directly ensure safe disposal yourself commission a suitable disposal contractor m In the event of a fire hazardous substances could possibly be generated or re leased m Do not expose electronic components to high temperatures m Beryllium oxide is used as inner insulation for example for...

Page 72: ...your com pany as well as with all national regulations of the responsible disposal facilities and au thorities In case of doubt consult the bureau of commerce or environmental protection authority responsible for your company WARNING Danger as a result of faulty deinstallation The deinstallation and disposal requires qualified personnel with adequate experi ence Therefore m Only allow deinstallati...

Page 73: ...73 of 80 Instruction handbook Control system PCC 04 Document No 5 16002 03 APPENDIX A DECLARATION OF CONFORMITY ...

Page 74: ...y notes of the referring instruction handbook must be com plied with to guarantee the compliance to the guidelines Nürnberg 21 06 2016 Place Date The content of the Declaration of Conformity is subject to change The current version can be obtained on request Standard Title EN 55022 2011 12 Information technology equipment Radio disturbance characteristics Limits and methods of mea surement EN 5502...

Page 75: ...g Settings Touchkit 43 Mouse mode Option dialog box 45 Touchkit Tools dialog box 46 4 Points Calibration screen 47 9 Points Calibration screen 48 Draw Test screen 49 Touchkit Edge Compensation dialog box 50 Example Edge compensation 50 Touchkit Hardware dialog box 51 MERCURY Hardware Configuration dialog box 52 Touchkit menu 53 Graphic Media Accelerator direct select options 55 Graphics Control Pa...

Page 76: ...Instruction handbook Control system PCC 04 Document No 5 16002 03 Baumüller Nürnberg GmbH 76 of 80 Table of Figures ...

Page 77: ... L Limitation of liability 7 M Maintenance 63 Memory 19 MERCURY 52 Modifications 11 Mounting 28 N Note 6 O Operating conditions 17 Operating personnel 13 Operating system 19 Operation 39 P Packaging disposal of 26 Personnel qualified 13 Personnel training 13 Power supply 17 37 Power switch 40 Protective equipment 13 R RAM 19 Repair 66 Required environmental conditions 18 S Safety equipment 14 Sign...

Page 78: ...Instruction handbook Control system PCC 04 Document No 5 16002 03 Baumüller Nürnberg GmbH 78 of 80 Index ...

Page 79: ...nt No 5 16002 03 79 of 80 Revision survey Revision survey Version Status Changings 5 16002 01 22 07 2016 First release 5 16002 02 10 07 2017 Hardware version with wider box processors changed 5 16002 03 22 11 2018 Type code changed Ch 8 3 Touchkit mew ...

Page 80: ...Instruction handbook Control system PCC 04 Document No 5 16002 03 Baumüller Nürnberg GmbH 80 of 80 Notes ...

Page 81: ......
Page 82: ...erungsdienst aktualisiert Bitte beachten Sie dass Angaben Zahlen Informationen aktuelle Werte zum Druckdatum sind Zur Ausmessung Berechnung und Kalkulationen sind diese Angaben nicht rechtlich verbindlich Bevor Sie in dieser Betriebsanleitung aufgeführte Informationen zur Grundlage eigener Berechnungen und oder Verwendungen machen informieren Sie sich bitte ob Sie den aktuellsten Stand der Informa...

Reviews: