background image

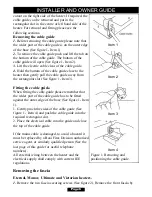
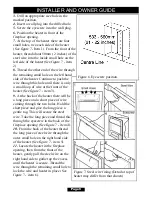
positioned away from the fire (See figure 13). 

4.

Position the supply cable in the spacer frame slot 

5.

Slide the nylon grommet along the supply cable towards the heater. When the

grommet reaches the slot, push it into the slot up to its flange (See figure 13).
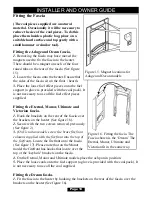
Fitting the heater.

1.

Locate the spacer frame and heater over the screw heads ensuring a tight fit. If the fit

is loose, remove the spacer frame and heater from the wall. Tighten the wall screws
slightly and reposition the spacer frame and heater.

Setting the position of the light bulb shroud.

What is the light bulb shroud?

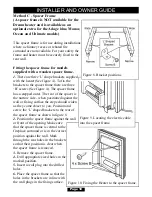
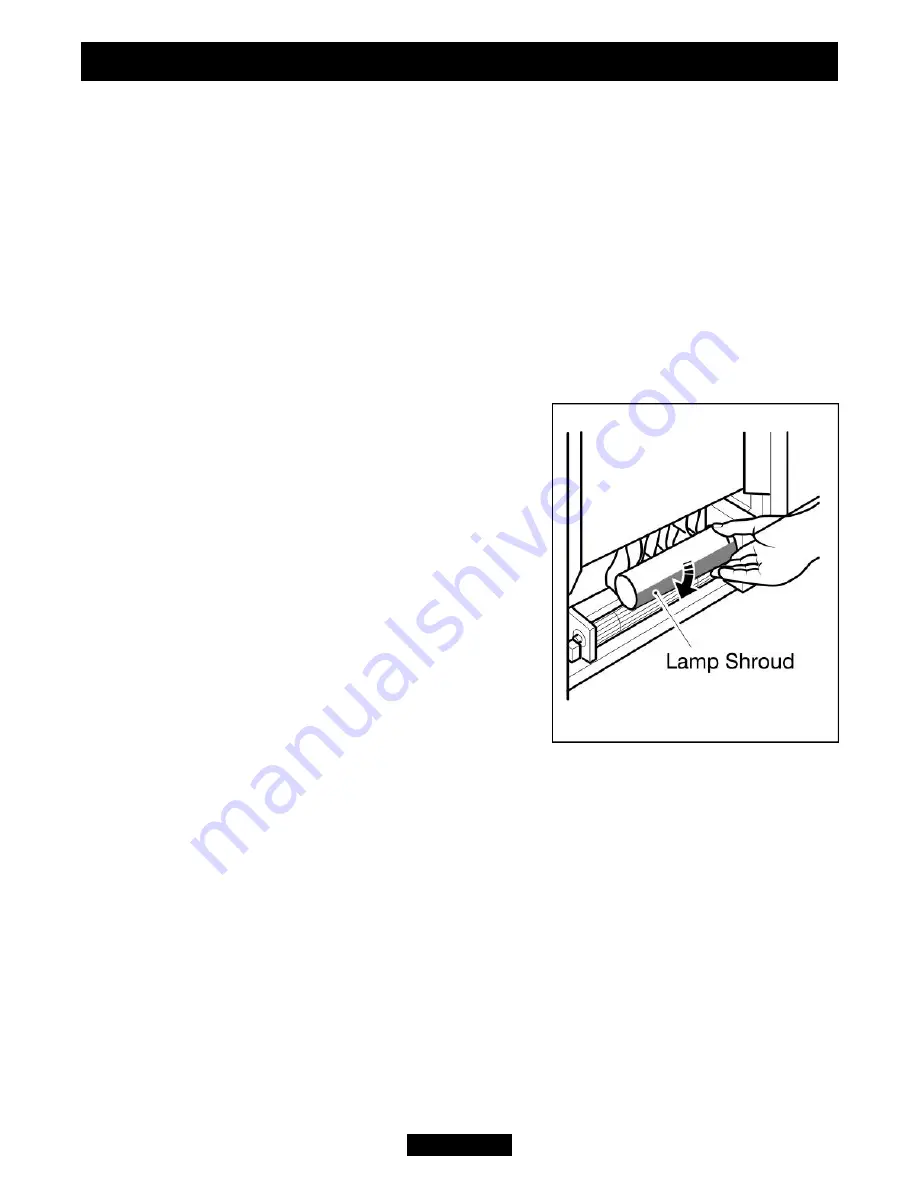
The light bulb shroud (See figure 14) is the coloured
tube that sits around the light bulb.

What is it for?

The light bulb shroud can be rotated to give different
light effects. If you look at the light bulb shroud you
will see a dark area. This dark area is there to reduce
the amount of light from the light bulb to the areas
which it faces. The slots are there to give a white or
brighter light. 

How will I know which position to set the light
bulb shroud?

Positioning the dark area of the shroud underneath the light bulb will reduce the

amount of light onto the hearth or floor surface.

Positioning the dark area to the rear of the light bulb will reduce the amount of light

to the flame effect at the rear of the heater.

A good start point is to have the light bulb shroud dark area facing the front of the
heater. If the light effect is not to your liking then the firefront can be removed  and
adjustments made to the shroud after the heater is fitted (On the Adage and Ocean
heaters it will be necessary to remove the whole fascia).

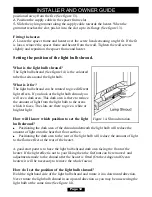
How do I set the position of the light bulb shroud?

Hold the right hand side of the light bulb shroud and rotate it in a downward direction.
Never rotate the light bulb shroud in an upward direction as you may be unscrewing the
light bulb at the same time (See figure 14).

Page 12

INSTALLER AND OWNER GUIDE

Figure 14. Shroud rotation

Summary of Contents for 807

Page 1: ...d our Baxi Fires Division Technical Helpline will be pleased to help Telephone 08706 061 065 National call rates apply in the United Kingdom In the Republic of Ireland telephone 0044 8706 061 065 Important Please keep your guide in a safe place for future reference Model 807 Electric Heater Fitted with one of the following fascia Adage Alisa Anthem Dream Eternal Manor Ocean Ultimate or Victorian B...

Page 2: ... years of trouble free service This guide aims to improve your understanding and appreciation of your new heater by providing simple and informative instructions to enable you to install it and to ensure that you benefit from the excellent performance and features it has to offer If you require further assistance the Baxi Fires Division Technical Helpline will be pleased to help Please telephone 0...

Page 3: ...Victorian 6 8 5 56 2 3 A Spacer is not supplied with the heater but is available as an optional extra Please contact your dealer quoting Part number 05801T1 The Adage blue does not include a spacer frame with the product but is available as an optional extra Please contact your dealer quoting part number 05801T1 One person should be sufficient to lift the heater If for any reason this weight is co...

Page 4: ...se the heater anywhere where water is in use i e Bathrooms Kitchens Shower Rooms Swimming Pools etc Never use aerosols or steam cleaners on or around the heater Never route the mains supply cable under carpet etc Never install the heater close to curtains or combustible materials Never use the heater to dry clothes etc Never sit or stand on the heater FITTING THE HEATER The installation of this he...

Page 5: ...pening are not available i e a flat wall The Dream heater does not have the 75mm 3 inch spacer and cannot be used against flat walls unless it is fitted to a rebated surround or suite A 75mm spacer kit is available for the Adage blue Manor Ocean and Ultimate models as an optional extra Please contact your dealer quoting Part number 05801T1 Important electrical safety The heater must not be located...

Page 6: ...uide When fitting the cable guide please remember that the wider part of the cable guide has to be fitted against the outer edge of the base See figure 1 Item 1 1 Gently pinch the sides of the cable guide See figure 1 Item 4 and push the cable guide into the required rectangular slot 2 Place the electrical cable into the guide and close the top of the cable guide If the mains cable is damaged to a...

Page 7: ...pull the fascia forward See figure 3 2 Keep the fascia in a safe place while installing the heater Alisa Anthem and Dream heaters The fascia is supplied in separate packaging within the main box Heater fixing All fixings supplied with the heater have been identified in figure 4 Page 7 INSTALLER AND OWNER GUIDE Figure 3 Removal of Adage and Ocean fascia Figure 2 Removing Eternal Ultimate and Victor...

Page 8: ... surround opening Make sure that the heater is in the middle of the surround or fireplace 2 There are two slotted holes in the top of the heater See figure 5 Mark through the slotted holes so that their position is clear when the heater is removed 3 Remove the heater 4 Drill an appropriate size hole in each of the marked positions Insert wall plugs into the drilled holes 5 Place the heater so that...

Page 9: ...At the back of the heater there will be a long piece and a short piece of wire coming through the two holes Hold the short piece and give the long piece a gentle tug This will secure the steel wire Take the long piece and thread this through the eyescrew in the back of the fireplace opening See figure 7 item 4 10 From the back of the heater thread the long piece of steel wire through the outer sma...

Page 10: ...gainst the wall or fixing surface the steps should widen as they come closer to you Position and screw the L shaped brackets to the rear of the spacer frame as shown in figure 8 2 Position the spacer frame against the wall or front of the opening Make sure that the spacer frame is central to the fireplace surround or is in the correct position against the wall Mark through the rear holes in the br...

Page 11: ...pacer frame is central to the fireplace 3 The top rear flange of the spacer frame has two screw locations Mark the positions of the two screw locations on the rear wall See figure 12 4 Remove the spacer frame from the fireplace and place away from the work area 5 Drill the screw locations using a no 12 masonry drill bit 6 Insert the two fibre wall plugs provided into the holes 7 Insert a screw int...

Page 12: ...rom the light bulb to the areas which it faces The slots are there to give a white or brighter light How will I know which position to set the light bulb shroud Positioning the dark area of the shroud underneath the light bulb will reduce the amount of light onto the hearth or floor surface Positioning the dark area to the rear of the light bulb will reduce the amount of light to the flame effect ...

Page 13: ...ok the brackets on the rear of the fascia over the brackets on the heater See figure 16 2 Secure with the two screws removed previously See figure 2 3 On Victorian models screw the brass firefront columns supplied with the firefront into the top of the firefront Locate the firefront onto the fascia See figure 17 Please note that on the Manor model the firefront has hooks that locate over the top o...

Page 14: ... to the outside upper edge See figure 18 2 Locate the left hand side trim tab into the slot fold along the upper edge of the top trim See figure 18 3 Locate the right hand side trim tab into the slot fold along the upper edge of the top trim See figure 18 4 Locate the four magnets on the side trims as in figure 19 Note that bottom edge of the the upper magnets are in line with the bottom of the to...

Page 15: ...d consequent risk of fire What are the three switches for The heater is operated by three switches located below the hood on the left hand side of the heater Switch 1 O Main On Off In the On position only the fuel effect operates Switch 2 I 1kW fan heat setting and fuel effect Switch 3 II 2kW fan heat setting and fuel effect The switches are connected on the inside so when switch 1 is turned off a...

Page 16: ...uorescent type but due to the indeterminate life span and ease of replacement it is specifically excluded from the guarantee To replace the light bulb 1 To gain access to the light bulb remove the loose coals pebbles from the fuel support and place them onto an old newspaper or plastic bag This will prevent them from marking the surface 2 Remove the firefront On the Adage and Ocean heaters it will...

Page 17: ...EPUBLIC OF IRELAND Call 0044 8706 061 065 For spares inquiries Spare parts are available nationwide via the interpart stockist network For your local stockist consult Yellow pages under Central Heating When ordering spare parts please have the below information available This will help us to deal with your call quicker and avoid you having to make a second call Your Post Code Type of Heater Electr...

Reviews: