background image

5116231/06

© Baxi Heating U.K. Limited 2009.

Model 939

OPEN DECORATIVE GAS FIRE

(GC No. 32-032-54)

INSTALLER: Please leave this guide with the owner

INSTALLATION AND OWNER GUIDE

We trust that this guide gives
sufficient details to enable this
appliance to be installed and
maintained satisfactorily. However, if
further information is required, our

Technical Helpline

will be pleased

to help.
Telephone 

0844 8711 565 

(National

call rates apply in the United
Kingdom).
In the Republic of Ireland
Telephone

0044 844 8711 565.

Summary of Contents for 939

Page 1: ... AND OWNER GUIDE We trust that this guide gives sufficient details to enable this appliance to be installed and maintained satisfactorily However if further information is required our Technical Helpline will be pleased to help Telephone 0844 8711 565 National call rates apply in the United Kingdom In the Republic of Ireland Telephone 0044 844 8711 565 ...

Page 2: ...owing address The Company Secretary Baxi Heating UK Limited The Wyvern Business Park Stanier Way Derby DE21 6BF Warning Any person who does any unauthorised act in relation to a copyright work may be liable to criminal prosecution and civil claims for damages Valor Fires Erdington Birmingham B24 9QP www firesandstoves co uk Because our policy is one of constant development and improvement details ...

Page 3: ...tandards Institute The Highest Standards The manufacturer is a member of SBGI and HHIC Heating and Hot water Industry Council that work to ensure high standards of safety quality and performance Careful Installation This gas fires must be installed by a competent GAS SAFE REGISTER engineer GAS SAFE REGISTER or CORGI engineer outside of UK in accordance with our installer guide and should not be fi...

Page 4: ...Page 4 Baxi Heating U K Limited 2009 INSTALLER GUIDE FOR OWNER GUIDE SEE PAGES 29 TO 43 INSTALLER GUIDE ...

Page 5: ...2 4 6 Chimney preparation 12 4 7 Fireplace preparation 13 4 8 The hearth 13 4 9 Fireplace clearances 14 4 10 Installation options 15 4 11 Propane appliances 16 5 UNPACKING 18 6 INSTALLATION OF APPLIANCE 18 6 1 Fireplace size 18 6 2 Fireplace flue pull 18 6 3 Installation of the burner unit 19 7 BURNER AND SUPPLY PIPE INSTALLATION 21 7 1 Preliminary burner checks 21 7 1 1 Lighting the fire 21 7 1 2...

Page 6: ... PARTS REPLACEMENT 26 11 1 Checking the aeration setting of the burner 26 11 2 To remove the complete burner unit 26 11 3 To remove the pilot unit 27 11 4 To remove the gas valve 27 11 5 To remove the piezo generator 28 11 6 To grease the control tap 28 11 7 To replace the burner 28 11 8 To remove the main burner injector 28 Page 6 Baxi Heating U K Limited 2009 INSTALLER GUIDE ...

Page 7: ...sive exposure to these materials may cause irritation to eyes skin and respiratory tract Consequently it is important to take care when handling these articles to ensure that the release of dust is kept to a minimum To ensure that the release of fibres from these RCF articles is kept to a minimum during installation and servicing we recommend that you use a HEPA filtered vacuum to remove any dust ...

Page 8: ...ck 0552301 Wonderfire models Wonderfire Gasflame 3 Convector box and 16inch Wonderfire Models Replacement Chair brick 0552311 Replacement Chair brick Trims Flat Brass effect 0552321 Flat Satin Chrome effect 0552331 Flat Black 0552341 Bauhaus Firefront 16 inch Fret Pale Gold effect 5135659 Chrome effect 5135660 Black 9800123 Black Nickel 5120251 Description Part Number Blenheim Firefront 16 inch Fr...

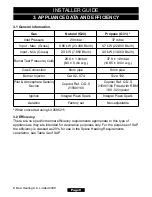
Page 9: ...ge 9 Baxi Heating U K Limited 2009 Gas Natural G20 Propane G31 Inlet Pressure 20 mbar 37 mbar Input Max Gross 6 85 kW 23 400 Btu h 6 7 kW 22 860 Btu h Input Min Gross 2 3 kW 7 850 Btu h 4 0 kW 13 650 Btu h Burner Test Pressure Cold 20 0 1 0mbar 8 0 0 4in w g 37 0 1 0mbar 14 85 0 4in w g Gas Connection 8mm pipe 8mm pipe Burner Injector Cat 82 074 Size 132 Pilot Atmosphere Sensing Device Copreci Ref...

Page 10: ...d ventilation for gas appliances of rated input not exceeding 70 kW net 1st 2nd and 3rd family gases BS 5871 Part 2 Installation Inset LFE gas fires BS 6461 Part 1 Masonry chimney flues Installation BS 6891 Gas pipework installation In England and Wales the current edition of the Building Regulations issued by the Department of the Environment and the Welsh Office In Scotland the current edition o...

Page 11: ...Page 11 Baxi Heating U K Limited 2009 Figure 1 Hearth and fireplace opening Figure 2 Hearth and fireplace opening for installations using the SPANISH BASKET CASTING ONLY See section 4 8 INSTALLER GUIDE ...

Page 12: ...ction of young children the elderly or the infirm 4 5 Room considerations 4 5 1 This appliance must not be installed in any room that contains a bath or shower or where steam is regularly present 4 5 2 An extractor fan may only be used in the same room as this appliance or in any area from which ventilation for the appliance is taken if it does not affect the safe performance of the appliance Note...

Page 13: ...ons given in this guide do not use the back of a fire surround or marble to reduce the opening This may cause cracking of the surround back or marble 4 7 5 The appliance must not stand on combustible materials or carpets 4 8 The hearth The appliance must be mounted behind a non combustible hearth unless the conditions of section 4 10 1 are met N B conglomerate marble hearths are considered as non ...

Page 14: ...to be 75mm from the fireplace opening See figure 4 4 9 4 The minimum height from the base of the fireplace opening to the underside of any shelf made from wood or other combustible materials is as follows For a shelf up to 150mm deep Minimum height 860mm For a shelf deeper than 150mm 860mm 12 5mm for every 25mm depth over 150mm See figure 5 Page 14 Baxi Heating U K Limited 2009 Firefront Dimension...

Page 15: ...in such a way in the future then the distance from the base of the fireplace opening in the wall to the finished floor level should be increased to at least 150mm If the lower part of the fascia the firefront is free standing the recommended reduced hearth depth is 100mm This is necessary to support the firefront To protect from the risk of burns and ignition of clothing a tactile separator shall ...

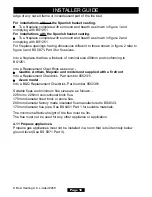
Page 16: ...cement Chair Brick as below Quattro Anthem Majestic and models not supplied with a firefront Into a Replacement Chairbrick Part number 0552311 Azure model Into a B Q Replacement Chairbrick Part number 0552301 Suitable flues and minimum flue sizes are as follows 225mm x 225mm conventional brick flue 175mm diameter lined brick or stone flue 200mm diameter factory made insulated flue manufactured to ...

Page 17: ...Page 17 Baxi Heating U K Limited 2009 Figure 6 Flue sizing table INSTALLER GUIDE ...

Page 18: ...ll Visually inspect the flue for any obstruction and that a smooth transition from the fireplace opening into the flue is available Close all doors and windows in the room in which the appliance is to be installed After confirming with a match that smoke is drawn into the flue light a 13 gram smoke pellet and check that there is a definite flow through the flue Verify outside that the smoke exits ...

Page 19: ...tted to Anthem or Quattro models The fire is supplied with a burner tray trim Fit the trim as in figure 8 6 3 3 Burner Positioning The two tags at the side of the burner can be folded against the side of the burner tray This may be required for installations where the width of the fireplace opening is restricted or when fitting into a Spanish Basket casting See figure 9 Page 19 Baxi Heating U K Li...

Page 20: ...rner may be moved forward providing the front of the burner tray trim does not protrude beyond the front plane of the fireplace opening by more than 33mm See figure 10 6 3 4 Locating the burner Mark onto the floor the position of the two fixing holes in the front fixing bracket See figure 11 Without disturbing the burner remove the two screws at the rear of the burner tray See figure 12 These secu...

Page 21: ...t edition of IS 813 Domestic Gas Installations 7 1 Preliminary burner checks Some burner operations can be checked at this stage Checking now will mean that less disassembly will be required if any problems are found A full check should still be made however after final installation 7 1 1 Lighting the fire If closed open the isolating inlet T connector Depress the control knob and slowly rotate it...

Page 22: ...ce the test point sealing screw 3 Relight the appliance Turn to the maximum output position and test around the sealing screw for gas soundness with a suitable leak detection fluid 8 FITTING THE FIREFRONT Before fitting the fascia ensure that the information on the back pages of the owner guide have been completed 8 1 For models NOT supplied with a firefront A slotted firefront with a minimum free...

Page 23: ... 2 The screw should be set at a distance of 7mm Measured from the surface of the bracket to the underside of the screw head Adjust the screw to this distance See figure 15 3 Locate the firefront as in figure 16 The screw heads should locate into the slots in the burner tray 4 The lower ash pan casting should be located as in figure 17 Page 23 Baxi Heating U K Limited 2009 Figure 16 Hanging the fir...

Page 24: ...should be level with the front face of the fireplace opening The installation is satisfactory if the smoke is drawn into the fireplace opening If the smoke is not drawn into the fireplace opening leave the appliance alight at the maximum setting for a further ten minutes and then repeat the test If smoke is still not drawn into the appliance disconnect the appliance and seek expert advice If the a...

Page 25: ...ect the appliance Clean off any marks incurred during installation 3 Hand this guide to the customer 4 Stress that no extra ceramic fuel effect pieces must be added over and above those supplied with the appliance and that any replacements must only be authorised spares Warn that ignoring this advice could cause incomplete clearance of the products of combustion with consequent health hazards 5 Ad...

Page 26: ... as RCF waste RCF waste is classed as a stable non reactive hazardous waste and may be disposed at a landfill licensed to accept such waste Protective clothing is not required when handling these articles but we recommend you follow the normal hygiene rules of not smoking eating or drinking in the work area and always wash your hands before eating or drinking Check that the appliance is clean and ...

Page 27: ...osphere sensing device It must be replaced as a whole assembly Its individual components are not separately replaceable 11 4 To remove the gas valve See figure 21 1 Remove the burner unit See section 11 2 2 If lying the burner on its back ensure that the work surface is suitably protected This will avoid damage to the work surface Turn the burner unit upside down Detach the thermocouple from the t...

Page 28: ...e not restricted by grease 6 Push the plug into the tap body and position the slot in line with the mark previously made on the tap body 7 Reassemble the niting head and spindle complete with collar and spring making sure that the components are correctly engaged Check the operation of the tap 8 Refit the piezo generator 11 7 To replace the burner See figure 22 1 Remove the burner unit See section...

Page 29: ...Page 29 Baxi Heating U K Limited 2009 OWNER GUIDE FOR WARRANTY AND SERVICE INFORMATION SEE PAGES 38 TO 43 OWNER GUIDE ...

Page 30: ...TTING THE LOWER FIREFRONT 37 MAINTENANCE 38 Regular maintenance 38 WARRANTY AND SERVICE 38 This gas fire is designed to meet the most stringent quality performance and safety requirements to provide you with many years trouble free service This guide aims to improve your understanding and appreciation of your gas fire by providing simple and informative instructions to ensure that you benefit from...

Page 31: ...elf is not more than 150mm deep For a shelf deeper than 150mm add 12 5mm to the clearance for every 25mm of additional shelf depth See figure1 Do provide a suitable guard that complies with BS 8423 for the protection of young children the elderly the infirm and pet animals Although this fire conforms to all the applicable standards it is a heating appliance and certain parts of its surface will be...

Page 32: ... room Don t hang clothing towels or any other fabrics over the front of the fire Don t add any extra ceramic fuel effect pieces above the number stated in the installer and owner guide supplied with the ceramic fuel effect This should have been placed inside or attached to this guide by the installer This could cause incomplete combustion and consequent safety hazard Don t put paper or any other m...

Page 33: ...Page 33 Baxi Heating U K Limited 2009 Firefront Dimension X mm Dimension Y mm Azure 400 65 Quattro Anthem 390 65 Majestic 400 50 Portland 390 60 Figure 2 Appliance dimensions Firefront may differ from that shown OWNER GUIDE ...

Page 34: ...ot Keep the control knob depressed and hold the pilot ignition position for ten seconds When the control knob is released the pilot flame should remain lit If a flame does not appear at the pilot then turn the control knob clockwise to the OFF position and repeat the above When the pilot burner is operating properly gradually turn the control knob anti clockwise to HIGH position Depress the knob s...

Page 35: ... the first 20 30 minutes of operation To do this simply turn the control knob to its HIGH setting This will also burn off any carbon deposits that may have formed during previous operations If operating the appliance for long periods it is beneficial occasionally to change the settings This will also help to remove any carbon deposits that may form during operation Lighting with a taper See figure...

Page 36: ...ring the normal operation of the fire Should any soot accumulation become excessive the ceramic fuel effect pieces should be removed from the fire for cleaning Cleaning should be carried out in a well ventilated area or in the open air by gently brushing with the pieces held away from your face so that you avoid inhaling the dust We do not recommend the use of a normal domestic vacuum cleaner that...

Page 37: ...move the ash pan where applicable and then lift the firefront clear To fit the firefront simply place the decorative firefront on the hearth and centralise to the appliance Then fit the ash pan where applicable Quattro and Anthem firefront only Note Before removing the Quattro Anthem firefront it is necessary to remove the ceramic fuel effect Remove the fuel effect carefully and place aside We rec...

Page 38: ... is for 12 months subject to contract In the United Kingdom servicing can be carried out either by a heateam service engineer or a GAS SAFE REGISTER engineer Outside of the United Kingdom servicing can be carried out either by a CORGI or GAS SAFE REGISTER engineer You must register your fire with heateam the service division of Baxi Heating UK Limited either by completing and returning the registr...

Page 39: ...Fire make and model number 5 Proof of purchase if you do not have the fire serial number Note Details 1 4 should be recorded on pages 42 43 at the end of this guide What this warranty covers Free of charge repair or replacement of components found to be of faulty manufacture Free of charge replacement of the complete unit providing the failure is related to a manufacturing fault that cannot be rep...

Page 40: ...Page 40 Baxi Heating U K Limited 2009 OWNER GUIDE ...

Page 41: ...Page 41 Baxi Heating U K Limited 2009 OWNER GUIDE ...

Page 42: ...Baxi Heating U K Limited 2009 Installer Details Block Capitals Installer Name Gas Safe Register or Corgi Registration Number Company Name Company Address Company Telephone number Company Fax number OWNER GUIDE ...

Page 43: ...scia name Block Capitals Fascia code Can be found close to the information label Block Capitals Model 9 3 9 Serial number Can be found on the information label See figure 7 A LABEL CONTAINING THE SERIAL NUMBER MAY HAVE BEEN PLACED INSIDE THIS BOX A LABEL CONTAINING THE FASCIA CODE MAY HAVE BEEN PLACED INSIDE THIS BOX OWNER GUIDE ...

Page 44: ... Baxi Heating U K Limited 2009 ...

Reviews: