6
TESTING
7
TESTING
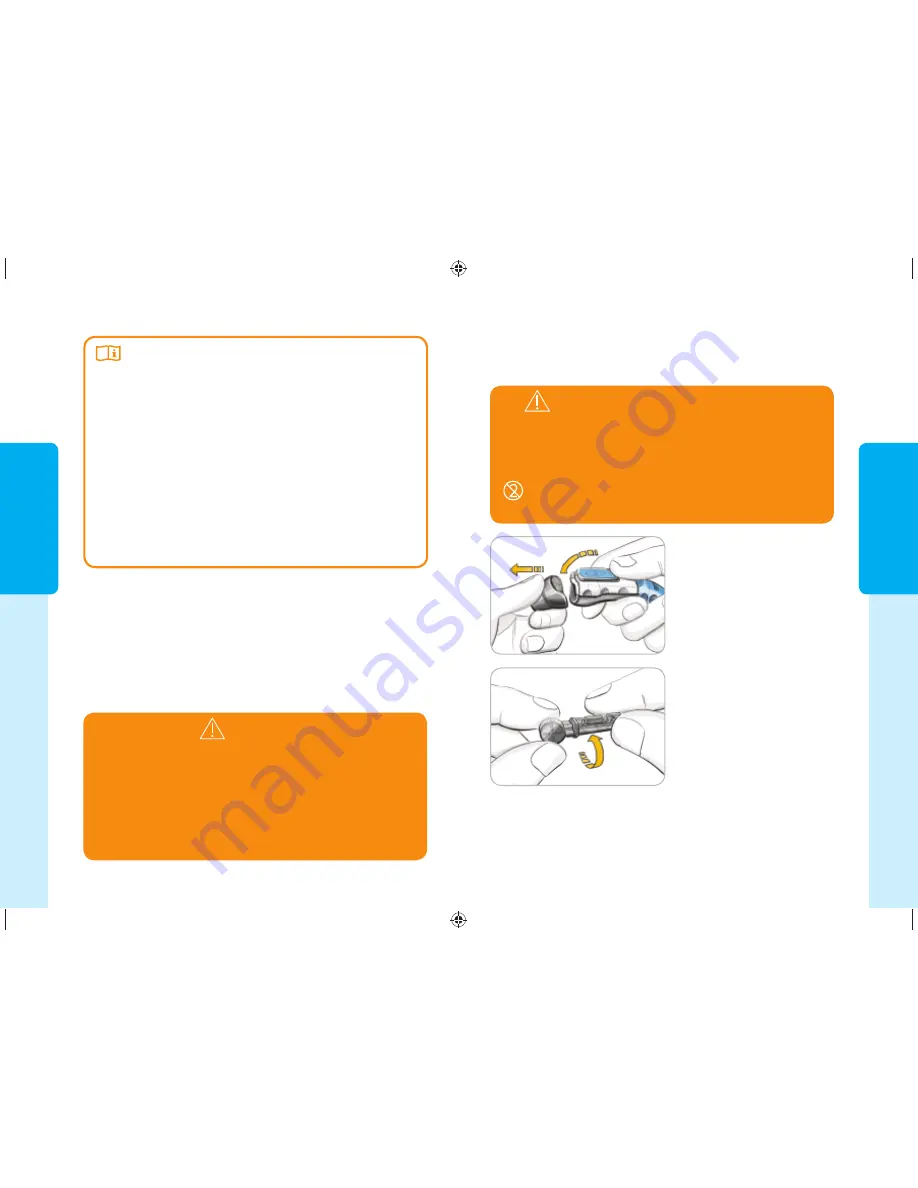
1.
Remove the endcap
from the M
ICROLET
2
lancing device with
your thumb on the grip
indent as shown. Snap
the endcap off from
top to bottom.
WARNING: Potential Biohazard
The M
ICROLET
2 lancing device is intended for
self-testing by a single patient. It must not be
used on more than one person due to the risk of
infection.
Use a new M
ICROLET
®
lancet each time you
test because it is no longer sterile after use.
Pr
eparing the Lancing Device
Getting Ready to T
est
Getting Ready to Test
WARNING
• All parts of the kit are considered biohazardous
and can potentially transmit infectious diseases,
even after you have performed cleaning. See
page 48.
• Always wash your hands well with soap and
water before and after testing, handling the
meter, lancing device, or test strips.
Read your C
ONTOUR
®
P
LUS
user guide,
the M
ICROLET
®
2 lancing device insert and all
instructional materials provided in your meter kit
before testing. Please follow all instructions for use
and care exactly as described.
Examine product for missing, damaged, or broken
parts. If the test strip bottle is open inside a new
box of strips, do not use those strips. Contact
Bayer Diabetes Care Customer Service at
0860 102 672 for replacement parts.
CAUTION:
Your C
ONTOUR
P
LUS
meter only
works with C
ONTOUR
®
P
LUS
test strips and
C
ONTOUR
®
P
LUS
control solutions.
Have all the materials you will need ready before you
begin testing. This includes your C
ONTOUR
P
LUS
meter, C
ONTOUR
P
LUS
test strips, and the
M
ICROLET
2 lancing device and M
ICROLET
®
lancets.
You may also need C
ONTOUR
P
LUS
control solution
to perform a quality control check. C
ONTOUR
P
LUS
test strips and C
ONTOUR
P
LUS
control solutions are
sold separately if not included in the meter kit.
2.
Loosen the round
protective cap on a
lancet by rotating it
¼ turn, but do not
remove it. Always use
M
ICROLET
lancets for
the best operation.
Preparing the Lancing Device
Read the M
ICROLET
®
2 lancing device insert for
complete instructions. For Alternative Site Testing
instructions, see page 14.
84721973_CntrPLUS_UG_EN_FpBp_v2.indd 6-7
84721973_CntrPLUS_UG_EN_FpBp_v2.indd 6-7
1/22/13 9:41 AM
1/22/13 9:41 AM


