background image

Chapter 2: Features & Systems

2858 Classic Cruiser    Owner’s Manual Supplement

22

Propulsion

Engine

The engine compartment can be accessed through the cockpit engine hatch. The owner’s packet contains detailed 
engine operation and maintenance manuals. Read and understand these manuals before operating or performing 
maintenance to the engine.

Fuel System

Fuel Fill and Vent:

The fuel fill and vent fitting is 

marked “GAS”.

If you experience difficulty filling 

the fuel tank, check to see if the 
fuel fill hose or vent hose is kinked 
or collapsed. 

If there are no visible signs of a 

problem, contact your local dealer.

Fuel Filters:

All fuel tanks are equipped with a fine 
mesh screen filter on the fuel pickup 
tube (located inside the fuel tank). In 
addition, when supplied by the engine 
manufacturer, a filter is installed on 
the engine.

Replace the fuel filter periodically 
to make sure it remains clean and 
free of debris. 

Consult your selling dealer or local 
marina concerning fuel additives 
that help to prevent fungus or 
buildup in your fuel tank.

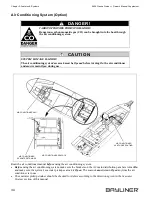
FIRE/EXPLOSION HAZARD! 

It is very important that the fuel system be inspected thoroughly the first time it is 
filled and at each subsequent filling. For your safety and the safety of your passen-
gers, the fueling instructions in the Owner’s Manual must be carefully followed.

WARN I NG!

!

Avoid the storage or handling of gear near the fuel lines, fittings and tank.

CAUTI O N!

!

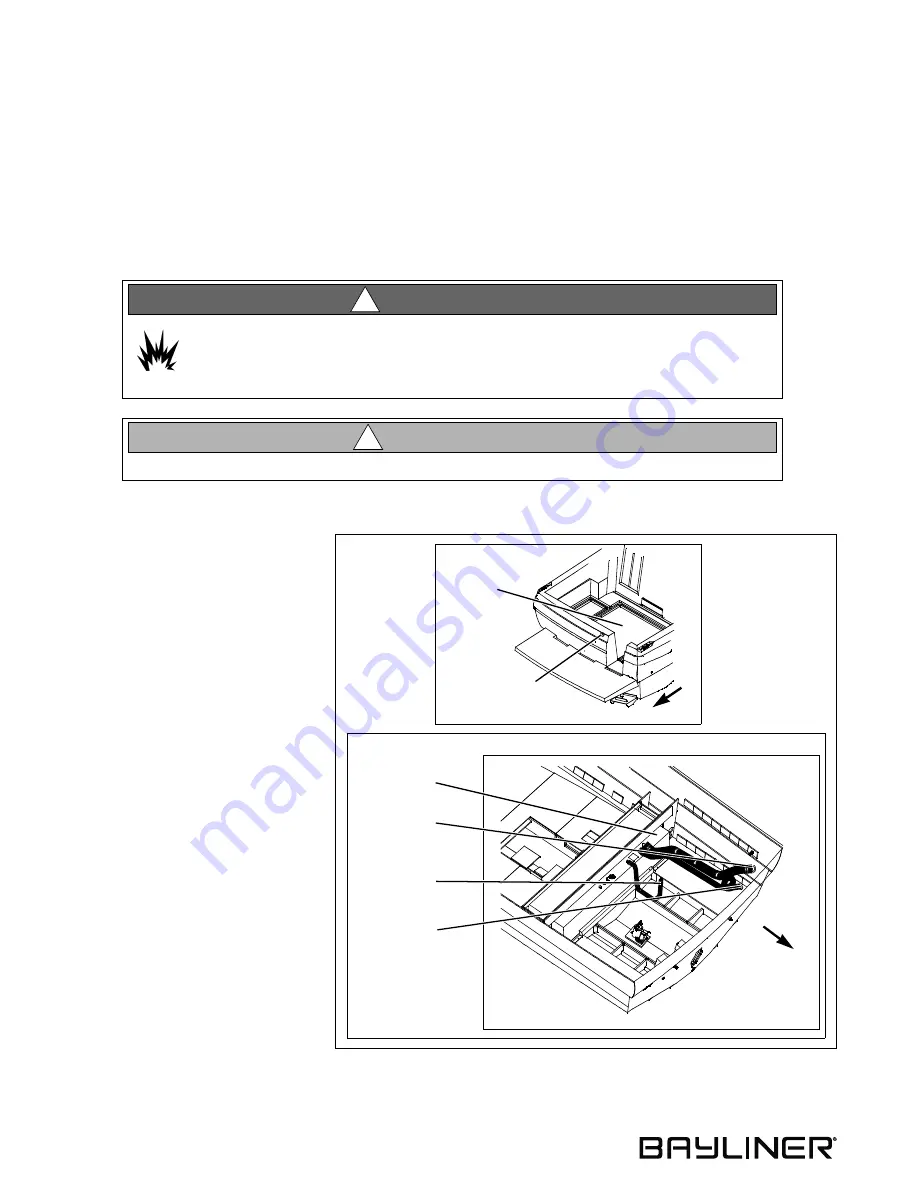
FUEL FEED

HOSE

FUEL SYSTEM ROUTING

 FUEL TANK

 VENT FITTING

FUEL TANK

AFT

VIEW OF THE ENGINE

COMPARTMENT

FUEL FILL

DECK FITTING

COCKPIT & AFT DECK

FUEL FILL

AFT

DECK FITTING

ENGINE

HATCH

Summary of Contents for 2858 Classic Cruiser

Page 1: ......

Page 2: ......

Page 3: ...ontained herein Due to our commitment to product improvement Bayliner reserves the right to make changes in the product design specifications and equipment at any time without notice or obligation Ill...

Page 4: ...hecklist 7 Annual Checklist 7 Carbon Monoxide Alarm System 8 More Information 9 Boat Lifting 10 Chapter 2 Features Systems 10 Hull Exterior Hardware Drains 11 Quick Oil Drain System 12 Deck Hardware a...

Page 5: ...Systems 30 Sump Box Cleaning 30 Sump System Winterization 30 Seawater Systems 30 Seacocks 31 Seawater Strainers 32 Marine Head with Holding Tank 34 Air Conditioning System Option 35 Chapter 3 Electric...

Page 6: ...lerts you to hazards or unsafe practices which COULD result in severe personal injury or death if the warning is ignored WARNING This box alerts you to hazards or unsafe practices which COULD result i...

Page 7: ...is your key to service Contact your dealer if you have any problems with your new boat If your dealer cannot help call our customer service hotline 360 435 8957 or send us a FAX 360 403 4235 Buy repla...

Page 8: ...d to provide optimum performance and service Installing a different engine or other accessories may cause unwanted handling characteristics Should you choose to install a different engine or to add ac...

Page 9: ...ory instruction sheets and manuals FALLING andROTATINGPROPELLER HAZARD NEVER allow anyone to ride on parts of the boat not designed for such use Sitting on seat backs lounging on the forward deck bow...

Page 10: ...n Check zincs regularly and replace them if they have deteriorated more than 70 There are many factors that determine the rate at which zincs deteriorate including Water temperature Salinity Water pol...

Page 11: ...eaths can be fatal Breathing CO blocks the ability of your blood to carry oxygen The effects are cumulative even low levels of exposure can result in injury or death Factors That Increase the Effects...

Page 12: ...d Although CO can be present without the smell of exhaust fumes if exhaust fumes are detected on the boat take immediate action to dissipate these fumes Treat symptoms of seasickness as possible CO po...

Page 13: ...tuned and well maintained Inspect each water pump impeller and the water pump housing Replace if worn Make sure cooling systems are in working condition Inspect all metallic exhaust components for cr...

Page 14: ...tates Power Squadrons U S Coast Guard Auxiliary 1 800 368 5647 or on the Internet at http www cgaux org U S Power Squadrons 1 888 FOR USPS 1 888 367 8777 or on the Internet at http www usps org United...

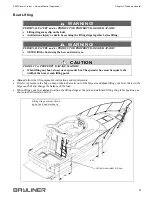
Page 15: ...ng label positions as shown in the illustration below PERSONAL INJURY and or PRODUCT OR PROPERTY DAMAGE HAZARD Lifting slings may slip on the hull Avoid serious injury or death by securing the lifting...

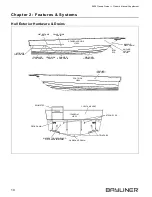
Page 16: ...BILGE PUMP DRAIN BOW EYE FWD BILGE PUMP DRAIN SHOWER SUMP DRAIN ANCHOR WATER TANK VENT DECK DRAIN STERN EYES GARBOARD DRAIN MACERATOR OVERBOARD TRANSOM VIEW AIR COND OVERBOARD TRIM TABS DISCHARGE OPT...

Page 17: ...n hose slide out of the garboard drain 4 Place the end of the oil drain hose into a suitable container 5 Unscrew the oil drain plug and drain the engine oil 6 Replace the oil drain plug 7 Push the dra...

Page 18: ...er s Manual Supplement 12 Deck Hardware and Accessories FUEL FILL FITTING WATER FILL FITTING AFT DECK STORAGE AREA DECK CLEAT TYPICAL WASTE PUMP OUT FITTING SHORE POWER CONNECTIONS DUAL OPTION SHOWN A...

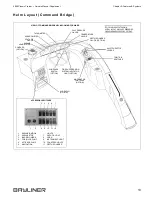
Page 19: ...VOLTAGE ENGINE SPEEDOMETER COMPASS DEPTH SOUNDER GAUGE OPTION TRIM TAB MACERATOR CONTROLS OPTION WINDLASS FIRE SUPPRESSION SWITCH OPTION VHF RADIO OPTION SYSTEM INDICATOR LIGHT OPTION OPTION HOUR METE...

Page 20: ...SION HAZARD Fuel fumes are heavier than air and will collect in the bilge areas where they can be accidently ignited Visually and by smell sniff test check the engine and fuel compartments for fumes o...

Page 21: ...e and maintenance instructions Alternators The alternators on your engines maintain proper charge levels of your boat s batteries when the engines are running Battery Charger Your boat is equipped wit...

Page 22: ...high idle or faster Turn the battery switch to the Off position whenever the boat will be unoccupied for long periods of time Battery Switch Positions Battery Switch Position Engine Starting Accessor...

Page 23: ...witches Instead IMMEDIATELY unplug the shore power cord ALWAYS from the dockside outlet first and alert marina management WARNING SHOCK ELECTRICAL SYSTEM DAMAGE HAZARD Before each use check the shore...

Page 24: ...the dockside outlet 3 Monitor the AC panel s polarity indi cator lights located below the line master breaker s as follows A green light illuminat ing after the power cord is plugged into the dockside...

Page 25: ...munications Commission Be sure to contact the FCC for licensing rules and regulations concerning VHF radio usage Compass Option Depth Finder Option Compass accuracy can be affected by many factors Hav...

Page 26: ...on manuals for the audio equipment installed on your boat is included in your boat s owner s packet Read and understand these manuals Appliances All appliances installed on your boat come with their o...

Page 27: ...Any non cooking devices on or near your stove during use are potential fire hazards DO NOT touch burners grates or nearby surfaces as they may be hot even when they are dark in color Areas near burne...

Page 28: ...ickup tube located inside the fuel tank In addition when supplied by the engine manufacturer a filter is installed on the engine Replace the fuel filter periodically to make sure it remains clean and...

Page 29: ...circulation run the bilge blower For at least four minutes before starting the engine During starting Anytime your boat is running below cruising speed NOTICE If an engine running problem is diagnosed...

Page 30: ...everal short touches to the switch rather than one long one After each short touch allow several seconds for the hull to react The trim tab hydraulic fluid reservoir is located in the engine compartme...

Page 31: ...or switches at the helm The bilge pumps are wired directly to the battery so they will normally function even when the boat is completely shut down and left unattended THE FORWARD BILGE PUMP IS AFT BI...

Page 32: ...st fins counter clockwise without lifting tab cartridge should stay in place Autofloat Switches Automatic bilge pumps use electromagnetic float autofloat switches to turn On the pump whenever water ri...

Page 33: ...ttended for long periods of time pump the water tank dry to prevent stored water from becoming stagnant and distasteful Should it become necessary to disinfect the freshwater system ask your dealer ab...

Page 34: ...the faucet that is furthest away from the water pump 3 Place the air nozzle against the end of the just removed water line and blow air through the system 4 When water stops coming out of the Open fau...

Page 35: ...ter heated by the water heater can reach temperatures hot enough to scald the skin WARNING WATER HEATER DAMAGE HAZARD DO NOT turn On the water heater electrical circuit on the AC panel until the water...

Page 36: ...e screws from mounting feet D and drain system 3 Reinstall screws in mounting feet and reconnect system Seawater Systems Seacocks A seacock is a valve that is used to manage the intake of seawater thr...

Page 37: ...lean The seacock must remain Closed until the strainer is completely reassembled 3 Take apart the seawater strainer 4 Remove the debris 5 Flush the strainer with water 6 Reassemble the seawater strain...

Page 38: ...ooking at the tank located under the forward floor hatch in the main cabin We advise emptying the holding tank at every opportunity If you are unable to pump water into the bowl the probable cause is...

Page 39: ...er Do not fill the bowl with anti freeze Close the intake seacock while the boat is underway or whenever the boat is left moored in the water The VacuFlush head system uses a vacuum pump and freshwate...

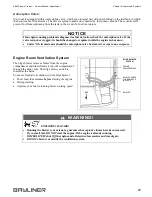
Page 40: ...anytime the air conditioner is in use The seawater pickup strainer should be checked for debris according to the directions given in the Seawater Strainer section of this manual CARBON MONOXIDE POISON...

Page 41: ...TRIM TABS AFT BERTH SHOWER SUMP LIGHT SWITCHES FWD TO LOWER HELM TO UPPER HELM ENGINE MACERATOR HEAD PICKUP GROUND FUEL FILL GROUND STEP LIGHT READING TO WINDLASS MAIN SWITCH AND HELM REMOTE SWITCH OP...

Page 42: ...ent 36 Deck Wire Harness Routings BOW LIGHT HORN WIPER STBD PORT WIPERS HALL LIGHTS DINETTE LIGHTS GALLEY LIGHTS MID BERTH LIGHT ENTRY LIGHT ENGINE HARNESS SPEAKER WIRES V BERTH OVERHEAD LIGHT COCKPIT...

Page 43: ...WITCH IN TRANSOM STORAGE TO STARTER SOLENOID ON ENGINE BATTERIES POSITIVE BATTERY CABLE ROUTINGS JUMPER CABLE POSITIVE CABLES ENGINE COMPARTMENT AFT BATTERIES NEGATIVE JUMPER CABLE TO ENGINE GROUND GR...

Page 44: ...38 2858 Classic Cruiser Owner s Manual Supplement Chapter 4 Wiring Diagrams AC Electrical System Single Dockside...

Page 45: ...2858 Classic Cruiser Owner s Manual Supplement Chapter 4 Wiring Diagrams 39 AC Electrical System Dual Dockside...

Page 46: ...Chapter 4 Wiring Diagrams 2858 Classic Cruiser Owner s Manual Supplement 40 Gas Engine Electrical System TRIM TAB SWITCH...

Page 47: ...2858 Classic Cruiser Owner s Manual Supplement Chapter 4 Wiring Diagrams 41 Diesel Engine Electrical System...

Page 48: ...ine Manufacturer Model Name Number Engine Serial Number Oil Type SAE Quarts per Engine Filter Type Propeller Manufacturer Pitch Model Number Key Numbers Ignition Other Electronics Manufacturer Model N...

Page 49: ...r Length Make Type Hull Color Trim Color Fuel Capacity Engine Type Number of Engines Distinguishing Features Distinguishing Features Operator of Boat Full Name Male or Female Age Health Address Addres...

Page 50: ...arture Time Stopover 1 Arrive No Later Than Date Arrive No Later Than Time Stopover 2 Arrive No Later Than Date Arrive No Later Than Time Stopover 3 Arrive No Later Than Date Arrive No Later Than Time...

Page 51: ...Owner s Notes...

Page 52: ...Owner s Notes...

Page 53: ...Owner s Notes...

Page 54: ...Owner s Notes...

Page 55: ......

Page 56: ...Part Number 1700666 Bayliner P O Box 9029 Everett WA98206 360 435 5571...

Reviews: