background image

®

Outdoor Charcoal Barbecue Grill  Model No. CBT825L / Item No. 129309

9.  After every use, allow grill to cool. Then protect clean cooking grids with a light coat of 

cooking oil, clean out all ashes, wipe outside surfaces with a suitable kitchen cleaner and 
protect surfaces with a quality cover that properly fits your grill. 

10.    Visit websites like www.bluerhino.com, watch barbecue themed TV shows or purchase 

related barbecue cookbooks to learn more interesting tips.

Cleaning and Care

  CAUTION: All cleaning and maintenance should be done when grill is 

cool and with the fuel supply removed.

  CAUTION: DO NOT clean any grill part in a self-cleaning oven. The 

extreme heat will damage the finish.

Notices

1. Abrasive cleaners will damage this product. 
2. Never use oven cleaner to clean any part of grill.
3.  Do not clean any grill part in a self-cleaning oven. The extreme heat will damage the 

finish.

Cleaning Surfaces

1. Wipe surfaces clean with mild dishwashing detergent or baking soda. 
2. For stubborn surfaces use a citrus based degreaser and a nylon scrubbing brush.
3. Rinse clean with water. 

Product Registration

For faster warranty service, please register your product immediately at www.bluerhino.com or 
call 1.800.762.1142.

Limited Warranty

Blue Rhino Global Sourcing, Inc. (“Vendor”) warrants to the original retail purchaser of this 
product, and to no other person, that if this product is assembled and operated in accordance 
with the printed instructions accompanying it, then for a period of one (1) year from the date 
of purchase, all parts in such product shall be free from defects in material and workmanship. 
Vendor may require reasonable proof of your date of purchase. Therefore, you should retain 
your sales slip or invoice. This Limited Warranty shall be limited to the repair or replacement of 
parts, which prove defective under normal use and service and which Vendor shall determine 
in its reasonable discretion upon examination to be defective. Before returning any parts, you 
should contact Vendor’s Customer Service Department using the contact information listed 
below. If Vendor confirms, after examination, a defect covered by this Limited Warranty in any 
returned part, and if Vendor approves the claim, Vendor will replace such defective part without 
charge. If you return defective parts, transportation charges must be prepaid by you. Vendor will 
return replacement parts to the original retail purchaser, freight or postage prepaid.

This Limited Warranty does not cover any failures or operating difficulties due to accident, 
abuse, misuse, alteration, misapplication, improper installation or improper maintenance or 
service by you or any third party, or failure to perform normal and routine maintenance on 
the product as set out in this owner’s manual.  In addition, the Limited Warranty does not cover 
damage to the finish, such as scratches, dents, discoloration, rust or other weather damage, 
after purchase.

This Limited Warranty is in lieu of all other expressed warranties. Vendor disclaims all 
warranties for products that are purchased from sellers other than authorized retailers or 
distributors, including the warranty of merchantability or the warranty of fitness for a particular 
purpose. VENDOR ALSO DISCLAIMS ANY AND ALL IMPLIED WARRANTIES, INCLUDING WITHOUT 
LIMITATION THE IMPLIED WARRANTIES OF MERCHANTABILITY AND FITNESS FOR A PARTICULAR 
PURPOSE. VENDOR SHALL HAVE NO LIABILITY TO PURCHASER OR ANY THIRD PARTY FOR ANY 
SPECIAL, INDIRECT, PUNITIVE, INCIDENTAL, OR CONSEQUENTIAL DAMAGES. Vendor further 
disclaims any implied or expressed warranty of, and assumes no responsibility for, defects in 
workmanship caused by third parties.

This Limited Warranty gives the purchaser specific legal rights; a purchaser may have other 
rights depending upon where he or she lives. Some jurisdictions do not allow the exclusion or 
limitation of special, incidental or consequential damages, or limitations on how long a warranty 
lasts, so the above exclusion and limitations may not apply to everyone.

Vendor does not authorize any person or company to assume for it any other obligation or 
liability in connection with the sale, installation, use, removal, return, or replacement of its 
equipment, and no such representations are binding on Vendor.

Blue Rhino Global Sourcing, Inc.
Winston-Salem, North Carolina USA
(800) 762-1142 

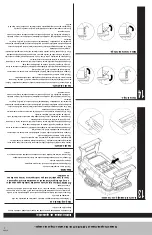
Operating Instructions (continued)

Summary of Contents for CBT825L

Page 1: ...roughly before installing or servicing this equipment 3 Failure to follow these instructions could result in fire or explosion which could cause property damage personal injury or death WARNING FOR YOUR SAFETY For Outdoor Use Only outside any enclosure Table of Contents Important Safeguards Page 2 Exploded View Hardware 3 Assembly Instructions 4 Operating Instructions 7 Initial Use 7 Cooking 7 Tip...

Page 2: ...hey are hot Do not use on wooden decks wooden furniture or other combustible surfaces Do not use in or on boats or recreational vehicles Position grill so wind can not carry ashes to combustible surfaces Do not use in high winds Never lean over the grill when lighting Do not leave a lit grill unattended especially keep children and pets away from grill at all times Do not attempt to move grill whe...

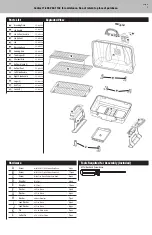
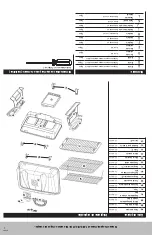
Page 3: ...Washer ø5 Zinc Plated 8 pcs K Pin ø5 x 30 Black Coated 2 pcs L Cotter Pin ø1 4 x 30 Zinc Plated 2 pcs Tools Required for Assembly Included 2 Phillips Head Screwdriver 4 1 3 5 7 9 14 13 11 15 2 12 Parts List 1 Branding Plate 55 08 248 2 Lid Handle 55 08 255 3 Lid Air Vent Handle 55 08 318 4 Lid Air Vent 55 08 319 5 Lid 55 08 320 6 Warming Rack 55 08 321 7 Cooking Grid 55 08 322 8 Top Hinges 2 55 08...

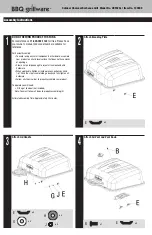
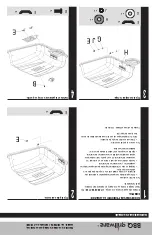
Page 4: ...or hardware assemble your product on a hard level surface that does not have cracks or openings Clear an area large enough to layout all components and hardware When applicable tighten all hardware connections by hand first Once the step is completed go back and fully tighten all hardware Follow all steps in order to properly assemble your product To operate you will need 1 Bag of charcoal not inc...

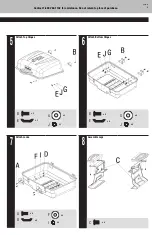
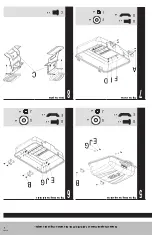
Page 5: ...62 1142 for assistance Do not return to place of purchase page no 5 Attach Top Hinges B x 2 E x 2 G x 2 J x 2 6 Attach Bottom Hinges B x 4 E x 4 G x 4 J x 4 7 Attach Locks A x 4 D x 4 F x 4 I x 4 8 Assemble Legs C x 8 ...

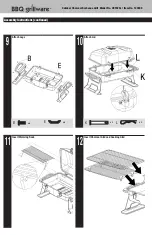
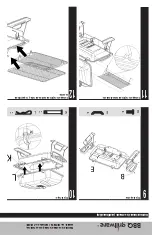
Page 6: ...oor Charcoal Barbecue Grill Model No CBT825L Item No 129309 Assembly Instructions continued 12 Insert Charcoal Grid and Cooking Grid 11 Insert Warming Rack 9 Attach Legs B x 6 E x 6 10 Attach Lid K x 2 L x 2 ...

Page 7: ...ng grid 2 Load and light charcoal per charcoal manufacturer s instructions Leave lid open 3 While wearing protective gloves carefully spread hot coals to the outsides of charcoal grid with a long handle tool 4 While wearing protective gloves replace cooking grid close lid and allow grill to preheat 5 Wear protective gloves to open lid Use long handled tools to place food onto cooking grids above t...

Page 8: ... If Vendor confirms after examination a defect covered by this Limited Warranty in any returned part and if Vendor approves the claim Vendor will replace such defective part without charge If you return defective parts transportation charges must be prepaid by you Vendor will return replacement parts to the original retail purchaser freight or postage prepaid This Limited Warranty does not cover a...

Page 9: ...ipo y cualquier representación de esta naturaleza no obliga al fabricante Blue Rhino Sourcing Inc Winston Salem North Carolina 27104 EE UU 800 762 1142 Sugerencias para una mejor preparación de los alimentos y una vida útil más larga de la parrilla 1 P ara reducir el encendido de la grasa mantenga la parrilla limpia use cortes de carne sin grasa o remueva el acceso de grasa y evita cocerla a tempe...

Page 10: ...erna del alimento se haya alcanzado Nota Si es necesario agregar briquetas remueva los alimentos de la parrilla de cocción y usando guantes de protección remueva la parrilla de cocción y coloque briquetas adicionales sin revolver las ya encendidas Cuidadosamente vuelva a colocar la parrilla y luego los alimentos 7 D eje que el carbón de leña se extinga completamente antes de cerrar la tapa y todos...

Page 11: ...iores modelo no CBT825L Articulo no 129309 Instrucciones de armado continuación 12 Coloque la rejilla de carbón de leña y la parrilla de cocción 11 Coloque la rejilla de calentamiento 9 Fije las patas B x 6 E x 6 10 Fije la tapa K x 2 L x 2 ...

Page 12: ... 1 800 762 1142 No vuelva al lugar de compra página 5 Fije las bisagras superiores B x 2 E x 2 G x 2 J x 2 6 Fije las bisagras inferiores B x 4 E x 4 G x 4 J x 4 7 Fije los cierres A x 4 D x 4 F x 4 I x 4 8 Arme las patas C x 8 ...

Page 13: ...ner todos los componentes y los elementos de ferretería C uando sea del caso apriete a mano en un principio las conexiones de ferretería Una vez que ha terminado el paso apriete completamente todos los elementos de ferretería S iga todos los pasos en el orden indicado para armar debidamente esta unidad Para cocer a la parrilla necesitará 1 bolsa de carbón de leña no incluidas Nota Es importante qu...

Page 14: ...jal Negro ø5 x 30 2 pcs L Pasador de horquilla Galvanizado ø1 4 x 30 2 pcs Herramientas necesarias para el armado incluidas Destornillador en cruz Phillips no 2 4 1 3 5 7 9 14 13 11 15 2 12 Lista de piezas 1 Placa de marca 55 08 248 2 Manija de la tapa 55 08 255 3 Manija del regulador de aire de la tapa 55 08 318 4 Regulador de aire de la tapa 55 08 319 5 Tapa 55 08 320 6 Rejilla de calentamiento ...

Page 15: ...quier otra una superficie combustible N O instalar o utilizar en embarcaciones o vehículos de recreo C oloque la parrilla de manera que el viento no lleve cenizas a superficies combustibles N o utilice la parrilla si hace mucho viento N unca se apoye sobre la parrilla cuando la está encendiendo N o deje una parrilla encendida sin vigilancia especialmente mantenga los niños y las mascotas lejos de ...

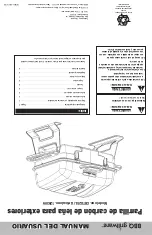
Page 16: ...nserve estas instrucciones para futuras consultas Si está montando esta unidad para otra persona entréguele este manual para futuras consultas MANUAL DEL USUARIO ADVERTENCIA PARA SU SEGURIDAD 1 U na instalación ajuste alteración reparación o mantenimiento inadecuados pueden causar lesiones o daños a la propiedad 2 L ea atentamente las instrucciones de instalación funcionamiento y mantenimiento del...

Reviews: