4
- Some countries do not allow the exclusion or limitation of
incidental or consequential damages or exclusions of implied
warranties. Therefore, the limitations or exclusions herein
may not apply. This warranty gives you specific legal rights,
in addition to other rights which vary from state to state or
country to country.
Warranty
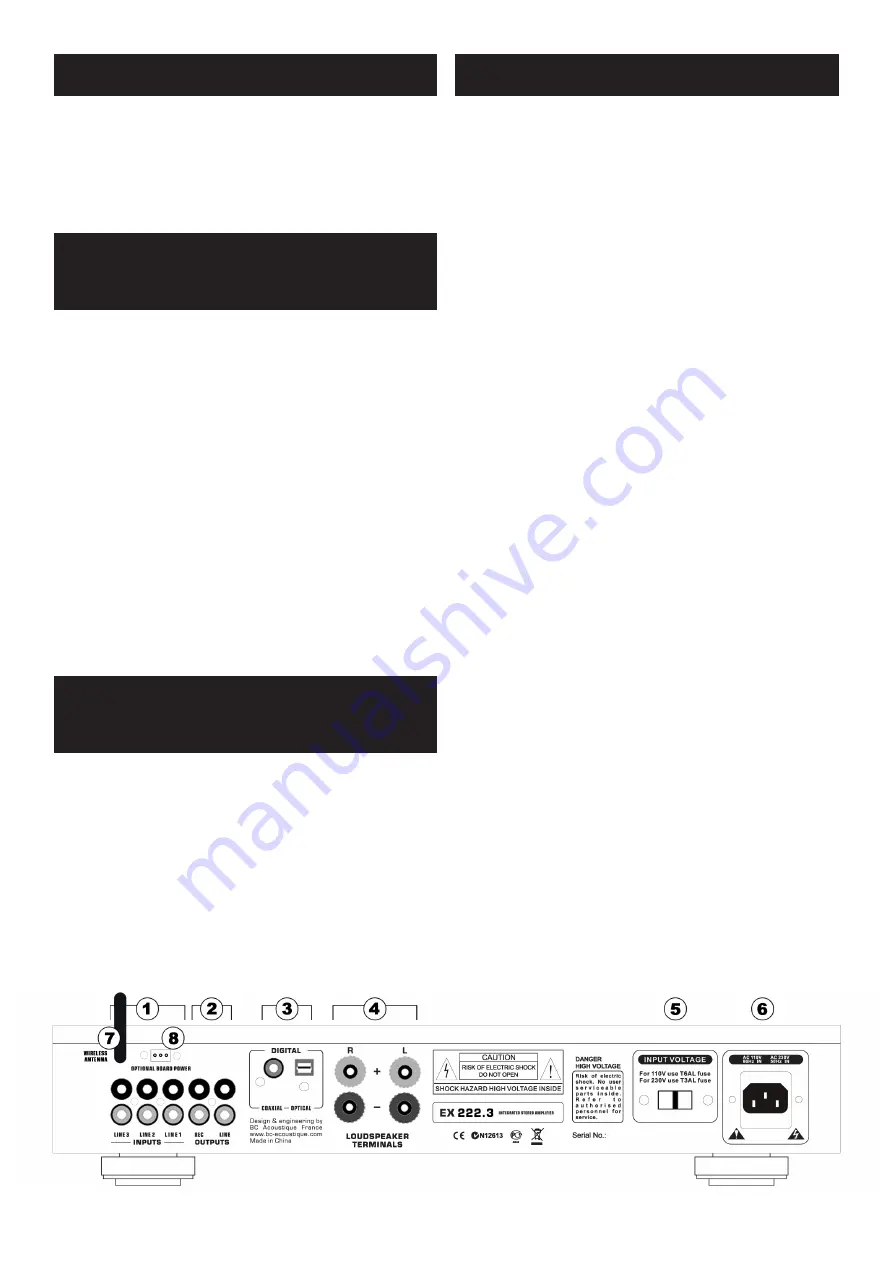
Connections to the amplifier
② OUTPUTS (OUTPUT - RCA)
REC
It allows to retrieve the selected amplifier to «source» level
audio signal that is independent of the level volume control.
This output is traditionally used to connect the amplifier to
a recording device.
LINE
It allows to retrieve the selected audio amplifier in proportion
to the level of volume control signal. This output is mainly used
to connect an additional power block to perform a
«bi-amplification».
③ DIGITAL
Your amplifier has a built-in digital-to-analog converter.
Therefore it is possible to connect a digital source (such as most
modern television screens).
To ensure compatibility with all existing types of digital
terminals, the amplifier has an «optical» socket and a «coaxial»).
However this entry is unique and it is possible to listen one
device at a time even if both are connected.
④ LOUDSEPAKER TERMINALS
Connect the speaker to the terminals marked RIGHT
«+ R» and «R -» ensuring that «R +» is connected to the «+»
terminal of the enclosure and «R -» is connected to the terminal
«-» the same enclosure. Connect the LEFT speaker to the
terminals marked «L +» and «L -» by doing the same.
Make sure that no wires are not insulated can bypass the
speaker outputs. Make sure that the speaker terminals are tight
enough to ensure a good electrical connection. If the terminal
screws are not tight enough, the sound quality may be affected.
Use only dedicated wire to the speaker (a section of 1.5 mm² or
more is recommended especially if the cable length is greater
than 3m).
Important Note:
Check the impedance of your speakers.
When using a pair of speakers, you can use speakers with an
impedance of between 4 and 8 ohms.
Make sure that the device is not plugged into the mains
before making any connections. It is also recommended to turn
off or disconnect all other devices associated while making
connections to the product.
Connect the speakers to the speaker terminals on the back
and the sources of the corresponding input jacks on the back.
Connect the power cord to the connector on the one hand AC
Mains product and the other to a wall outlet.
IMPORTANT:
Make sure you have set the voltage selector ⑤
to suit your country: INPUT VOLTAGE: AC110 (USA) and
AC230
(EUROPE).
Turn the POWER switch ON.
If the unit is equipped with a standby, then press the STANDBY
button to turn it on.
Press the input selector for the source you want to hear.
Basic instructions
Quick starting guide
WARNING:
Be sure to turn off the power on your product before
making any connections. Similarly it is best to cut the power of
other devices you want to connect to your amplifier.
① INPUTS (INPUT - RCA)
The LINE 1 to LINE 3 inputs are designed to connect sources
«line level» to your amplifier. These inputs are designed for
so-called «analog» signals (as opposed to «digital» signals).
Compatible cables are made with these type «RCA», they are
traditionally identified by a color code «RED» for the RIGHT
channel and «WHITE» for the LEFT channel.
Rear panel
Connections to the amplifier


