Auxiliary Power Connector (J1)
Signal
PIN
VCCSB
3
VCC
2
PSON#
1
Note:
Set J1 to 2-3 closed. If AT power supply is to be
used
Front Panel Connector (JP1)
Signal
PIN
Signal
NC
16 15
NC
VCC
14 13 HDD
LED
VCC
12 11 Suspend
LED
GND
10 9 Reset in
GND
8 7 Suspend
SW
GND
6 5 Power
Button
VCC3SB 4 3 LED
Link
VCC3SB 2 1 LED Tx
Power Connector 1 (PWR1)
Signal
PIN
NC
1
VCC
2
+12V
3
-12V
4
GND
5
GND
6
GND
7
GND
8
-5V
9
VCC
10
VCC
11
VCC
12
CD-ROM Audio Input Connector (J4)
Signal
PIN
CD_R
4
CD_GND
3
CD_L
2
CD_GND
1
Clear CMOS (J3 / Pin 1, 3, 5)
You can use J3 to clear the CMOS data if necessary. To reset the CMOS data, set J3 to 3-5 closed for just a
few seconds, and then move the jumper back to 1-3 closed.
Clear CMOS (J3 / Pin 1, 3, 5)
Protect* Clear CMOS
* default
COM3 / 4 Pin 9 Signal Select (J5 / J6)
The EBC5410/5410D/5410V COM3 / 4 pin 9 signal can be selected as +12V, +5V, or Ring by setting
J5 / J6 respectively.
COM3 Select (J5)
Ring* +5V +12V
* default
COM4 Select (J6)
Ring* +5V +12V
* default
WARNING: CMOS Battery Damage
Replace your system’s CMOS RAM battery only with the identical CR-2032 3V Lithium-Ion coin cell (or equivalent) battery type
to avoid risk of personal injury or physical damage to your equipment. Always dispose of used batteries according to the
manufacturer’s instructions, or as required by the local ordinance (where applicable). The damage due to not following this
warning will void your motherboard’s manufacturer warranty.
J3
2 4 6
1 3 5
2 4 6
1 3 5
J5
J6
5 3 1
6 4 2
5 3 1
6 4 2
5 3 1
6 4 2
5 3 1
6 4 2
5 3 1
6 4 2
5 3 1
6 4 2
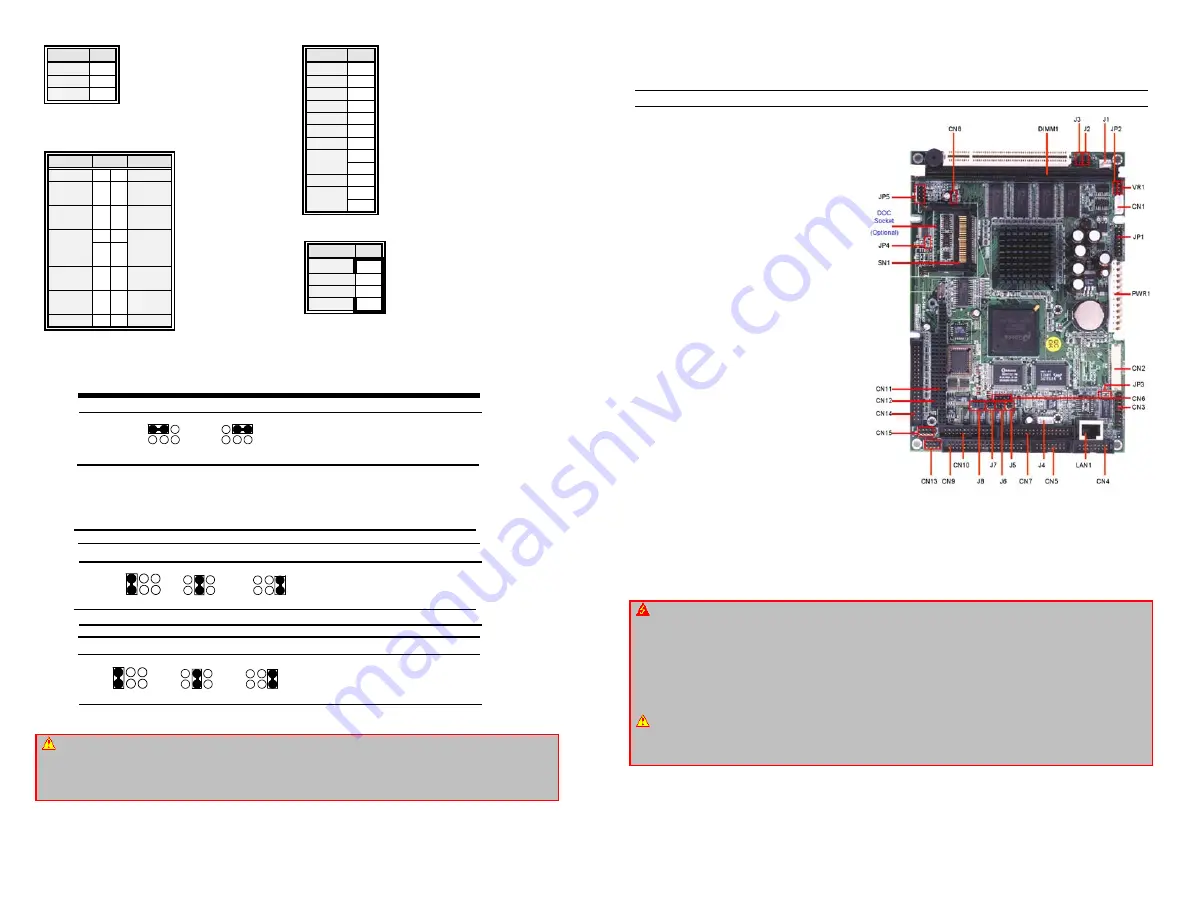
EBC5410 Quick Reference Guide
All-in-One NS Geode GX1 Single Board with LCD, AC97 Audio, 10/100Base-Tx
Ethernet Interface, 4COMs, & Optional LVDS, DSTN Companion Chip
User’s Quick Start Card
Version 1.0
http://www.bcmcom.com
Inspect the Package:
1
EBC5410/5410D/5410V
All-in-
One NS Geode GX1 Computing
Module
1 Quick Installation Guide
1 CD-ROM contains the followings:
—
User’s Manual (this manual in PDF file)
—
Ethernet driver and utilities
—
VGA drivers and utilities
—
Audio drivers and utilities
—
Latest BIOS (as of the CD-ROM was
made)
If any of these items are missing or damaged,
please contact your distributor or sales
representative immediately.
Copyright Notice
Copyright
2002 BCM Advanced Research,
ALL RIGHTS RESERVED.
No part of this document may be reproduced,
copied, translated, or transmitted in any form
or by any means, electronic or mechanical, for
any purpose, without the prior written
permission of the original manufacturer.
Trademark Acknowledgement
Brand and product names are trademarks or
registered trademarks of their respective
owners.
Disclaimer
BCM Advanced Research reserves the right to
make changes, without notice, to any product,
including circuits and/or software described or contained in this manual in order to improve design and/or
performance. BCM assumes no responsibility or liability for the use of the described product(s), conveys no
license or title under any patent, copyright, or mask work rights to these products, and makes no
representations or warranties that these products are free from patent, copyright, or mask work right
infringement, unless otherwise specified. Applications that are described in this manual are for illustration
purposes only. BCM Advanced Research makes no representation or warranty that such application will be
suitable for the specified use without further testing or modification.
WARNING: Electrostatic Sensitive Device (ESD)
Static electricity can easily damage your motherboard and will void your motherboard warranty. Keep the motherboard
and other system components in their anti-static packaging until you are ready to install them. Touch a grounded
surface before you remove any system component from its protective anti-static packaging. Unpacking and installation
should be done on a grounded, anti-static mat. The operator should be wearing an anti-static wristband, grounded at
the same points as the anti-static mat. During configuration and installation touch a grounded surface frequently to
discharge any static electrical charge that may have built up in your body. Avoid touching the components when
handling the motherboard or a peripheral card. Handle the motherboard and peripheral cards either by the edges or
by the peripheral card case-mounting bracket.
WARNING: Misplaced Jumper Damage
Incorrect setting jumpers and connectors may lead to damage to your motherboard and will void your motherboard
warranty. Please pay special attention not to connect these headers in wrong directions. DO NOT change ANY
jumpers while the motherboard has the power!


