background image

ESM-KBLH 

User’s Manual 

32 ESM-KBLH User

’s Manual


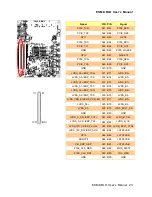
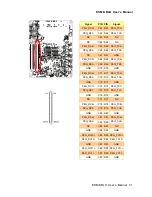
Signal 

PIN 

PIN 

Signal 

C91 

D91 

PEG_RX12- 

C92 

D92 

PEG_TX12- 

GND 

C93 

D93 

GND 

C94 

D94 

PEG_RX13- 

C95 

D95 

PEG_TX13- 

GND 

C96 

D96 

GND 

NC 

C97 

D97 

NC 

C98 

D98 

PEG_RX14- 

C99 

D99 

PEG_TX14- 

GND 

C100  D100 

GND 

P  C101  D101  P 

PEG_RX15-  C102  D102  PEG_TX15- 

GND 

C103  D103 

GND 

+VIN_9V_19V  C104  D104  +VIN_9V_19V 

+VIN_9V_19V  C105  D105  +VIN_9V_19V 

+VIN_9V_19V  C106  D106  +VIN_9V_19V 

+VIN_9V_19V  C107  D107  +VIN_9V_19V 

+VIN_9V_19V  C108  D108  +VIN_9V_19V 

+VIN_9V_19V  C109  D109  +VIN_9V_19V 

GND 

C110  D110 

GND 


Summary of Contents for ESM-KBLH

Page 1: ...rt No E2047289000R ESM KBLH 7th Gen Intel Core Processor i7 i5 i3 Type6 COMe Basic Module with Intel QM175 Chipset User s Manual 1st Ed 30 August 2017 Copyright Notice Copyright 2017 ALL RIGHTS RESERV...

Page 2: ...THE USER WILL BE REQUIRED TO CORRECT THE INTERFERENCE AT HIS OWN EXPENSE Notice This guide is designed for experienced users to setup the system within the shortest time For detailed information plea...

Page 3: ...rt device or system whose failure to perform can be reasonably expected to cause the failure of the life support device or system or to affect its safety or effectiveness A Message to the Customer Cus...

Page 4: ...TX mode selection 20 2 4 2 COM Express Connector 1 CN1A 21 2 4 2 1 Signal Description COM Express Connector 1 CN1A 25 2 4 2 1 1 Audio Signals 25 2 4 2 1 2 Gigabit Ethernet Signals 25 2 4 2 1 3 PCI Exp...

Page 5: ...3 2 Firmware Update Configuration 50 3 6 2 3 3 PTT Configuration 51 3 6 2 4 Trusted Computing 52 3 6 2 5 APCI Settings 53 3 6 2 6 NCT6106D Super IO Configuration 54 3 6 2 6 1 Serial Port 1 Configurati...

Page 6: ...3 3 6 3 2 2 SATA And RST Configuration 88 3 6 3 2 3 USB Configuration 89 3 6 3 2 4 HD Audio Configuration 90 3 6 4 Security 91 3 6 4 1 Secure Boot 92 3 6 4 1 1 Key Management 93 3 6 5 Boot 93 3 6 6 Sa...

Page 7: ...the PC chassis Caution Always ground yourself to remove any static charge before touching the CPU card Modern electronic devices are very sensitive to static electric charges As a safety precaution us...

Page 8: ...ESM KBLH User s Manual 8 ESM KBLH User s Manual 1 3 Document Amendment History Revision Date By Comment 1st August 2017 Initial Release...

Page 9: ...y before attempting to set up ESM KBLH series or change the standard configurations Whilst all the necessary information is available in this manual we would recommend that unless you are confident yo...

Page 10: ...System Temperature Voltage and FAN Status with Auto Throttling Control Expansion 8 x PCIe 1 IBL 546717 I O MIO 4 x SATAIII Support RAID0 1 5 10 LPC I2C SPI SMBus 2 x UART 2 wire SDIO optional USB 8 x...

Page 11: ...4 LCD Interface LVDS via CH7511B VGA via RTL2168 DP to VGA Audio Audio Amp intel HD audio I F Ethernet Ethernet Interface Intel I219LM Gigabit Ethernet PHY Mechanical Environmental Power Requirement 9...

Page 12: ...OTG 7th Generation Intel Core i7 i5 i3 QM175 DMI DDR4 ChA 2 x DDR4 2400 2133MHz 260P SO DIMM Socket upto 32GB USB3 0 x 4 PEG x 1 1 PCIex16 2 PCIex8 1 PCIex8 2 PCIex4 eDP LVDS eDP toLVDS CH7511B eDP DD...

Page 13: ...ESM KBLH User s Manual ESM KBLH User s Manual 13 2 Hardware Configuration...

Page 14: ...ESM KBLH User s Manual 14 ESM KBLH User s Manual 2 1 Product Overview...

Page 15: ...ESM KBLH User s Manual ESM KBLH User s Manual 15...

Page 16: ...rd disk keyboard mouse USB etc except for flat panel A CRT monitor must be connected in order to change NVRAM settings to support flat panel 4 Connect power supply to the board via the ATXPWR 5 Turn o...

Page 17: ...Memory ESM KBLH provides two 260 pin SODIMM socket supports up to 32GB DDR4 2400 2133 SDRAM Make sure to unplug the power supply before adding or removing DIMMs or other system components Failure to d...

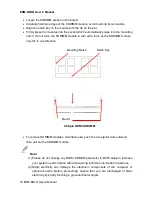
Page 18: ...e SODIMM module only fits in one direction To remove SODIMM modules simultaneously push the two ejector tabs outward then pull out the SODIMM module Note 1 Please do not change any DDR4 SDRAM paramete...

Page 19: ...ws A pair of needle nose pliers may be helpful when working with jumpers Connectors on the board are linked to external devices such as hard disk drives a keyboard or floppy drives In addition the boa...

Page 20: ...AT ATX mode selector SW1 Default AT ATX mode AT mode ATX mode OFF 1 ON 2 OFF 1 ON 2 2 4 1 1 Signal Description AT ATX mode selection AT ATX mode Description AT mode Auto power on no need to press Powe...

Page 21: ...GBE0_MDI1 A10 B10 CLK_24M_CB GND A11 B11 GND GBE0_MDI0 A12 B12 PWRBTN GBE0_MDI0 A13 B13 SMB_CK_A GBE0_CTREF A14 B14 SMB_DAT_A SUS_S3 A15 B15 SMB_ALERT SATA0_TX A16 B16 SATA1_TX SATA0_TX A17 B17 SATA1...

Page 22: ...USB4 A40 B40 USB5 GND A41 B41 GND USB2 A42 B42 USB3 USB2 A43 B43 USB3 USB_2_3_OC A44 B44 USB_0_1_OC USB0 A45 B45 USB1 USB0 A46 B46 USB1 VCC_RTC A47 B47 EXCD1_PERST EXCD0_PERST A48 B48 EXCD1_CPPE EXCD0...

Page 23: ...A72 B72 LVDS_B0 LVDS_A1 EDP_TX1 A73 B73 LVDS_B1 LVDS_A1 EDP_TX1 A74 B74 LVDS_B1 LVDS_A2 EDP_TX0 A75 B75 LVDS_B2 LVDS_A2 EDP_TX0 A76 B76 LVDS_B2 LVDS_VDD_EN EDP_VDD_EN A77 B77 LVDS_B3 LVDS_A3 A78 B78 L...

Page 24: ...C_CK PP_TPM A96 B96 VGA_I2C_DAT NC A97 B97 SPI_CS SER0_TX A98 B98 NC SER0_RX A99 B99 NC GND A100 B100 GND SER1_TX A101 B101 FAN_PWMOUT SER1_RX A102 B102 FAN_TACHIN LID A103 B103 SLEEP VIN_9V_19V A104...

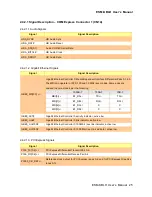
Page 25: ...pairs are unused in some modes per the following 1000B T 100B T 10B T MDI 0 B1_DA TX TX MDI 1 B1_DB RX RX MDI 2 B1_DC X X MDI 3 B1_DD X X GBE0_ACT Gigabit Ethernet Controller 0 activity indicator act...

Page 26: ...rame indicates the start of an LPC cycle LPC_AD 0 3 LPC multiplexed address command and data bus LPC_DRQ 0 1 LPC serial DMA request LPC_CLK LPC clock output 33MHz nominal SERIRQ LPC serial interrupt 2...

Page 27: ...dicates system is in Suspend to RAM state Active low output SUS_S4 Indicates system is in Suspend to Disk state Active low output SUS_S5 Indicates system is in Soft Off state BATLOW Indicates that ext...

Page 28: ...ut to VGA monitor VGA_ I 2 C_CK DDC clock line I2C port dedicated to identify VGA monitor capabilities VGA_ I 2 C_DAT DDC data line 2 4 2 1 12 USB Signals Signal Signal Description USB 0 7 USB differe...

Page 29: ...STX2 USB_SSRX2 C10 D10 USB_SSTX2 GND C11 D11 GND USB_SSRX3 C12 D12 USB_SSTX3 USB_SSRX3 C13 D13 USB_SSTX3 GND C14 D14 GND NC C15 D15 DDI1_CTRLCLK_AUX NC C16 D16 DDI1_CTRLDATA_AUX LVDS_BLUP C17 D17 NC L...

Page 30: ...IR0 C39 D39 DDI2_PAIR0 DDI3_PAIR0 C40 D40 DDI2_PAIR0 GND C41 D41 GND DDI3_PAIR1 C42 D42 DDI2_PAIR1 DDI3_PAIR1 C43 D43 DDI2_PAIR1 DDI3_HPD C44 D44 DDI2_HPD NC C45 D45 NC DDI3_PAIR2 C46 D46 DDI2_PAIR2 D...

Page 31: ...69 PEG_TX5 GND C70 D70 GND PEG_RX6 C71 D71 PEG_TX6 PEG_RX6 C72 D72 PEG_TX6 GND C73 D73 GND PEG_RX7 C74 D74 PEG_TX7 PEG_RX7 C75 D75 PEG_TX7 GND C76 D76 GND NC C77 D77 NC PEG_RX8 C78 D78 PEG_TX8 PEG_RX8...

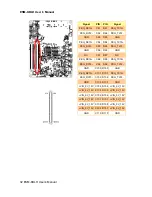
Page 32: ...X13 GND C96 D96 GND NC C97 D97 NC PEG_RX14 C98 D98 PEG_TX14 PEG_RX14 C99 D99 PEG_TX14 GND C100 D100 GND PEG_RX15 C101 D101 PEG_TX15 PEG_RX15 C102 D102 PEG_TX15 GND C103 D103 GND VIN_9V_19V C104 D104 V...

Page 33: ...ics lane reversal input strap Pull low on the Carrier board to reverse lane order 2 4 3 1 3 DDI Signals Signal Signal Description DDI 1 3 _PAIR 0 3 DDI 1 3 _PAIR 0 3 Digital Display Interface 1 to 3 P...

Page 34: ...ESM KBLH User s Manual 34 ESM KBLH User s Manual 3 BIOS Setup...

Page 35: ...ishes the BIOS will seek an operating system on one of the disks and then launch and turn control over to the operating system While the BIOS is in control the Setup program can be activated in one of...

Page 36: ...u Quit and not save changes into NVRAM Status Page Setup Menu and Option Page Setup Menu Exit current page and return to Main Menu key Increase the numeric value or make changes key Decrease the numer...

Page 37: ...that your computer no longer is able to boot the BIOS supports an override to the NVRAM settings which resets your system to its defaults The best advice is to only alter settings which you thoroughly...

Page 38: ...appear on the screen The Main Menu allows you to select from several setup functions and exit choices Use the arrow keys to select among the items and press Enter to accept and enter the sub menu 3 6...

Page 39: ...Date Use the system date option to set the system date Manually enter the day month and year 3 6 1 3 System Time Use the system time option to set the system time Manually enter the hours minutes and...

Page 40: ...2 Advanced Menu This section allows you to configure your CPU and other system devices for basic operation through the following sub menus 3 6 2 1 CPU Configuration Use the CPU configuration menu to v...

Page 41: ...Enabled Default When enabled a VMM can utilize the additional hardware capabilities provided by Vanderpool Technology Active Processor Cores All Default 1 2 3 Number of cores to enable in each process...

Page 42: ...lows more than two frequency ranges to be supported Turbo Mode Enabled Default Disabled Enable Disable processor Turbo Mode requires EMTTM enabled too AUTO means enabled unless max turbo ratio is bigg...

Page 43: ...ower Limit MSR Lock Disabled Default Enabled Enable Disable locking of Package Power Limit settings When enabled PACKAGE_POWER_LIMIT MSR will be locked and a reset will be required to unlock the regis...

Page 44: ...tio Limit 3 Core Ratio Limit Override 0 83 4 Core Ratio Limit with range 0 to 83 The Minimum range may vary between Processors This 4 Core Ratio Limit Must be Less than or equal to 1 Core Ratio Limit...

Page 45: ...600Mhz 650Mhz 700Mhz 750Mhz 800Mhz 850Mhz 900Mhz 950Mhz 1000Mhz 1050Mhz 1100Mhz 1150Mhz 1200Mhz Auto Updated 3 6 2 3 PCH FW Configuration Item Options Description AMT BIOS Features Disabled Enabled De...

Page 46: ...6 2 3 1 AMT Configuration Item Option Description ASF support Disabled Enabled Default Enable Disable Alert Standard Format support USB Provisioning of AMT Disabled Default Enabled Enable Disable of A...

Page 47: ...cess Trigger CIRA boot Note Network Access must be activated first from MEBx Setuup 3 6 2 3 1 2 ASF Configuration Item Option Description PET Progress Disabled Enabled Default Enable Disable PET Event...

Page 48: ...guration Item Option Description Secure Erase mode Simulated Default Real Change Secure Erase module behavior Simulated Performs SE flow without erasing SSD Real Erase SSD Force Secure Erase Disabled...

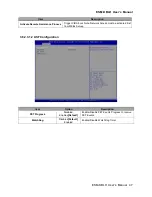
Page 49: ...de Unconfigure ME Confirmation Disabled Default Enabled OEMFlag Bit 6 Hide Unconfigure ME confirmation prompt when attempting ME unconfiguration MEBx OED Debug Menu Enable Disabled Default Enabled OEM...

Page 50: ...ser s Manual 50 ESM KBLH User s Manual 800x600 1024x768 3 6 2 3 2 Firmware Update Configuration Item Option Description ME FW Image Re Flash Disabled Default Enabled Enable Disable Me FW Image Re Flas...

Page 51: ...Device Selection dTPM Default PTT Selects TPM device PTT or dTPM PTT Enables PTT in SkuMgr dTPM 1 2 Disables PTT in SkuMgr Warning PTT dTPM will be disabled and all data saved on it will be lost PTP...

Page 52: ...for the Security Device NOTE Your Computer will reboot during restart in order to change State of Security Device Platform Hierarchy Disabled Enabled Default Enable or Disable Platform Hierarchy Stor...

Page 53: ...I Auto Configuration Enable Hibernation Disabled Enabled Default Enables or Disables System ability to Hibernate OS S4 Sleep State This option may not be effective with some OS ACPI Sleep State Suspen...

Page 54: ...Configuration You can use this item to set up or change the NCT6106D Super IO configuration for serial ports Please refer to 3 6 2 6 1 3 6 2 6 3 for more information Item Description Serial Port 1 Con...

Page 55: ...ser s Manual ESM KBLH User s Manual 55 3 6 2 6 1 Serial Port 1 Configuration Item Option Description Serial Port Enabled Default Disabled Enable or Disable Serial Port COM 3 6 2 6 2 Serial Port 2 Conf...

Page 56: ...2 Default UART 422 UART 485 Change the Serial Port as RS232 422 485 3 6 2 6 3 Parallel Port Configuration Item Option Description Parallel Port Enabled Default Disabled Enable or Disable Parallel Port...

Page 57: ...r s Manual 57 3 6 2 7 NCT6106D HW Monitor 3 6 2 8 IT8528SEC Super IO Configuration You can use this item to set up or change the IT8528SEC Super IO configuration for serial ports Please refer to 3 6 2...

Page 58: ...anual 58 ESM KBLH User s Manual 3 6 2 8 1 SER0_TX SER0_RX JCN3 Configuration Item Option Description Serial Port Enabled Default Disabled Enable or Disable Serial Port COM 3 6 2 8 2 SER1_TX SER1_RX JC...

Page 59: ...User s Manual 59 Item Option Description Serial Port Enabled Default Disabled Enable or Disable Serial Port COM 3 6 2 9 H W Monitor Item Options Description Smart Fan Function Enabled Disabled Defaul...

Page 60: ...ult Disabled Enables or Disables Smart Fan 3 6 2 9 1 Smart Fan Mode Configuration Item Option Description CPU Smart Fan Mode Manual Mode Default Mode 01 02 03 04 05 06 07 08 09 10 11 12 13 14 15 16 17...

Page 61: ...ings Item Options Description Wake system from S5 Disabled Default Fixed Time Dynamic Time Enable or disable System wake on alarm event Select Fixed Time system will wake on the hr min sec specified S...

Page 62: ...up day 1 31 Select 0 for daily system wake up 1 31 for which day of the month that you would like the system to wake up Wake up hour 0 23 Select 0 23 For example enter 3 for 3am and 15 for 3pm Wake up...

Page 63: ...ual ESM KBLH User s Manual 63 3 6 2 11 Serial Port Console Redirection Item Options Description Console Redirection Disabled Default Enabled Console Redirection Enable or Disable 3 6 2 11 1 Smart Fan...

Page 64: ...l data bit Stop Bits 1 Default 2 Stop bits indicate the end of a serial data packet A start bit indicates the beginning The standard setting is 1 stop bit Communication with slow devices may require m...

Page 65: ...T100 VT100 VT UTF8 Default ANSI VT UTF8 is the preferred terminal type for out of band management The next best choce is VT100 and then VT100 See above in Console Redirection Settings page for more He...

Page 66: ...User s Manual 3 6 2 11 3 Console Redirection Settings Item Option Description Legacy Serial Redirection Port COM0 Default Select a COM port to display redirection of Legacy OS and Legacy OPROM Message...

Page 67: ...ription Network Stack Enabled Disabled Default Enable Disable UEFI Network Stack Item Options Description Network Stack Enabled Default Disabled Enable Disable UEFI Network Stack Ipv4 PXE Support Enab...

Page 68: ...port If disabled IPV6 PXE boot option will not be created Ipv6 HTTP Support Enabled Disabled Default Enable Ipv6 HTTP Boot Support If disabled IPV6 HTTP boot option will not be created PXE boot wait t...

Page 69: ...BIOS reaction on INT19 trapping by Option ROM IMMEDIATE execute the trap right away POSTPONED execute the trap during legacy boot Boot Option filter UEFI and Legacy Legacy only Default UEFI only This...

Page 70: ...ESM KBLH User s Manual 70 ESM KBLH User s Manual 3 6 2 15 NVMe Configuration 3 6 2 16 USB Configuration The USB Configuration menu helps read USB information and configures USB settings...

Page 71: ...ion support This should be enabled for the complete USB keyboard legacy support for non USB aware OSes USB transfer time out 1 sec 5 sec 10 sec 20 sec Default The time out value for Control Bulk and I...

Page 72: ...ESM KBLH User s Manual 72 ESM KBLH User s Manual 3 6 3 Chipset 3 6 3 1 System Agent SA Configuration Item Option Description VT d Enabled Default Disabled VT d capability...

Page 73: ...t is automatically enabled when selecting 2048MB aperture To use this feature please disable CSM Support DVMT Pre Allocated 0M 32M 64M 4M 8M 12M 16M 20M 24M 28M 32M F7 Default 36M 40M 44M 48M 52M 56M...

Page 74: ...nt Secondary boot display selection will appear based on your selection VGA modes will be supported only on primary display Active LFP No eDP eDP Port A Default Select the Active LFP Configuration No...

Page 75: ...0 Default 75 100 Select LVDS back light PWM duty LVDS Back Light PWM Frequency 200 Hz Default 300 Hz 400 Hz 500 Hz 700 Hz 1kHz 2kHz 3kHz 5kHz 10kHz 20kHz Select LVDS back light PWM Frequency Item Opti...

Page 76: ...LFP No eDP Default eDP Port A Select the Active LFP Configuration No LVDS VBIOS does not enable LVDS Int LVDS VBIOS enable LVDS driver by Integrated encoder SDVO LVDS VBIOS enables LVDS driver by SDV...

Page 77: ...tts is calculated by multiplying this value by the Slot Power Limit Scale Values 0 255 PEG0 Slot Power Limit Scale 1 0x Default 0 1x 0 01x 0 001x Select the scale used for the Slot Power Limit Value P...

Page 78: ...able or Disable the Root Port Max Link Speed Auto Default Gen1 Gen2 Gen3 Configure PEG 0 1 2 Max Speed PEG2 Slot Power Limit Value 0 255 75 Default Sets the upper limit on power supplied by slot Power...

Page 79: ...s Manual 79 3 6 3 1 3 1 PEG Port Feature Configuration Item Option Description Detect Non Compliance Device Disabled Default Enabled Detect Non Compliance PCI Express Device in PEG 3 6 3 1 3 2 Gen3 R...

Page 80: ...0 11 12 13 14 15 0 7 Value of Lane 0 1 2 3 4 5 6 7 8 9 10 11 12 13 14 15 3 6 3 1 3 3 Gen3 Endpoint Preset value for each Lane Item Option Description Lane0 1 2 3 4 5 6 7 8 9 10 11 12 13 14 15 0 7 Valu...

Page 81: ...undle1 0 Gen3 RxCTLE setting for Bundle1 Lane2 Lane3 Bundle2 0 Gen3 RxCTLE setting for Bundle2 Lane4 Lane5 Bundle3 0 Gen3 RxCTLE setting for Bundle3 Lane6 Lane7 Bundle4 0 Gen3 RxCTLE setting for Bundl...

Page 82: ...roller Disabled Enabled Default Enable or disable onboard NIC Wake on LAN Enable Disabled Enabled Default Enable or disable integrated LAN to wake the system Serial IRQ Mode Quiet Continuous Default C...

Page 83: ...ation 3 6 3 2 1 1 PCI Express Root Port1 Item Option Description PCI Express Root Port 1 Enabled Default Disabled Control the PCI Express Root Port Topology Unknown x1 x4 Default Sata Express M2 Ident...

Page 84: ...2 Gen3 Configure PCIe Speed PCIE1 CLKREQ Mapping Override Default Default No CLKREQ Custom number PCIE CLKREQ Qverride for default platform mapping 3 6 3 2 1 2 PCI Express Root Port5 Item Option Descr...

Page 85: ...t No CLKREQ Custom number PCIE CLKREQ Qverride for default platform mapping 3 6 3 2 1 3 PCI Express Root Port6 Item Option Description PCI Express Root Port 6 Enabled Default Disabled Control the PCI...

Page 86: ...IE CLKREQ Qverride for default platform mapping 3 6 3 2 1 4 PCI Express Root Port7 Item Option Description PCI Express Root Port 7 Enabled Default Disabled Control the PCI Express Root Port Topology U...

Page 87: ...form mapping 3 6 3 2 1 5 PCI Express Root Port8 Item Option Description PCI Express Root Port 8 Enabled Default Disabled Control the PCI Express Root Port Topology Unknown x1 Default x4 Sata Express M...

Page 88: ...m Options Description SATA Controller s Enabled Default Disabled Enable Disable SATA Device SATA Mode Selection AHCI Default RAID Determines how SATA controller s operate SATA Controller Speed Default...

Page 89: ...2 Identify the SATA Topology if it is Default or ISATA or Flex or DirectConnect or M2 3 6 3 2 3 USB Configuration Item Option Description XHCI Disable Compliance Mode FALSE Default TRUE Option to disa...

Page 90: ...io Configuration Item Option Description HD Audio Disabled Enabled Auto Default Control Detection of the HD Audio device Disable HDA will be unconditionally disabled Enabled HDA will be unconditionall...

Page 91: ...ESM KBLH User s Manual ESM KBLH User s Manual 91 3 6 4 Security Administrator Password Set setup Administrator Password User Password Set User Password...

Page 92: ...Boot Disabled Default Enabled Secure Boot can be enabled if 1 System running in User mode with enrolled Platform Key PK 2 CSM function is disabled Secure Boot Mode Standard Custom Default Secure Boot...

Page 93: ...l ESM KBLH User s Manual 93 3 6 4 1 1 Key Management Item Option Description Provision Factory Defaults Disabled Default Enabled Allow to provision factory default Secure Boot keys when System is in S...

Page 94: ...Quiet Boot option Fast Boot Disabled Default Enabled Enables or disables boot with initialization of a minimal set of devices required to launch active boot option Has no effect for BBS boot options...

Page 95: ...S settings to the factory default This option is useful if the controller exhibits unpredictable behavior due to an incorrect or inappropriate BIOS setting 3 6 6 4 Launch EFI Shell from filesystem dev...

Page 96: ...LH User s Manual 96 ESM KBLH User s Manual 4 Drivers Installation Note Installation procedures and screen shots in this section are for your reference and may not be exactly the same as shown on your...

Page 97: ...If not locate Index htm and choose the product from the menu left or link to Driver_Chipset Intel ESM KBLH_KBLA Note The installation procedures and screen shots in this section are based on Windows...

Page 98: ...tomatically If not locate Index htm and choose the product from the menu left or link to VGA ESM KBLH_KBLA Note The installation procedures and screen shots in this section are based on Windows 10 ope...

Page 99: ...cts automatically If not locate Index htm and choose the product from the menu left or link to Driver_Gigabit Intel I219LM ESM KBLH_KBLA_LAN Note The installation procedures and screen shots in this s...

Page 100: ...ESM KBLH User s Manual 100 ESM KBLH User s Manual Step 6 Click Finish to complete setup...

Page 101: ...e Index htm and choose the product from the menu left or link to Utility ESM KBLH_KBLA_ME Note The installation procedures and screen shots in this section are based on Windows 10 operation system If...

Page 102: ...ducts automatically If not locate Index htm and choose the product from the menu left or link to Utility ESM KBLH_KBLA_SerialIO Note The installation procedures and screen shots in this section are ba...

Page 103: ...ESM KBLH User s Manual ESM KBLH User s Manual 103 5 Mechanical Drawing...

Page 104: ...ESM KBLH User s Manual 104 ESM KBLH User s Manual Unit mm...

Page 105: ...ESM KBLH User s Manual ESM KBLH User s Manual 105 Unit mm...

Reviews: