background image


                              OFT10W-3455J User’s Manual 


10

Chapter 1: IO Port, Mounting Hole Placements 


1.1 

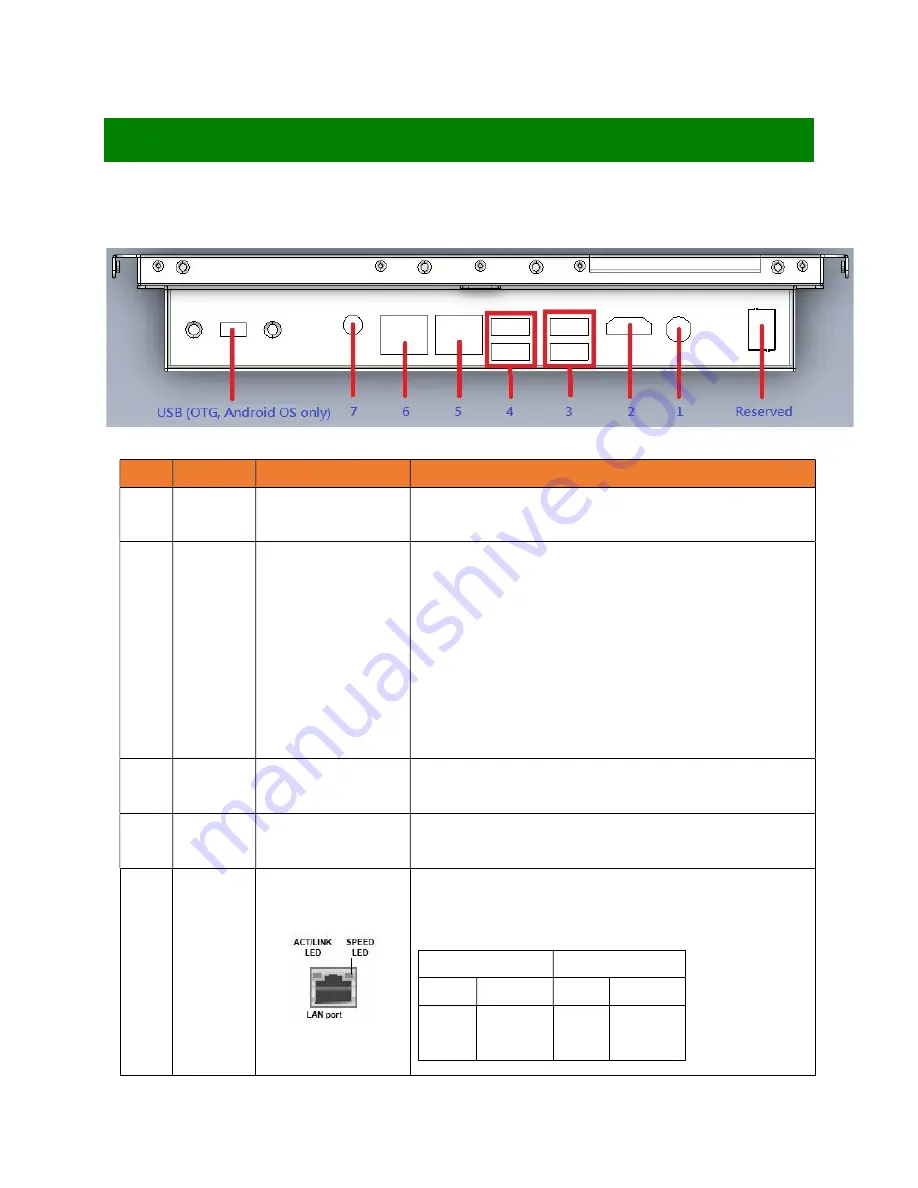
IO Ports 


Item 

Name 

Function 

Description 

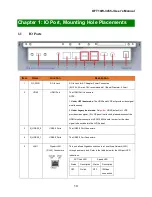
DC_PWR 

DC-In Jack 


DC-In Jack for AC Adapter Power Connection. 

(9V~36V, 6A max. 19V recommended)    (Barrel Diameter: 5.5mm) 

HDMI 


HDMI Port 

The HDMI Port Connectors. 

NOTE: 

1. 

Under UEFI boot mode:

 The HDMI and LVDS will provide video signal 

simultaneously.   

2. 

Under Legacy boot mode:

 Only 

either

 HDMI (default) or LVDS 

provides video signal. (if LVDS panel is attached, please disconnect the 

HDMI monitor connection to ECM-3455J board in order for the video 

signal to be switched to the LVDS panel). 

R_USB30_2 


USB3.0 Ports 

The USB3.0 Port Connectors 

R_USB30_1 


USB3.0 Ports 

The USB3.0 Port Connectors.   

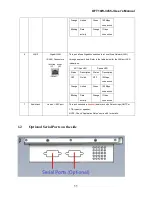
LAN1 


Gigabit LAN   

(RJ-45) Connectors 


This port allows Gigabit connection to a Local Area Network (LAN) 

through a network hub. Refer to the table below for the LAN port LED 

indications.   

ACT/Link LED 

Speed LED 

Status 

Description  Status 

Description 

OFF 

No link 

OFF 

10Mbps 

connection 

Summary of Contents for OFT10W-3455J

Page 1: ...OFT10W 3455J User s Manual 1 OFT10W 3455J Intel J3455 SoC User s Manual Edition 1 01 Nov 2022...

Page 2: ...ED AND USED IN ACCORDANCE WITH THE INSTRUCTION MANUAL MAY CAUSE HARMFUL INTERFERENCE TO RADIO COMMUNICATIONS OPERATION OF THIS EQUIPMENT IN A RESIDENTIAL AREA IS LIKELY TO CAUSE HARMFUL INTERFERENCE I...

Page 3: ...earch makes no representation or warranty that such application will be suitable for the specified use without further testing or modification Life Support Policy BCM Advanced Research PRODUCTS ARE NO...

Page 4: ...ly find answers in your product documentation These answers are normally a lot more detailed than the ones we can give over the phone So please consult the user s manual first To receive the latest ve...

Page 5: ...service time and freight Please consult your dealer for more details If you think you have a defective product follow these steps 1 Collect all the information about the problem encountered For examp...

Page 6: ...manual and want to inform us of these please contact our Customer Service department with the relevant details Safety Precautions Warning Always completely disconnect the power cord from your chassis...

Page 7: ...B 3 0 ports 2x stack up Rear I O 4 x USB 2 0 ports 2x Header F_USB2 header port 0 USB set on pin 2 4 6 8 10 only supports Dual Role OTG when BIOS XDCI Support is set at Device Mode Super I O Controlle...

Page 8: ...Connection 1 x Header for LVDS Panel Backlight Control SMBUS 1 x Header I2C 1 x Header SPI 1 x Header LPT GPIO 1 x Header LPC 1 x Header Volume Control 1 x Header Chassis Intrusion 1 x Header Onboard...

Page 9: ...OFT10W 3455J User s Manual 9 Power Connector 1 x Wide Range DC In 9V 36V 6A Max 19V Recommended 1x Header uses a 1x4 2 54mm to AC adapter barrel connector cable Form Factor 3 5 SBC 5 7 x 4...

Page 10: ...nly either HDMI default or LVDS provides video signal if LVDS panel is attached please disconnect the HDMI monitor connection to ECM 3455J board in order for the video signal to be switched to the LVD...

Page 11: ...to the table below for the LAN port LED indications ACT Link LED Speed LED Status Description Status Description OFF No link OFF 10Mbps connection Orange Linked Green 100Mbps connection Blinking Data...

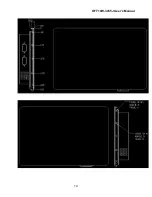
Page 12: ...OFT10W 3455J User s Manual 12 1 3 Mounting Hole Locations Dimensions Corresponding Screw Sizes...

Page 13: ...OFT10W 3455J User s Manual 13...

Page 14: ...OFT10W 3455J User s Manual 14...

Page 15: ...install mainboard components or change any mainboard settings Unplug the power cord from the wall socket before touching any component inside the system Use a grounded wrist strap or touch a safely gr...

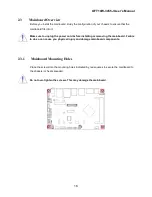
Page 16: ...ke sure to unplug the power cord before installing or removing the mainboard Failure to do so can cause you physical injury and damage mainboard components 2 3 1 Mainboard Mounting Holes Place the scr...

Page 17: ...s the system is either in the standby state or the power cable is still connected to the power source The Power On LED lights on off to indicate that the system status in sleep mode or in soft off mod...

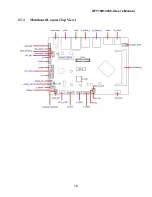
Page 18: ...OFT10W 3455J User s Manual 18 2 3 3 Mainboard Layout Top View...

Page 19: ...LVDS Backlight Enable Voltage Select 3 3V default 5V 1 x 3 header pitch 2 54mm 38 COMA_PW COMA 12V 5V Ring In Select 2 x 3 header pitch 2 54mm 39 COMB_PW COMB 12V 5V Ring In Select 2 x 3 header pitch...

Page 20: ...pitch 2 54mm F_USB2 header port 0 the USB set on pin 2 4 6 8 10 only Supports Dual Role OTG when BIOS XDCI Support is set at Device Mode 31 COMA Serial Port A 2 x 5 wafer header pitch 2 00mm 32 COMB S...

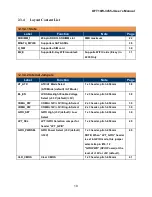
Page 21: ...hassis Intrusion Connector 1 x 2 wafer header 2 54mm 37 2 3 4 4 Back Panel Connectors Rear I O Label Function Note Page DC_PWR DC In Jack DC In Jack for AC Adapter Power Connection Barrel diameter 5 5...

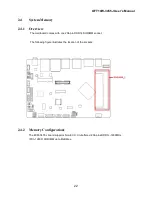
Page 22: ...erview The mainboard comes with one 204 pin DDR3L SODIMM socket The following figure illustrates the location of the sockets 2 4 2 Memory Configurations The ECM 3455J board supports Non ECC Un buffere...

Page 23: ...le carefully and keep away of touching its connectors 3 Align the notch key on the SODIMM module with the rib on the slot 4 Firmly press the SODIMM module into the socket which will be snapped into th...

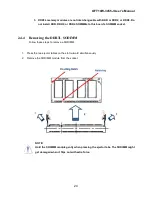
Page 24: ...s to this board s SODIMM socket 2 4 4 Removing the DDR3L SODIMM Follow these steps to remove a SODIMM 1 Press the two ejector tables on the slot outward simultaneously 2 Remove the SODIMM module from...

Page 25: ...if LVDS panel is attached please disconnect the HDMI monitor connection to ECM 3455J board in order for the video signal to be switched to the LVDS panel 3 R_USB30_2 USB3 0 Ports The USB3 0 Port Conn...

Page 26: ...the LAN port LED indications ACT Link LED Speed LED Status Description Status Description OFF No link OFF 10Mbps connection Orange Linked Green 100Mbps connection Blinking Data activity Orange 1Gbps c...

Page 27: ...for the system chassis which doesn t provide the access to DC_PWR AC adapter connection through ECM 3455J rear IO A 4 pin 2 54mm to AC adapter barrel connector cable is required NOTE 1 If AC adapter...

Page 28: ...2 6 3 System Fan Connector SYS_FAN The fan power connectors support system cooling fan with 12V When connecting the wire to fan connector please note that the red wire is designated as Power and shoul...

Page 29: ...A 3 0 Connector SATA3 This SATA port supports SATA3 0 standard Do not fold the Serial ATA cable into 90 degree angle Otherwise data loss may occur during data transmission 2 6 5 SATA Power Connector S...

Page 30: ...OFT10W 3455J User s Manual 30 2 6 6 mSATA Mini PCIE Connector MSATA_MPCIE This connector supports mSATA type SSDs 2 6 7 uSIM Card Slot U_SIM This slot provides connection to uSIM card...

Page 31: ...y This connector supports WIFI cards in 2230 2 6 9 Front USB2 0 Headers F_USB1 F_USB2 This header provides two USB2 0 connections An USB2 0 cable is required NOTE 1 F_USB2 header port 0 the USB set on...

Page 32: ...eaders provide serial connections with serial port COMA and COMB COMA provides RS232 or Ring In support COMB supports RS232 RS422 RS485 or Ring In 2 6 11 LVDS Panel Connector LVDS This header provides...

Page 33: ...5J User s Manual 33 2 6 12 LVDS Panel Backlight Connector BACKLIGHT This header provides connection for LVDS panel backlight control connections 2 6 13 I2C Header I2C This header provides I2C signal c...

Page 34: ...OFT10W 3455J User s Manual 34 2 6 14 SPI Header SPI This header provides SPI signal connection 2 6 15 SMBUS Header SMBUS This header provides SMBUS signal connections...

Page 35: ...OFT10W 3455J User s Manual 35 2 6 16 Volume Control Header VOLUME_CONTROL This header provides volume control signal 2 6 17 LPT GPIO Header LPT_GPIO This header provides LPT or GPIO signal connections...

Page 36: ...OFT10W 3455J User s Manual 36 2 6 18 LPC Header LPC This header provides LPC signal connections 2 6 19 Speaker Header SPEAKER This header supports 4 ohms 2W speaker...

Page 37: ...OFT10W 3455J User s Manual 37 2 6 20 Chassis Intrusion Header CI This 2 pins header provides chassis intrusion warning connection...

Page 38: ...lt or AT mode When the system is set in AT mode the system power on off will be controlled directly by the power switch on the power supply And some of the power saving modes will not function as ATX...

Page 39: ...al 39 2 7 3 COM Port 12V 5V Ring In Select COMA_PW COMB_PW These jumpers provide selection between 12V 5V and Ring In default 2 7 4 GPIO High Low Select GPIO_SET This jumper provides selection for GPI...

Page 40: ...r LPT_GPIO LPT_SEL This jumper selects will designate the function of LPT_GPIO header in LPT or GPIO 2 7 6 GPIO Power Select GPIO_PWRSEL When LPT_GPIO header is set in GPIO mode this jumper selects it...

Page 41: ...ault the jumper is set on pin location 2 and 3 To clear the CMOS here is the procedure 1 Disconnect all power connections to ECM 3455J first 2 Set the CLR_CMOS jumper to pin location 1 and 2 for at le...

Page 42: ...you need to turn on the power supply and press the ATX power switch on the front side of the case 5 The power LED on the front panel of the system case will light on The system will then run power on...

Page 43: ...the system power on system post a menu with all detected bootable devices which are attached to the system will be displayed Then you may select the desired first bootable device from this menu 3 Pow...

Page 44: ...diagnostic test called POST power on self test for all the necessary hardware it detects the entire hardware device and configures the parameters of the hardware synchronization Only when these tasks...

Page 45: ...er Setup restart the system to try again by turning it OFF then ON or pressing the RESET button on the system case You may also restart by simultaneously pressing Ctrl Alt and Delete keys The items un...

Page 46: ...be launched from this field A sub menu contains additional options for a field parameter You can use arrow keys to highlight the field and press Enter to call up the sub menu Then you can use the con...

Page 47: ...wing screen appears The BIOS menu screen displays the items that allow user to make changes to the system configuration To access the menu items press the up down right left arrow key on the keyboard...

Page 48: ...user an overview of the general system specifications such as time date etc 4 6 1 System Information Displays the auto detected BIOS information 4 6 2 System Date The date format is in Day Month Year...

Page 49: ...tion when change the settings of the Advanced menu items Incorrect field setting could cause the system not to function properly 4 7 1 AC Power Loss System s state after AC power loss Options Always O...

Page 50: ...Press power button 4 sec to power off 4 7 6 ErP Configure the ErP mode configuration 4 7 7 Reset Case Open Status Select enable to clear the record of previous chassis intrusion status notifications 4...

Page 51: ...And reboot the system in order to initiate the TPM support at BIOS CAUTION When TPM is enabled and utilized through TPM software under OS there is a possibility that the encrypted data will not be acc...

Page 52: ...stem Super IO chip parameters 4 7 13 1 Serial port 1 Configuration Set parameters of Serial Port 1 COMA header 4 7 13 2 Serial port 2 Configuration Set parameters of Serial Port 2 COMB header 4 7 13 3...

Page 53: ...OFT10W 3455J User s Manual 53 4 7 14 Hardware Monitor Monitor hardware status...

Page 54: ...up time The amount of time fan takes to increase its value by one step Units are intervals of 0 1 second 10 x 0 1 sec 1 sec as default Step down time The amount of time fan takes to decrease its valu...

Page 55: ...and min value of Fan target Temperature tolerance value stop duty startup value can be set from 0 to 127 Thermal Cruise mode controls the fan speed to keep the temperature in a specified range First...

Page 56: ...ng at full speed but the temperature still exceeds the high end a warning message is issued to protect the system 2 If the temperature falls below the high end e g 58 C but remains above the low end e...

Page 57: ...ion CPU Configuration Parameters 4 7 15 1 Socket 0 CPU Information Socket specific CPU information 4 7 15 2 CPU Power Management CPU Power Management options 4 7 15 2 1 EIST Enable Disable Intel Speed...

Page 58: ...led CPU will switch to minimum speed when all cores enter C State 4 7 15 3 Active Processor Cores Number of cores to enable in each processor package 4 7 15 4 Intel Virtualization Technology When enab...

Page 59: ...4 7 16 2 Legacy USB Support Enable Legacy USB support Auto option disables legacy support if no USB devices are connected Disable option will keep USB devices available only for EFI applications 4 7 1...

Page 60: ...OFT10W 3455J User s Manual 60 4 7 16 4 USB Mass Storage Driver Support Enable disable USB Mass Storage Driver Support...

Page 61: ...twork Stack 4 7 17 2 Ipv4 PXE Support Enable Ipv4 PXE Boot Support If disabled IPV4 PXE boot option will not be created 4 7 17 3 Ipv4 HTTP Support Enable Ipv4 HTTP Boot Support If disabled IPV4 HTTP o...

Page 62: ...Boot Support If disabled IPV6 HTTP option will not be created 4 7 17 6 PXE boot wait time Wait time too press ESC key to abort the PXE boot 4 7 17 7 Media detect count Number of times presence of medi...

Page 63: ...dministrator Password Setup Administrator Password If only the administrator s password is set then this only limits access to BIOS menu and is only asked for when entering BIOS 4 8 2 User Password Se...

Page 64: ...64 4 8 3 Secure Boot Customizable Secure Boot settings Customer needs to provide the code to the board manufacture in order to insert the code to the BIOS Customer also needs to embedded the correspon...

Page 65: ...wait for setup activation key 4 9 2 Bootup NumLock State Select the keyboard NumLock state 4 9 3 Full Screen LOGO Show Enable or disables Quiet Boot option 4 9 4 Fast Boot Enables or disables boot wit...

Page 66: ...y Boot Option 4 CD DVD connected to SATA port Boot Option 5 Hard Disk connected to SATA ports or MSATA port Boot Option 6 Network Boot Option 7 UEFI Shell only available when boot mode is set in UEFI...

Page 67: ...hanges and Exit Exit system setup after saving the changes 4 10 2 Discard Changes and Exit Exit BIOS without saving any changes made 4 10 3 Load Optimized Defaults Automatically load optimal BIOS sett...

Page 68: ...at next reboot NOTE This function will only function once after rebooted If user prefers to set the boot device boot order permanently then the change will need to be made under Boot Fixed Boot Order...

Page 69: ...evice under Windows Device Manager NOTE 1 If any of the driver listed above can t be installed you may update Win10 to the latest version through Windows Update by connecting ethernet cable to one of...

Page 70: ...Port 0 of F_USB2 header the USB port pin 2 4 6 8 10 right next to the SATA header can support Dual Role when 1 Set the BIOS option Advanced XDCI Support to Device Mode then save and exit BIOS NOTE 1...

Page 71: ...oot Option 1 NOTE a LAN1 the one next to USB ports is described as PXE iP4 Realtek PCIe GBE Family Controller LAN1 under BIOS UEFI NETWORK Drive BBS Priorities list b LAN2 the one next to audio port i...

Page 72: ...ice to the desired PXE LAN that selected under step 4 7 Save and Exit BIOS 8 The system will be prompted with PCIe version and establish link with PXE server 5 7 The SPEAKER Header The SPEAKER header...

Reviews: