background image

29

28

RepRapBCN

User Manual

When it is necessary to update the firmware?

It will be always necessary when adding new functionalities that imply a change in its control system such as new 
extruder head, Dual extruder heads or a Paste extruder. Changing other parameters such as pulleys or axes lenght, 
printing speed and endstops will also need a firmware update. 

When RepRapBCN publishes a new update, it will be announced through its web site and social networks, 
highlighting improvements and new features.

Downloading Arduino’s IDE

This section describes the steps to update / modify the controller firmware. The first step is to install the Arduino IDE 
on a computer. This is a program that enables us to interact with BCN3D + Arduino card.

1.    Download Arduino’s software package from  

http://www.reprapbcn.com

 o execute from the provided USB 

dongle.
2.   Install the program.
3.   Once installed, plug the BCN3DR to the computer through a USB cable, thus the connection with the Arduino 
board being established.

If the board drivers are not installed automatically, please follow the steps below:


http://arduino.cc/en/guide/windows#toc3

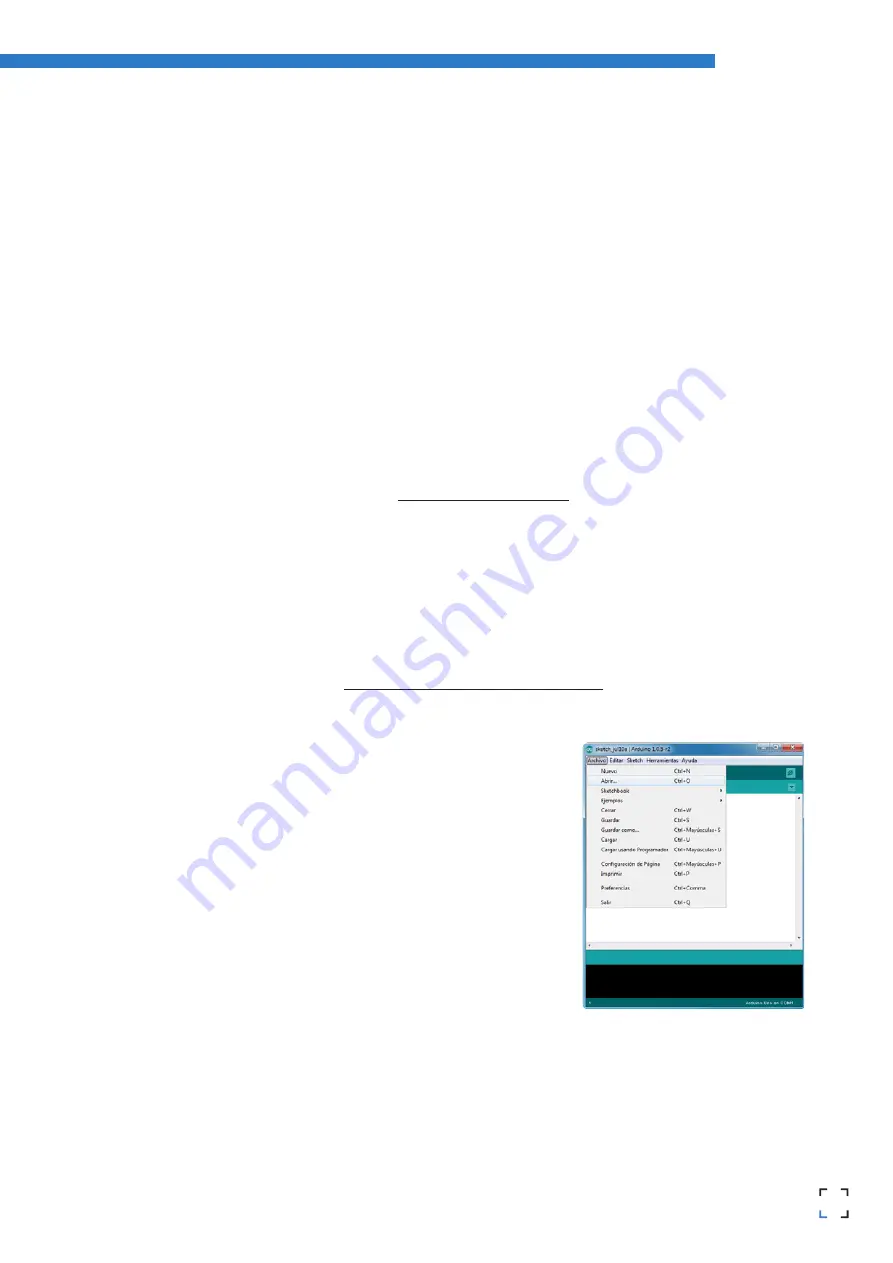
4.    Open the Arduino manager

5.    From File>Open, select the saved new firmware file.
The file has the *.ino extensión and it’s located in a folder with the same name.

6.    Now the desired parameters can be modified if necessary.

7.    Select the card model and port using

Herramientas>Tarjeta>Arduino Mega 

2560

 and 

Herramientas>Puerto Serial>COM X

• 

The card used by the BCN3DR is an Arduino Mega 2560.

• 

Port means the connector through which the board is connected to the 
computer (COM port). It can be  checked from Start> Computer> Right 
click> Properties> Device Manager> Ports COM and LPT (Windows)

Summary of Contents for BCN3DR

Page 1: ...R...

Page 2: ...d move home G CODE generation Slic3r configuration Slic3r first steps Transfering our G Code to the BCN3DR 6 PRINTING FROM USB AND SD CARDS 7 FILAMENTS PLA 8 FIRMWARE What is it and when to update it...

Page 3: ...s operation USB Cable controlled through Repetier Host Espec fico BCN3DR basado en Marlin STL Slic3r Cura AC 100 240 V 0 2 0 4 amps 50 60 Hz 60W 3 1 PRIOR INFORMATION Specifications Print Technology P...

Page 4: ...rial then a slight vertical movement to continue with the next layer The process is repeated until the full object is completed Through rotation the extruder uses a hobbed bolt to insert the right amo...

Page 5: ...i Privada Centre Cim hereby states that BCN3DR complies with the essential requirements and other rele vant provisions of the following Directives Low Tension Directive 2006 95 CE Directive on machine...

Page 6: ...tructions in this manual to avoid harmful interference to domestic appliances such as television or radio If the machine causes interference increase the separation bet ween it and other appliances Pr...

Page 7: ...ns have been arranged on the printer to warn users about areas of potential risk arising from its use or possible actions that are not recommended Hot Surface allow it to cool down before handling Mov...

Page 8: ...secured cardboard box Printed parts Sheet metal panels Rods and bars NEMA 17 motors Arduino Mega Ramps 1 4 LCD and Pololus drivers Wiring Fans Screws bearings and belts Bowden tube and BCNozzle Glass...

Page 9: ...essories The BCN3DR comes with a kit with every tool necessary to build the printer from scratch included It also includes a fixing spray specially design for 3d printing Allen wrenches set Flat screw...

Page 10: ...BCN3DR diagram 1 LCD Screen 2 SD Card Slot 3 Hot end 4 Extruder rod guides 5 Lineal guides 6 7 9 3 10 2 11 1 4 8 5 Left view Perspective 10 6 Endstop 7 Stepper motors 8 Power supply 9 ON OFF button 10...

Page 11: ...al Hot end 1 Heatsink 2 Heat break 3 Heatblock 4 Nozzle 5 Hotend fan Extruder 6 Idler 7 Tightening screws 8 Bowden tube 9 Pneufit Electronics 10 Drivers Pololus 11 Arduino RAMPS 12 USB connector 1 8 9...

Page 12: ...Axis 1 mm Move Z to movethe extruder platformto Z 000 00 mm 5 Move the nozzle closer to the X tightening screw following the glass surface To do that click on Prepare Move Axis 1 mm Move X and set it...

Page 13: ...is out disconnect the Bowden tube from the hotend connector The easiest way to do that is by following these steps 1 Tighten the Bowden tube to the end from below 2 Manually open the latch taking care...

Page 14: ...is an emergency red button to stop the machine in case of malfunction It stops the printer but keeps the screen and fans on Once pressed the printer resets itself to resume use Home Screen The main s...

Page 15: ...r right value indicates the printing head height NOTE This value might be incorrect when mesured just after switching the printer on Z 0 actually being the point at which the printer stopped last time...

Page 16: ...he axes Likewise it is necessary to perform the calibration process before selecting this option Preheat Unfolds a list of several materials Selecting one of them makes the printer preheat to the prop...

Page 17: ...a much deeper knowledge of the internal operations of the machine Print from SD No SD Allows you to access the SD card and select a stored file to print If the SD card is not inserted a No SD message...

Page 18: ...Autotemp Min Max Fact FanSpeed PID P PID I PID D PID C PreheatPLASettings Temperature Control Vmax Y Vmax Z Vmax E Vtrav min Vmin Amax X Amax X Amax X Amax X Aretract Xsteps nn Ysteps nn Zsteps nn Est...

Page 19: ...eling A wide range of available programs exist some of them free OpenSCAD FreeCAD Blender while others requiere a software license SolidWorks Rhinoceros Inventor etc In general terms all of them allow...

Page 20: ...most common errors are Holes The model must be unclosed with no holes present Facesorientation AnSTLmodeliscomposedofflatfaces Theirorientationmustbethesameandoutwards Inotherwords itcannotbethatsomes...

Page 21: ...ce 4 Move Rotate and Escale tools 5 Repairment tools Intherightpartofthescreenthemodel sbasicinfoandthecuttingtoolareavailable Repairment Incasethemodelneedstoberepairedbeforeprinting awarningsignwill...

Page 22: ...art ExportPart as STL and save with the desired name G CODE generation At this point we ve got a 3D model ready to print However a last step is required The STL file must be converted to file type the...

Page 23: ...mm for most builds HQ High quality standard configuration with a layer height of 0 1mm HS Setting targeted at jobs needing a fast print without loosing much quality SV Special configuration for contai...

Page 24: ...Type RepRap Marlin Sprinter 2 BedSize x 252 y 200 mm 3 NozzleDiameter 0 4mm 4 FilamentDiameter 2 9 mm 5 ExtrusionTemperature 220 C 6 BedTemperature 55 C Loading a profile Once configured we can load...

Page 25: ...one copy can be printed You just only have to slect the outline of the object or select it in the right side list to duplicate and click the button as many times as needed Exporting Gcode Once the ob...

Page 26: ...t allows you to visualize STL files automatically generate the GCode from precon figured profiles and monitor the printing progress A simpler alternative to RepetierHost is Printrun https github com k...

Page 27: ...perature is reached clean out excess material Home Menu Prepare Move axis 1mm Extruder Turn the wheel clockwise until the material flows continously through the nozzle Then clean out the extruded mate...

Page 28: ...It is dissolved in caustic soda 8 FIRMWARE What is a firmware and when to update it The firmware is a software needed to control a hardware Namely it is the internal program that controls your BCN3D...

Page 29: ...Arduino s software package from http www reprapbcn com o execute from the provided USB dongle 2 Install the program 3 Once installed plug the BCN3DR to the computer through a USB cable thus the connec...

Page 30: ...Loading starts first compiling the program for errors and then properly speaking loading the firmware on the me mory board 9 If the process is completed successfully the message Charge completed is d...

Page 31: ...he potentiometer clock pololu 5 minutes clockwise 3 If the motors move but from time to time make sudden movements ie lose steps they have too much power In that case turn off the machine and turn the...

Page 32: ...al 2 Seleccionar la opci n superior Info screen para volver al men de informaci n anterior De esta forma la pantalla se actualizara y volver a mostrar la informaci n correctamente si no sucede esto re...

Page 33: ...s endstop 2 The symptons above are present in just part of the first layer The reason being that the printer is not correctly cali brated the X axis is not parallel to the base and this causes the ext...

Page 34: ...here s a decrease in string shaped waste Modeling The higher we print the need for support structures becomes more obvious Deposited material tends to detach itself in steep areas or hanging parts suc...

Page 35: ...accumulate To clean the glass it must be removed from the printer The remains of the coating and dust are easily removed by placing the glass under water with a little soap Any remaining plastic stuck...

Page 36: ...RT 34 93 348 70 25 Call this numbers to contact our team to get either a direct answer to your question or to make an appointment and have your printer checked in our facilities This information is al...

Page 37: ...files http www netfabb com downloadcenter php basic 1 Open Source Freely developed and distributed software Pololu An electronic component that controls the functioning of the printer motors RepetierH...

Page 38: ...ience purposes only RepRapBCN reserves the right to modify or revise this manual at any time You accept being subject to any modifica tion and or revision Please contact RepRapBCN support tem if you w...

Page 39: ...39 RepRapBCN User Manual Fundaci CIM UPC 12 Lloren i Artigas 08028 Barcelona T 934 017 171 F 934 017 170 info reprapbcn com www reprapbcn com RepRapBCN 2014 All Rights Reserved BCN3DRUsermanual...

Reviews: