background image

User Manual 

6  

8  

If a part of the Product is repaired or replaced during 

the warranty period, the remaining warranty period 
for the entire product will apply to this part. However, 
repairing and / or replacing a part will not extend the 
warranty period.

BCN3D Technologies official Distributors are 
responsible for the warranty on behalf of BCN3D 
Technologies. Therefore, any warranty notification must 
be made directly to the BCN3D Technologies official 
Distributor where the product was originally purchased.

Any warranty claim must first be acknowledged 
and accepted, either by BCN3D Technologies or by a 
Distributor of BCN3D Technologies. The Distributor 
is obliged to rectify any damage for free according to 
this guarantee. In the event that the defect can not be 
repaired, the Distributor, within the warranty period, 
will replace the Product for an identical product, or if the 
product is no longer manufactured, for a similar product 
of the same value or offer an adequate refund.

Depending on the country, the warranty may not 
automatically include the costs incurred for the shipping 
of the defective Products for repair or replacement.

How to exercise the warranty? 

In order to exercise the warranty, you will have to contact 
us to 

support@bcn3d.com

.

1  

You will receive a document by email to be completed 

(RMA), so that we can authorize the reparation.

2

  Once the RMA is completed, you must send it to 

support@bcn3d.com

 duly completed.

3  

The technical support department will assess the 

situation and within 48 hours will tell you whether or 
not we accept your return request. If accepted, it will 
assign you an RMA number with a validity of 30 days.

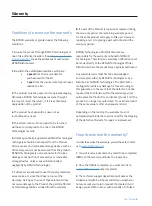
Warranty

Conditions to exercise the warranty

The BCN3D warranty is granted under the following 
conditions:

1  

Acquire the product through BCN3D Technologies or 

one of its authorized resellers (See 

https:/www.bcn3d.

com/en/reseller/

 to see the addresses of authorized 

BCN3D Distributors).

 Be within the established deadlines, which are:

•  2 years

 from the invoice date for 

purchases within the EU.

•  1 year

 from the invoice date for purchases 

outside the EU. 

 The product must be packed in its original packaging. 

Otherwise, BCN3D Technologies reserves the right 
to accept or reject the return, or if it is estimated, a 
depreciation of the product.

4  

The product has been sold as new, not as 

reconditioned or used.

 The serial number of the product to be returned 

will have to correspond to the one in the BCN3D 
Technologies records.

6  

Unless specifically requested by BCN3D Technologies, 

nothing else should be sent apart from the Product. 
All accessories and removable storage devices such as 
SD memory cards must be removed from the product. 
BCN3D Technologies is not responsible for the loss, 
damage or destruction of accessories or removable 
storage devices, unless caused intentionally or 
negligently by BCN3D Technologies.

7  

Customers are allowed to use third-party materials, 

accessories, etc, since that does not cancel the 
warranty. As long as the use of these elements does 
not cause damage to the Product, the part (s) affected 
by this damage will be excluded from the warranty.

Summary of Contents for Sigma Series

Page 1: ...User Manual 1 User Manual Sigma Series ...

Page 2: ...d liability exemptions Conformity Specifications Safety and compliance General information Hazards Proper area to install the printer Moving the machine Installation What is in the box Unboxing Diagram Set up Remove protections Install printing surface Using the printer Online Ethernet WiFi Offline SD Card Turn on the printer 5 5 5 5 5 5 5 5 5 9 10 12 12 12 14 15 16 16 17 17 21 21 21 22 22 22 22 2...

Page 3: ...lling BCN3D Cura Add printer Add an offline virtual printer Add a printer that is linked to your account Printing modes Regular Single Dual Mirror Duplication How to print the file Online printing From the BCN3D Cloud dashboard From BCN3D Cura via cloud Offline printing Via SD card Detach print from build plate Use a spatula Use water Reusage of the magigoo adhesives Clean the glass surface Rating...

Page 4: ... Printer setup Temperatures Information Maintenance General maintenance Hotend Extruder Printing surface Motion system Firmware upgrade Troubleshootin Error message Glossary Filaments BCN3D Technical Assistance Services Terms and Conditions Open Source 58 58 58 58 59 61 61 64 66 67 71 72 73 73 74 75 76 77 77 78 78 80 82 83 84 86 ...

Page 5: ...ding to the clauses set out below All the products purchased at BCN3D Technologies are covered by the Law 23 2003 of July 10 of Warranties on the Sale of Consumer Goods consolidated in Royal Legislative Decree 1 2007 Also covered by the Directive 99 44 CE of the European Parliament and of the Council of 25 May 1999 on certain aspects of the sale and warranties of consumer goods as amended by the D...

Page 6: ... department will assess the situation and within 48 hours will tell you whether or not we accept your return request If accepted it will assign you an RMA number with a validity of 30 days Warranty Conditions to exercise the warranty The BCN3D warranty is granted under the following conditions 1 Acquire the product through BCN3D Technologies or one of its authorized resellers See https www bcn3d c...

Page 7: ... for non payment Warranty exclusions This Warranty does not cover 1 Defects caused by inappropriate transportation without original packaging or handling of the Product including without limitation defects caused by sharp elements cutting bending compression or fall 2 The wear and tear caused by the use of the Product including but not limited to the wear of moving parts control panels or elements...

Page 8: ...S S L whether oral or written on any method However this Warranty does not limit either the consumer s rights specified in current legislation or the rights against the seller also set out in the legislation BARCELONA THREE DIMENSIONAL PRINTERS S L is not responsible in any case for the loss of business loss of contracts loss of profits loss of savings increase of costs or expenses for the use of ...

Page 9: ...1 UNE EN 61000 4 3 2 2007 This equipment has been tested and found to comply with the limits for a Class A digital device pursuant to part 15 of the FCC Rules These limits are designed to provide reasonable protection against harmful interference when the equipment is operated in a commercial environment This equipment generates uses and can radiate radio frequency energy and if not installed and ...

Page 10: ... mode Support mode Duplication mode Mirror mode Electronics Single Board Computer Toradex ARM Compute Module Motion Board BCN3D Electronics with Independent Stepper Drivers Firmware BCN3D Embedded Linux distribution BCN3D Sigma D25 Marlin Heated bed Silicone thermal pad Screen 5 full color capacitive touchscreen Supported languages Spanish English German French Italian Japanese Portuguese Chinese ...

Page 11: ... profiles Layer height 0 2mm 0 3mm 0 4mm depending on nozzle diameter Layer height 0 05mm 0 5mm custom profiles Positioning resolution X Y Z 1 25µm 1 25µm 1µm Operating temperature 15 ºC 30 ºC Extruder maximum temperature 300 ºC Heated bed maximum temperature 80 ºC ELECTRIC PROPERTIES Input AC 84 240V AC 3 6 1 3A 50 60Hz Maximum power consumption 650W SOFTWARE File preparation software BCN3D Cura ...

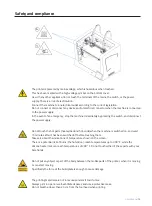
Page 12: ...RCELONA THREE DIMENSIONAL PRINTERS S L ARE EXEMPT FROM ANY LIABILITY IF THE USER DOES NOT FOLLOW THE INSTRUCTIONS FOR USE Hazards The following stickers have been affixed to the printer to warn users about the hazardous areas of the machine and actions which are not recommended as they will stop the machine from working properly Supervise the printer while it is printing to make sure it is working...

Page 13: ...plate is enough to cause damage The printing materials are not innocuous and emit toxic fumes Always print in open or well ventilated spaces and use a protective mask Do not breathe closer than 25 cm from the tool head when printing The printer is powered by mains voltage which is hazardous when touched This has been marked with a high voltage symbol on the bottom cover As with any other appliance...

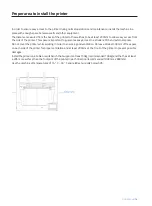
Page 14: ... guarantee easy access to extruders FRS and external spools Do not cover the printer while working in order to ensure a good ventilation Do leave at least 100mm of free space on each side of the printer for proper ventilation and at least 200mm at the front of the printer to prevent possible damages Install the printer on a table or workbench that supports at least 50kg recommended 100kg and that ...

Page 15: ...chine Also disconnect the ethernet cable and USB Wifi dongle if it is connected Ensure the glass printing surface is well fixed with the clamps The printer is heavy two people are necessary to perform this step Make sure that the table where the printer is being installed is close enough Lean the printer backwards holding it from both the side handle and the front bottom 15 User Manual ...

Page 16: ...BCN3D Sigma with 0 4mm hotends Ethernet cable SD card Quick start guide and warranty 2 Spool holders Upper box Spatula USB cable Pliers 3 Allen key Nylon cleaning filament Power supply cable USB dongle 10 Shims Sample part Magigoo glue stick Calibration gauge BCN3D 3 plastic covers 10 Thumbscrews ...

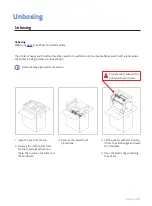
Page 17: ...ng Unboxing Watch our video to see how to correctly unbox 1 Open the box from the top 2 Remove the components from the foam and place them on a table Then remove the foam and the cardboard 3 Remove the lateral foam protections 4 Lift the printer with care holding it from the side flanges and place it on the table 5 Open the plastic bag containing the printer Unboxing Proper area to take out the pr...

Page 18: ... 4 SD Card reader 5 Touchscreen 6 Spool holder 7 Filament spool 8 Glass printing surface 9 Extruder 10 Power plug 11 USB port 12 Ethernet port 13 External spool holder 14 External filament spool 15 Filament Runout sensor FRS 16 Power switch 5 4 3 8 1 2 16 6 7 ...

Page 19: ...User Manual 19 Diagram 9 12 14 11 13 10 15 ...

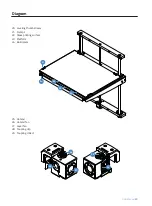
Page 20: ...anual 20 Diagram 20 Leveling thumbscrews 21 Clamps 22 Glass printing surface 23 Platform 24 Build plate 25 Hotend 26 Hotend fan 27 Layer fan 28 Coupling clip 29 Coupling collect 20 21 22 23 24 25 27 26 28 29 ...

Page 21: ...arriage and one under the printing surface Install printing surface The BCN3D Sigma printing surface is the area where the hotends deposit the material layer by layer to construct the model It is very important that the printing surface is correctly installed before printing Follow the instructions Watch our video to see how to correctly position the printing surface Pivot the left and right sprin...

Page 22: ...er end of the cable to a network source WiFi Find the USB WiFi Dongle in the accessories box Plug the USB WiFi Dongle into the USB port at the back of the printer Offline SD Card Find the SD Card in the accessories box Insert the SD Card into the SD Card slot at the front of the printer Turn on the printer Take the power supply cable out from the accessories box that was on top of the printer Conn...

Page 23: ... a welcome setup wizard helps the user to configure some settings such as the language the connectivity and the registration Language BCN3D Sigma series printers are prepared to show information in several languages In this screen choose your preferred language on the list and tap Continue Network connectivity The BCN3D Sigma series printers come with the ability to connect to a network in order t...

Page 24: ...If the network does not use DHCP the connection cannot be set up automatically To configure the network connection manually follow the instructions described in the Printer setup section B WiFi connection When the wireless option is preferred the USB WiFi Dongle must be connected as indicated in the section WiFi connection At this point a screen similar to the one below appears A list of detected ...

Page 25: ...gister section This step is very important for warranty and support purposes Register It is very important that the printer is registered This is a mandatory step for warranty and support purposes and it is needed to be able to use the BCN3D Cloud functionalities To perform this operation the printer must have a working internet connection Once the printer is connected to the network the registrat...

Page 26: ...3D Cloud account fill your user information in the form that appears on the browser After submitting the form an email will be sent in order to verify the sign up process Once verified both the accou nt in BCN3D Cloud and your printer will be registered Welcome setup ...

Page 27: ...with the form as shown in the image below After submitting the form your printer will be registered Continuing on the printer s screen the following screen will appear Welcome setup After the registration the Setup assistant will appear on the touchscreen This process shows the required steps before printing Some of these steps are loading filament material and printer calibration ...

Page 28: ...l is not in use place it inside the zip bag to prevent the moisture from degrading the material Place the spool onto the spool holder External spool feeding Recommended in case the spools exceed the 200mm diameter or when the filament runs out and a new spool is needed Place the external spool holders on the back of the printer Keep the zip bag that is inside the cardboard box and put the silica g...

Page 29: ...ment at 45º to ease the insertion Take the loose end and cut the filament at 45º and straighten the filament a bit to ease the insertion Take the tip of the filament out of the placing hole and cut the first centimeters of the filament to ensure it is straight Place the spool onto the spool holder and insert the loose end of the filament into the feeding hole to prevent undesired unroll Be sure th...

Page 30: ...ube tap and hold the Load button on the screen in order to move more filament towards the end of the tube until there is fused filament coming out of the nozzle Then press Accept Repeat the process for the second extruder Setup Assistant Push the filament gently through the tubes until it arrives at the extruder Notice that the filament may get a bit stuck in the Filament Run out Sensor FRS The fi...

Page 31: ...first layer During this process the printer will measure the surface level and it will guide you to adjust the calibration screws of the build plate Watch our video to see how to calibrate the printer Tap on the Next button to start the process and follow the instructions on the screen Once the calibration sensors placed on the printheads probed all the four points on the surface it may be that th...

Page 32: ... operations is needed However it is suggested to perform as many operations as needed until the Success screen appears indicating that the calibration is correct Z Offset calibration Z offset is the vertical distance between the nozzles and build surface It is necessary to configure it before printing but also when you change hotends Tap on the Next button to start the process and follow the instr...

Page 33: ...een apply a thin and uniform layer of printing adhesive Magigoo glue stick included in the Upper Box on the entire printing surface glass to ensure a better calibration Place the Calibration Gauge included in the accessory box inside the Upper Box between the nozzle and the printing surface glass hold the other end and move it back and forth without pressing the platform Use the arrows on the scre...

Page 34: ...ut how the gauge should fit beneath the nozzle Select the best line If the nozzle is too close to the glass the line will be transparent or non uniform The line must be adhered to the printing glass and with no gaps If the nozzle is too far to the glass the line won t be properly adhered to the printing glass and there will be gaps in it HINT Press the up right button with the info icon to get mor...

Page 35: ...ully it is key important to make sure both nozzle tips are exactly at the same height However due to manufacturing and assembly tolerances the offset between tips can be up to 0 5mm The BCN3D Sigma Series automatically corrects the offsets when printing in Duplication Mirror modes by printing a raft in the toolhead that is higher However this correction may distort the first layer since it s not p...

Page 36: ...me and wastes material For those users planning to use the Mirror or Duplication modes frequently it is highly recommended to install the shims when it is suggested during the Printer Calibration process Select Install Wait until the printer cools down to avoid any dangerous manipulation Turn off the printer with the power switch at the left side of the printer Take note of the amount of shims tha...

Page 37: ...User Manual 37 Install as many shims as indicated on the screen Screw the bolts again Turn on the machine and follow the instructions on the screen Setup Assistant ...

Page 38: ...calibrating the Z offset it is time to calibrate the offset between both print heads This procedure is very im portant while printing the same model with both extruders either for dual color printing or for printing with support material The procedure is splitted in two parts to calibrate the X offset and the Y offset although the process is very similar in both axes X Axis calibration X offset is...

Page 39: ...another screen appears In this case select whether the lines on the left 1 or on the right 10 have better alignment Y Axis calibration Y offset is the horizontal distance between the nozzles along the Y direction It is necessary to configure it before printing but also when changing a hotend Tap Calibrate and follow the steps on the screen Ensure that a thin and uniform layer was applied on the en...

Page 40: ...on the back 1 or on the front 10 have better alignment Setup Assistant The printer now prints 10 lines from from to back along the X direction with both extruders as in the image below Find the best aligned couple of lines and select the number which corresponds to these lines on the screen If none are good press Redo to repeat the test print ...

Page 41: ...truders and correctly calibrated in the X Y and Z directions this chapter focuses on the preparation of the model to be printed printing the file and collecting the print once it finishes The printer can be controlled at all times through the touchscreen and the main operations can be accessed from the main menu To know more how to navigate through all the menu options please check the Menu struct...

Page 42: ... increase the printing success rate Just select the installed hotends and materials on the printer to get the right set of parameters And of course those experts users still can tweak more than 200 parameters Installing BCN3D Cura Visit Knowledge base to download the suitable version of BCN3D Cura for your Operative System and the BCN3D Cura manual Once downloaded follow the installation wizard Ad...

Page 43: ...modes BCN3D Cura takes advantage of all the benefits of the IDEX system simply merge multi material models gene rate support structures cut down printing times by combining hotends with different nozzle sizes or even double production capacity thanks to duplication and mirror mode Visit Learn to know more about success stories learn about our latest updates whitepapers and more In order to perform...

Page 44: ... a print i Click Open File Regular In Regular mode single or dual prints can be performed For single prints It only uses one toolhead It is ideal to print large models taking advantage of the massive print surface or just to print with one single material For dual prints It uses both toolheads It is ideal to print multicolor multi material parts or to cut down printing times by combining hotends w...

Page 45: ...User Manual 45 Click one part of the model and assign the extruder to print with Then select the material loaded in the selected Extruder Select Profile Preparing a print ...

Page 46: ...ting file Dual Select Regular in the Print mode list option Click Open File Select the STL file to be printed A Benchmark model can be found in the Sample parts folder Click one part of the model and assign the extruder to print with Preparing a print ...

Page 47: ...xtruder 2 and select the material loaded Select the models by Shift Left Click Selected models will be highlighted with a blue outline Right click on any of the selected models and select Merge Models Preparing a print Then select the material loaded in the Extruder 1 ...

Page 48: ... the model and its symmetrical part along the X axis at the same time Using this printing mode the printing capacity is doubled but the available printing surface is reduced to less than half the original size Select Mirror in the Print mode list option Click Open File Preparing a print ...

Page 49: ...g a print Select the STL file to be printed It can be found in the Sample parts folder Information Note how the available printing volume is reduced and the loaded models automatically move to the left These models can still be modified A preview of the duplicated or mirrored parts is available at the right Then select the material loaded in the Extruder 1 ...

Page 50: ...e available printing surface will be reduced by half Select Duplication in the Print mode list option Click Open File Select the STL file to be printed It can be found in the Sample parts folder Note how the available printing volume is reduced and the loaded models automatically move to the left These models can still be modified A preview of the duplicated or mirrored parts is available at the r...

Page 51: ...e registered and have an internet connection as indicated in the sections Network connectivity and Register There are two options for online printing using the BCN3D Cloud dashboard or directly from BCN3D Cura Choose the preferred option and follow the instructions Select the printing profile for the Left Extruder Make sure the material loaded at Right Extruder is the same as in the Left Extruder ...

Page 52: ...oaded To know more about the features available on BCN3D Cloud read the manual HINT Do not forget to apply a thin and uniform layer of printing adhesive Magigoo included in the Upper Box on the entire glass to ensure that your print adheres reliably to the printing surface i i From the BCN3D Cloud dashboard Slice the project in BCN3D Cura as shown in Preparing a print and a Save file button will a...

Page 53: ...e instructions in the section Add printer in BCN3D Cura Slice the project in BCN3D Cura as shown in Preparing a print and a Send to Printer button will appear on the right bottom panel Click Send to Printer and the printing file will be sent automatically to the selected printer HINT Do not forget to apply a thin and uniform layer of printing adhesive Magigoo included in the Upper Box on the entir...

Page 54: ... project in BCN3D Cura as shown in Preparing a print and a Save to Removable Drive button will appear on the right bottom panel Click Save to Removable Drive and the printing file will be automatically stored in the SD card Safely remove the SD card from the computer and insert it into the SD Card slot at the front of the printer Select Print in the main menu of the touchscreen Scroll the list and...

Page 55: ...the printer as shown in the Set up section and place it on a clean and flat surface Removing the part inside of the printer can result in disruption of the calibration Place the spatula included in the Upper box under the part parallel to the build surface avoiding too steep angles and apply a small amount of force to remove the print Always remove the parts with a movement that is made from your ...

Page 56: ...S and TPU Be aware that PA and PAHTCF absorbs water so make sure to dry the part afterwards When the print has been removed place the glass surface back in the printer and press the Continue button Reusage of the magigoo adhesives Depending on the size and material the amount of times you can reuse the same adhesive differs Although it is possible to print several times and reuse the applied layer...

Page 57: ...he touchscreen shows the following screen Select the number of stars depending on the quality of your printed part Use the following chart as a guideline on how to rate your printed parts Print not finished or it is rubbish I have to print it again Print finished but it is useless It has lits of defects I have to print it again Print finished and it is simehow useful as a first iteration It has so...

Page 58: ...ntenance and setup 3 Temperatures check temperatures of hotends and build platform and perform preheat 4 Information check unit specific information such as software version serial number or printjobs statistics Print Select the Print menu icon to initiate a print stored on the SD card Be sure that your SD card is correctly inserted in order to see all the files If you prefer using the BCN3D Cloud...

Page 59: ...t the combination of materials and or hotends currently inserted on the printer do not match the combination selected on the print job In this case please proceed with the needed operation change hotend or unload and load material While printing Once the print job starts the temperatures adjust to the ones indicated on the slicer program During the entire printing process this is the menu shown on...

Page 60: ...cally move to their home position At this point several operations are available to perform such as purge change filament or adjust light intensity After finishing operating the printer tap on resume to continue printing or stop to end the print job 3 Stop finalize the current print The printer stops printing and the printheads automatically move to their home position Before stopping a confirmati...

Page 61: ...luded in the Setup assistant Be sure to have the filament spool ready and follow the instructions on the screen Select the extruder the material will be loaded to and select the type of material This is very important for the temperatures to be adjusted accordingly Push the filament gently through the tubes until it arrives at the extruder Notice that the filament may get a bit stuck in the Filame...

Page 62: ...ions on the screen to finish the operation At the end the filament should be coming out of the nozzle In case the filament hasn t reached the nozzle but it s in the upper bowden tube tap and hold the Load button on the screen in order to move more filament towards the end of the tube until there is fused filament coming out of the nozzle Then press Accept ...

Page 63: ... extruder the material will be removed from As soon as the nozzle reaches the correct temperature press Next and the material will automatically purge a little bit before moving backwards Be sure to roll the spool back and pull the filament out of the tubes 3 Purge this procedure is used to move filament towards the nozzle in order to ensure that there is filament on the tip before starting a prin...

Page 64: ...ration is very easy to perform and at the same time very important to achieve good results This is also included in the Setup assistant 2 Printer calibration it performs all the needed calibrations related to the offsets between the two extruders and the nozzles in relation to the build plate This operation may take some time but at the same time is very important to achieve good results This is a...

Page 65: ...ore information about how to install shims can be found in the Installing shims chapter in this docu ment To know more about how to print in mirror or duplication mode go to the Printing modes section in this document 3 Manual fine calibration this is considered a fine tuning operation and is only recommended for advanced users It allows the modification of X Y offsets between the two nozzles and ...

Page 66: ...ded to lower or raise the printing platform This is a very simple operation and it is very useful to separate the printing platform from the print heads 2 Hotend cleaning assistant this procedure is meant to remove the rests of dust and previously used material from inside the hotend It is recommended that this operation is performed regularly or when the nozzle is clogged Follow the instructions ...

Page 67: ...mple and automatic Just follow the instructions on the screen Printer setup This menu contains most operations that allow the user to control the configuration of the printer 1 Change hotend it starts the operation to change the hotend Follow the instructions on the screen For more information see Change hotend maintenance It s recommended to perform a Printer calibration after changing the hotend...

Page 68: ...ament runout sensor and the door sensor are activated or not 3 Light intensity it adjusts the brightness of the LEDs on the printer 4 Brightness shows a sliding bar to adjust the brightness of the touchscreen 5 Run setup assistant this menu entry activates the wizard of the setup assistant as it is indicated in the Setup Assistant section on this manual ...

Page 69: ...ireless networks the user can connect the printer to At the top right of the screen the wireless interface can be turned off In this case or when the wifi dongle is not connected this menu shows the following screen 7 Wired settings this menu shows the configuration settings of the network when the printer is connected using an ethernet cable ...

Page 70: ...er will automatically change the menus and information to that language 9 Register printer in case the printer was unregistered from the BCN3D Cloud dashboard this process runs the wizard to register the printer again and link it to the user s account Follow the instructions as in the Register section of this document ...

Page 71: ...elements is done by tapping on the corresponding button The temperatures of the preheat is determined by the printer itself depending on the materials that are loaded into the extruders These elements can be turned off by tapping again on the button After this action the target temperature is automatically set to 0ºC and the temperature will go progressively down HINT Be careful when operating the...

Page 72: ...ferent packages of software that are installed in the printer and the serial number of the current unit This data is mandatory to have it ready in case contact to support is needed Current configuration of the print heads formed by material and hotend s nozzle size is also available on this screen 3 Printer statistics it shows some statistics related to the current unit The date shown here contain...

Page 73: ...ways free of dust and operating in a dry and cool place We suggest that the printer operates in an environment at temperatures between 15 and 30 ºC and relative humidity below 50 Regarding the filaments in general we also advise that the spools that are not currently in use are always stored in an airtight container with relative humidity below 50 although this may vary for certain materials Activ...

Page 74: ...sion in the previous prints Every print Check if the hotend and cooler fan are working properly Every print Clean the hotend Weekly or when switching materials Nylon filament Perform XYZ offset hotend calibration Every 300 printing hours after transportation or after changing hotend Check if the hotend cables are correctly connected to the hotend electronic board behind the print head Every 300 pr...

Page 75: ...hey need very careful maintenance Activity Frequency Tools How to clean the Bondtech extruder Weekly Compressed air Check bowden tubes and connections to the extruder Every 300 printing hours Check if the cables are correctly connected to the motor driver and the extruder motor Every 300 printing hours Tune the thumbscrew tensioner to adjust the pressure exerted by the drive gears onto the filamen...

Page 76: ...maintained every time you start a printing process The estimated lifespan of this component is 500 printing hours but it highly depends on the material used the calibration and the type of printing Activity Frequency Tools Clean the glass printing surface with warm water and soap Before each print Spatula Cloth Check correct strength of the clamps Before each print Perform printing surface calibra...

Page 77: ...ive screws on the motor and rod pulleys are tightened and aligned with the flat surface of the motor shaft Every 300 printing hours Allen key Lubricate X Y linear guides and Z axis screw and rods Every 1000 printing hours Cloth Lubrication kit Check X Y belts tension and adjust if loose Every 1000 printing hours Allen key Screwdriver Check connections of moving cables Every 1000 printing hours Inf...

Page 78: ... Left Hotend A heater error on one of the Hotends or HotBed can occur when the printer is trying to heat up but the sensor does not report an increase in temperature or it is not fast enough The display will show with which print core a problem has been detected Heating Failed on Right Hotend Heating Failed on HotBed Thermal runaway on Left Hotend A heater error on one of the Hotends or HotBed can...

Page 79: ...e printer failed to successfully upload the firmware from embedded electronics to the mainboard This error is caused by a faulty connection or the printer has been turned off during the process Automatically the printer will retry the process Machine configuration error Printer configuration not found The printer can not find the Printer configuration file needed to define the machine This is a fi...

Page 80: ...tures Brim One of the methods of improving the adhesion of printouts to the heatbed It consists in enlarging the adhesion surface of the printout to the heatbed by generating additional external outlines of the model proper at the level of the first printout layer The more outline lines are added the larger the adhesion surface will be The brim should be used in the case of problems with separatin...

Page 81: ...ile that has been submitted to be printed This file is the result of preparing your model through BCN3D Cura The format of print jobs is Gcode Print profile The settings used to slice your 3D model and create a print file BCN3D Cura software comes with preset profiles carefully optimized and tested for BCN3D products Safety Pause Door sensor that will stop the printing process every time the enclo...

Page 82: ...Filaments Visit BCN3D website to know more about filaments portfolio or Knowledge base to learn how to handle and print different types of materials User Manual 82 ...

Page 83: ...ble Please remember to include your phone number so we can contact you support bcn3d com Email If you have a question that is not related to technical assistance please send us an email to the address below A BCN3D Technologies expert will contact you as quickly as possible info bcn3d com You can find all of this information in the Contact Section of our website https www bcn3d com contact us Be s...

Page 84: ...in the established deadline which is 14 calendar days from the reception of the order 2 Defective goods If you detect any defect in the operation of the product you have 7 working days from the reception of the product to communicate this defect and proceed to its return You should contact the sales department by email through sales bcn3d com or by phone 34 935 95 43 43 to notify this incident In ...

Page 85: ... goods to be returned perfectly packed being able to desist from the collection in case of improper packing It is important that you place the RMA number visible on the package You will not have to pay anything to the courier except if the withdrawal right is applied first case where the cost of the carriage will be deducted from the amount to be returned or in case the damages produced in the pro...

Page 86: ...to develop a 3D printer which could print most of its own components and be a low cost printer As an open source project all of the designs produced by the project have been released under a free software General Public License GPL This project does not only include hardware but has been conceived as a complete ecosystem of tools for printing from the CAD CAM software to the code read by the machi...

Page 87: ...MSS 2020 1 ...

Reviews: