background image

|


NOTE:

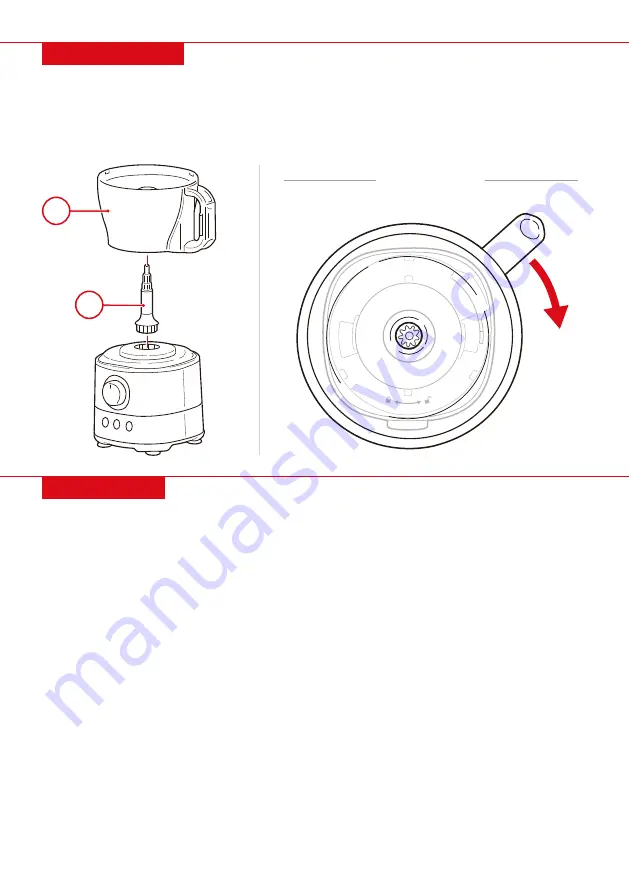
 Bowl and jars must be firmly locked in order to operate appliance.

1.

  Position the bowl or jar on the unit at the 2-o’clock position, then rotate it 45° clockwise to the 3-o’clock 

position until it locks in place. 

2.

 If applicable, position the lid on the bowl at the 2-o’clock position, then rotate it 45° clockwise to the 

3-o’clock position until it locks in place. The lid and feeding chute will line up with the handle. 

SAFETY LOCK

• 

Make sure that your workspace is clean and free of grease and dirt.

 Do not wear a tie or loose clothing when operating appliance. Tie long hair back to avoid contact 

with appliance.

 After processing two batches, let appliance cool to room temperature before continuing use. 

 Make sure hot ingredients are cooled before processing or mixing. Do not pour hot liquid into appliance 

as it could eject due to sudden steaming.

 Cut large ingredients into smaller pieces (approximately 1” x 1”) to ensure they fit through the feeding chute.

 Run appliance at short intervals (pulse) when chopping hard ingredients. 

 If using blade hook or dough hook and spindle attachment, make sure to install accessories before 

adding ingredients to the bowl.

 Do not use the blade hook to chop hard ingredients such as coffee beans, nutmeg, turmeric, or ice 

cubes as this will dull the blade. 

 If chopping onions, use the pulse function to make sure the onions are not too finely chopped. 

 Only crush ice with the blender jar. Do not crush ice with food processor bowl or grinder jar.

 If food sticks to the blade or inside of the food processor, switch off the unit, remove the lid, and 

dislodge the food with the spatula. 

 If material jams the motor during operation, immediately turn unit off, pull the plug, remove the 

container, and carefully remove the jammed material. Continue use after the motor has cooled.

 Never switch off appliance by detaching blender jar or food processor bowl. Always turn off by turning 

speed knob to off and unplugging. 

 Turn appliance off, unplug, and clean appliance after every use.

USAGE TIPS

C

N

TOP VIEW

Summary of Contents for SKY5133

Page 1: ...SKY5133 Ver 1 INSTRUCTION MANUAL Multifunction Food Processor ...

Page 2: ...Generally do not allow continuous operating time to exceed 3 minutes If the unit overheats stop use for 20 minutes Do not operate until it has cooled bestchoiceproducts com ...

Page 3: ...ect sunlight and other sources of heat stove heater etc Do not cover appliance while it is in use as it is a fire risk Do not run power cord over sharp edges corners or a hot surface Do not pull or carry appliance by the power cord Do not immerse the appliance or power cord in water or any other liquid Do not spill water on the electrical components or connectors Do not unplug the appliance by pul...

Page 4: ...LENDER JAR E 1 PC EMULSIFYING DISC F 1 PC DISC G 1 PC SLICING ATTACHMENT H 1 PC FRENCH FRY ATTACHMENT I 1 PC GRATING ATTACHMENT J 1 PC TWIN BEATER K 1 PC CITRUS CONE L 1 PC JUICER BOWL M 1 PC SPINDLE N 1 PC SPINDLE ATTACHMENT O 1 PC BLADE HOOK P 1 PC DOUGH HOOK Q 1 PC GRINDER JAR R 1 PC GRINDER BLADES S 1 PC SPATULA T ...

Page 5: ...ct appliance to make sure it is in good condition 2 Wash accessories and attachments with warm water and mild detergent Allow parts to dry 3 Wipe exterior of unit with a damp cloth and allow to dry 4 Place appliance on a stable and level surface 5 Arrange appliance so it is at least 12 inches away from other kitchen appliances NOTE Unit may give off a slight odor during first use This is normal an...

Page 6: ... x 1 to ensure they fit through the feeding chute Run appliance at short intervals pulse when chopping hard ingredients If using blade hook or dough hook and spindle attachment make sure to install accessories before adding ingredients to the bowl Do not use the blade hook to chop hard ingredients such as coffee beans nutmeg turmeric or ice cubes as this will dull the blade If chopping onions use ...

Page 7: ...cessor bowl and remove ingredients with the spatula OPERATING INSTRUCTIONS 7 1 Insert the part N spindle Place the part C food processor bowl and turn it clockwise to lock it in place 2 Slide the back tab of your desired disc attachment into the part G disc then snap the attachment into place Place the disc onto the spindle 3 Place the part B lid and turn it clockwise to lock it in place 4 Turn sp...

Page 8: ...Once finished switch off and unplug Remove the lid and carefully take out the spindle attachment and emulsifying disc Unlock the food processor bowl and remove ingredients with the spatula 1 Insert the part N spindle Place the part C food processor bowl and turn it clockwise to lock it in place 2 Place the part M juicer bowl and turn it clockwise to lock it in place It will line up with the handle...

Page 9: ...d switch off and unplug Remove the lid and twin beater Unlock the food processor bowl and remove ingredients with the spatula 1 Place ingredients into the part E blender jar 2 Place part D blender lid and turn it clockwise to lock it in place a A measuring cup is included with the blender lid Twist the measuring cup clockwise to attach it to the lid 3 Place the blender jar on the unit and turn it ...

Page 10: ...sec Emulsifying disc Whip whisk egg whites cream mayonnaise pudding High 3 min Twin beater Mix light mixtures like cream eggs milk Low to High 3 min R S GRINDER MILL 1 Hold the part R grinder jar upside down and place ingredients into the grinder jar Place the part S grinder blades and turn it counterclockwise to lock it in place 2 Place the assembled grinder mill onto the unit and turn it clockwi...

Page 11: ...ventilated place to dry Store appliance in a clean dry place away from the reach of children 11 CLEANING AND STORAGE TROUBLESHOOTING REASON Bowl or jar dislodged during operation Citrus cone or juicer bowl not attached correct Attachments not fully locked Lock and secure attachments PROBLEM Attachment blocked or hindered Pulse crush ice or smoothie mode not working Citrus press does not turn Stops...

Page 12: ... of an error by Best Choice Products then Best Choice Products will provide a pre paid shipping label via email Boxes for return shipping will not be provided by Best Choice Products and is the customer s responsibility to either use the original shipping boxes or purchase new boxes Pictures may be required for some returns to ensure an item is not damaged prior to its return Items returned are no...

Reviews: