background image


BD SENSORS GmbH 

BD-Sensors-Straße 1 

T49 (0) 92 35 / 98 11- 0 

www.bdsensors.de 

D - 95199 Thierstein 

T49 (0) 92 35 / 98 11- 11 

info@bdsensors.de 

Operating Manual 

Display and Switching Unit ASM 400 


Important notes: 


Please read this operating manual carefully before installing and starting 


up the device. 


This operating manual must be kept at an accessible location for further 


use. 


This operating manual discribes the installation and operation of ASM 400. 


Further information about BD SENSORS pressure transmitters are given in 


the product-specific operating manuals. 


The device may only be installed, used and serviced by persons who are 


familiar with this operating manual as well as with the applicable regulations 


on occupational safety and accident prevention. 

Summary of Contents for ASM 400

Page 1: ...tarting up the device This operating manual must be kept at an accessible location for further use This operating manual discribes the installation and operation of ASM 400 Further information about B...

Page 2: ...l installation 6 3 5 Supply 2 wire system 6 3 6 Supply 3 wire system 7 3 7 Wiring diagrams 7 3 8 Test of signal and displayed value 8 3 9 Final inspection of the device 8 4 Operation 8 4 1 Operating a...

Page 3: ...ion of or damage to the device 1 2 Target group This operating manual is intended for qualified technical personnel The display and switching unit ASM 400 has been exclusively designed for qualified c...

Page 4: ...urface and housing parts The display and the plastic housing are equipped with a rotational limiter Please do only rotate the display or the housing within the limit The ingress protection by factory...

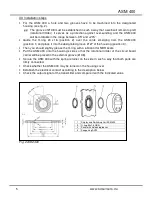
Page 5: ...oove 27 of the housing position 3 Then you should slightly grease the O ring with a lubricant for NBR seals Put the ASM 400 onto the housing s side so that the rotational limiter of the circuit board...

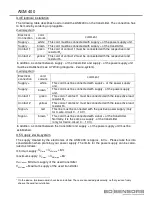
Page 6: ...f the power supply unit Contact 1 green This cord of contact 1 must be connected with the respective load resistor RL Contact 2 yellow This cord of contact 2 must be connected with the respective load...

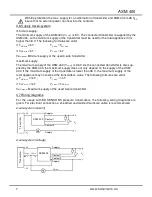
Page 7: ...As the connected transmitter is also sup plied by the ASM 400 the maximum supply does not only depend on the supply of the ASM 400 If the maximum supply of the transmitter is lower than 36 V the maxi...

Page 8: ...Fig 3 Touchpad The device has a green LED for displaying the active contact of set point 1 and a yellow LED for displaying the active contact of set point 2 The LEDs will light up when the respective...

Page 9: ...r clear identification Please follow the manual meticulously and remember that changes of the adjustable parameters switch on point switch off point etc become only effective after pushing both button...

Page 10: ...Hysteresis and compare mode Menu 11 HY 1 CP 1 End point Menu 4 EP Damping Menu 5 FILt Exceeding message Menu 6 HILo Switch on point S1 Menu 7 S1on Switch off point S1 Menu 8 S1of Switch on point S2 Me...

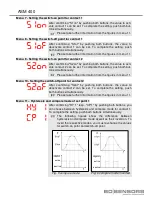
Page 11: ...int can be selected Set the desired position by using the or button To complete the setting push both buttons simultaneously Menu 3 Setting the zero point After confirming ZP by pushing both buttons t...

Page 12: ...e setting push both but tons simultaneously Please take further information from the figures in menu 11 Menu 10 Setting the switch off point for contact 2 After confirming S2of by pushing both buttons...

Page 13: ...multaneously Menu 14 Setting the switch off delay for set point 1 After confirming d1of by pushing both buttons the switch off delay after reaching contact 1 can be set The time can be set from 0 to 1...

Page 14: ...igate to the special menus proceed as described below Specia menu 1 Correction of the display on deviation of full scale For correction of the display on deviation of the full scale select 0238 by usi...

Page 15: ...Placing out of service When dismantling the device it must always be done in the depressurized and currentless condition 6 Service This device is maintenance free If desired the device can be cleaned...

Page 16: ...riod of 24 months from the date of improper use modifications of or damages to the device Furthermore defects due to normal wear are not subject to warranty services The electronical assembly group in...

Page 17: ...1 2 G EEx ia IIC T4 only with 4 20 mA 2 wire safety technical maximum values Vi 28 V Ii 93 mA Pi 660 mW Display Type 4 digit red LED display digit height 7 mm digit width 4 85 mm Range 1999 9999 Accu...

Page 18: ...ASM 400 Dimensions...

Page 19: ...19 www bdsensors de ASM 400...

Page 20: ...wan France Thailand Greece Italy AUSTRALIA Lithuania Queensland Luxembourg Netherlands Norway Poland Romania Russia Sweden Switzerland Slovakia Spain Czech Republic Turkey Ukraine The contents of this...

Reviews: