BGS technic KG
Bandwirkerstr. 3
D-42929 Wermelskirchen
Tel.: 02196 720480
Fax.: 02196 7204820
mail@bgs-technic.de
www.bgstechnic.com
© BGS technic KG, Copying and further use not allowed
AFTER USE
•
Before you put down the tool, switch off the motor and ensure that all moving parts have come to
a complete standstill.
•
After switching off the tool, never stop the rotation of the accessory by a lateral force applied
against it.
DESCRIPTION
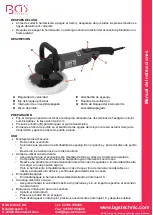
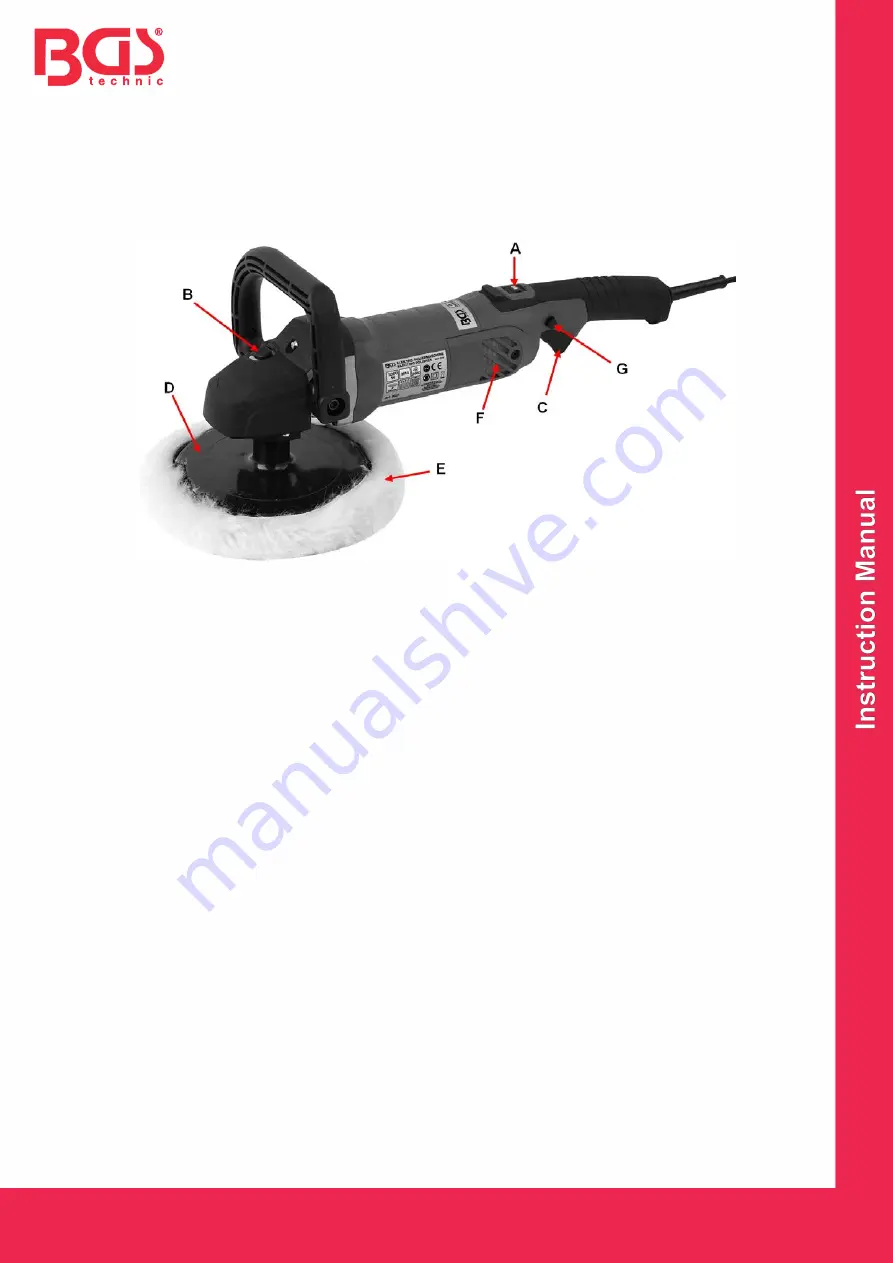
A
Speed regulator
B
Drive shaft locking knob
C
On/Off switch
D
Polishing disc
E
Polishing hood
F
Ventilation slots
G
Locking knob on/off switch
PREPARATION
•
Mount the handle in upright position onto the machine and tighten it with the two supplied inner
hex screws and the 6 mm hex spanner.
•
Push the knob (
B
) for locking the drive shaft.
•
Turn the inner thread of the polishing disc in clockwise direction onto the outer thread of the drive
shaft and hand-tighten it.
USE
•
Mounting of accessories
o
disconnect the plug
o
simply mount polishing hood (
E
) onto polishing disc (
D
)
o
for removing accessories handle vice-versa
•
Before using the tool
o
ensure that accessory is correctly mounted and firmly tightened
o
check if accessory runs freely by turning it by hand
o
test-run tool for at least 30 seconds at highest no-load speed in a safe position
o
stop immediately in case of considerable vibration or other defects and check tool to
determine the cause
•
On/Off
o
switch on/off the tool by pulling/releasing trigger (
C
).
•
Electronic soft-start
o
Ensures reaching the maximum speed smoothly without a sudden impact when tool is
switched on
•
Switch locking for continuous use
o
pull trigger (
C
)
o
press knob (
G
) with your thumb
o
unlock the switch by pulling again trigger (
C
) and then releasing it


