background image


Seite 17 von 17 

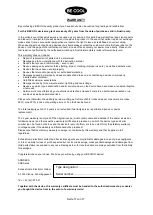
WARRANTY


By purchasing a BECOOL quality product you have acquired an innovative, long lasting and reliable item.  
 

For this BECOOL device we grant a warranty of 2 years from the date of purchase, valid in Austria only. 
 

In the unlikely event that service work is required on your device in this period we warrant free repair (spare parts 
and labour) or (subject to Schuss’s decision) to replace the product. In the event that neither repair nor exchange 
make sense from an economical perspective we reserve the right to issue a credit based on current value. 
When dealing with air conditioning devices you should always contact the customer hotline first (see label on the 
device or the title page of the instruction manual), in case of fans contact your dealer or us directly. Please note 
that repair not performed by the authorised workshop in Austria immediately renders this warranty void. 
 
This warranty does not include: 


Repair of replacement of parts due to normal wear 


Damage due to non-compliance with the instruction manual  


Devices that are used commercially 

– even in part 


Devices damaged by external forces (falling, impact, cracking, improper use etc.) as well as aesthetic wear 


Devices that have been used improperly 


Devices that were not opened by our authorised workshop. 


Damages caused by improperly closed condensation drains on air conditioning devices or improperly 
inserted water container. 


Unfulfilled customer expectations. 


Damage caused by force majeure, water, lightning and overvoltage. 


Devices on which type denomination and/or serial number on the device have been erased, rendered illegible 
or removed.   


Service work not performed by our authorised workshops, transport costs to an authorised workshop or us 
and back as well as associated risks. 
 

Please note that within t

he warranty period we charge a flat rate of 60 € (indexed as per consumer price index 

2010, June 2015) in case of operating errors or if no fault can be found. 
 
The total warranty period of 2 years is not extended if warranty service is performed (repair or device 
replacement).  
 
The 2 year warranty is only valid if the original invoice (must contain name and address of the dealer as well as 
full device name) and the respective warranty certificate are produced, on which the device type and serial 
number (can be found on the box and the device's rear or bottom) are to be noted! Only the statutory warranty 
coverage applies if the warranty certificate cannot be produced! 
Please note that the statutory warranty coverage is not altered by this warranty and that it applies in full 
regardless. 
 
Schuss Home Electronic GmbH and its vicarious agents are only liable for damages in case of gross negligence 
or intent. Liability for loss of profit, expected but not incurred savings, consequential damages and damages from 
third party claims is excluded in any case. Damages to or for recorded data are always excluded from the liability 
for damages.   
 
Congratulations on your choice. We hope you will enjoy using your BECOOL device! 
 
ADDRESS 
SHE Sales 


Schuss Home Electronic GmbH 


A-1140 Vienna, Scheringgasse 3 


Tel.: +43 (0)1/ 970 21 


Together with the device, this warranty certificate must be handed to the authorised workshop or dealer 
you bought the device from in the event of a warranty claim!


Type designation:...................................................................... 
 
Serial number:............................................................................ 

Summary of Contents for BC45ST2002F

Page 1: ...5ST2002F HERZLICHEN GL CKWUNSCH VIELEN DANK DASS SIE SICH F R EIN PRODUKT VON BE COOL ENTSCHIEDEN HABEN Diese Bedienungsanleitung gibt es in folgenden Sprachen DEUTSCH Seite 2 9 ENGLISH Seite 10 17 DE...

Page 2: ...nicht defekt oder lose sein und muss f r die erforderliche Strombelastung geeignet und vor allem zuverl ssig geerdet sein 7 Vermeiden Sie die Verwendung eines Verl ngerungskabels denn dieses k nnte be...

Page 3: ...in einem guten Zustand indem Sie das Ger t pflegen und reinigen Falls Sie Fragen zur Instandhaltung haben k nnen Sie mit der vom Hersteller autorisierten Kundenhotline Servicestelle in Kontakt treten...

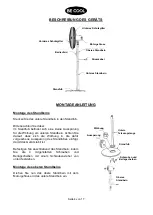
Page 4: ...dfu es einf gt damit das Ger t stabil ist Befestigen Sie anschlie end das Standbein indem Sie die 4 mitgelieferten Schrauben und Beilagscheiben mit einem Schraubenzieher von unten festziehen Montage d...

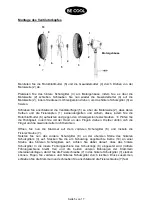
Page 5: ...Hand an den Fl geln drehen Hierbei d rfen sich die Fl gel und die Gewindemutter nicht ber hren ffnen Sie nun die Klammer auf dem vorderen Schutzgitter 8 und lockern die Fixierschraube 7 Setzten Sie n...

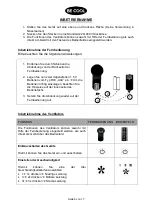
Page 6: ...nun zwei mitgelieferten 1 5 V Batterien vom Typ R03 AAA ein Um die Batterien richtig einzulegen beachten Sie die Hinweise auf der Innenseite des Batteriefachs 3 Setzen Sie die Abdeckung wieder auf de...

Page 7: ...uf die LED Anzeige 1x dr cken 1 Stunde 1H leuchtet 2x dr cken 2 Stunden 2H leuchtet 3x dr cken 3 Stunden 1H 2H leuchtet 4x dr cken 4 Stunden 4H leuchtet 5x dr cken 5 Stunden 1H 4H leuchtet 6x dr cken...

Page 8: ...Ursache Eventuelle Behebung Das Ger t zeigt keine Funktion Keine Stromversorgung berpr fen Sie ob der Netzstecker richtig eingesteckt ist Die Ventilatorfl gel drehen sich nicht Falsche Montage berpr...

Page 9: ...el scht unleserlich gemacht oder entfernt worden ist Dienstleistungen au erhalb unserer Vertragswerkst tten die Transportkosten zu einer Vertragswerkstatt oder an uns und retour sowie die damit verbun...

Page 10: ...operly earthed 7 Avoid the use of an extension cable as this may overheat and cause a fire 8 It is strictly forbidden to modify the properties of this device in any form or manner and you must only us...

Page 11: ...ry place out of reach for children when you are not using it RECYCLING The device s packaging materials can be recycled It is therefore recommended to dispose of them through sorted waste collection D...

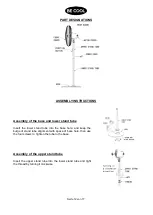
Page 12: ...sert the lower stand tube into the base hole and keep the bulge of stand tube alignment with space of base hole then use the four screws to tighten the tube to the base Assembly of the upper stand tub...

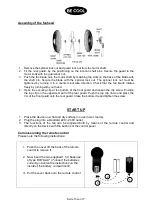
Page 13: ...clip screw Position the top clip on the uppermost part of the rear guard Push the top clip down and press the rim of the front guard onto the rear guard Close the bottom clip and tighten the screw STA...

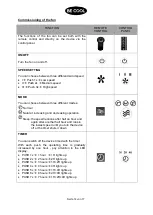
Page 14: ...es Normal Natural increasing and decreasing operation Sleep the speed reduces after half an hour and again after another half hour and runs in the lowest speed until you turn the device off or the tim...

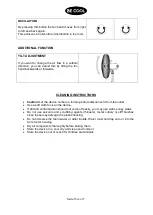
Page 15: ...e come to a full stop before disconnect it from the outlet Use a soft cloth to clean the device If dirt and contamination should not come off easily you may use warm soapy water Do not use solvents an...

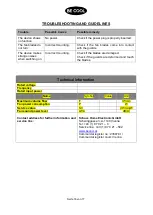
Page 16: ...ounting Check if the blades are damaged Check if the guards are deformed and touch the blades Technical information Rated voltage Frequency Rated input power Name Symbol Value Unit Maximum volume flow...

Page 17: ...r serial number on the device have been erased rendered illegible or removed Service work not performed by our authorised workshops transport costs to an authorised workshop or us and back as well as...

Reviews: