background image

35

be quiet! 20/24-pinowa wtyczka płyty głównej:

Dzięki  20-pinowej  (rozszerzalnej  do  24  pinów)  wtyczce  głównej  seria  DARK  POWER  PRO


10 jest 

dodatkowo kompatybilna ze wszystkimi powszechnymi specyfikacjami płyty głównej. 

Płyt głównych potrzebujących przewodu -5 V oraz płyt głównych z GNIAZDEM A (462) nie można już 
niestety zasilać tym zasilaczem.

Wtyczki Serial ATA (S-ATA):

Zasilacze serii DARK POWER PRO


10 są wyposażone w dużą liczbę wtyczek S-ATA. 

5.  KOMPATYBILNOŚĆ

Zasilacze be quiet! serii DARK POWER PRO


10 są kompatybilne ze wszystkimi aktualnie stosowanymi 

specyfikacjami zasilaczy oraz płyt głównych, jak m.in.
• Intel ATX12V Power Supply Design Guide wersja 2.31 (oraz kompatybilne wstecznie z V2.3, V2.2, 

V2.01, V2.0).

• ATX System Design Guide wersja 2.3, 2.2 i wersja 2.1
• BTX wersja 1.0a
• płyty główne E-ATX Server Dual z 8-pinowym konektorem
• EPS12V wersja 2.92
• 

nowa generacja procesorów Intel C6

• 

wytyczne Energy Star 5

• dyrektywa EuP

6.  INSTALACJA NOWEGO ZASILACZA

Przed rozpoczęciem instalacji należy przeczytać punkt „Wskazówki bezpieczeństwa”.

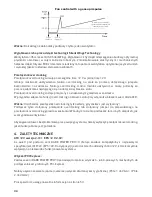
Uwaga

:  Do  zamontowania  zasilacza  w  komputerze  potrzebny  będzie  śrubokręt.  Należy  użyć  śrub 

dostarczonych wraz z zasilaczem, gdyż posiadają one odpowiednie gwinty.

Uwaga! Należy używać wyłącznie dostarczonego zestawu kabli. Używanie kabli innych niż dostarczone 
(np. kabli starszych serii zasilaczy) może doprowadzić do usterki!

Najpierw należy wymontować stary zasilacz. W tym celu należy postępować następująco:

• Odłączyć komputer od wszystkich źródeł prądu, a następnie ostrożnie wyciągnąć wszystkie kable 

podłączone do komputera.

• Następnie otworzyć obudowę komputera, stosując się do instrukcji producenta.
• Odłączyć  wszystkie  wtyczki  od  płyty  głównej  i  wszystkich  innych  komponentów,  jak  stacja 

dyskietek, dysk twardy oraz napędy optyczne. Upewnić się, iż żadna wtyczka starego zasilacza nie 
jest połączona z żadnym komponentem systemu.

• Teraz wyciągnąć śruby z tyłu zasilacza i ostrożnie go wyjąć z obudowy komputera. Zwrócić przy tym 

szczególną uwagę na to, aby kable nie wplątały się w komponenty systemu i nie uszkodziły ich.

Montaż nowego zasilacza be quiet! DARK POWER PRO


10:

• Umieścić nowy zasilacz w odpowiednim miejscu wnętrza obudowy i przymocować jego tylną stronę 

czterema dostarczonymi śrubami. Nie należy stosować nadmiernej siły.

• Włożyć  20/24-pinową  wtyczkę  w  odpowiednie  gniazdo  na  płycie  głównej.  Jeżeli  dostępne  jest 

przyłącze 24-pinowe, przed włożeniem wtyczki do gniazda na płycie głównej ustawić 4 dodatkowe 

Summary of Contents for BQT P10- 850W

Page 1: ...USER MANUAL BQT P10 1200W BQT P10 1000W BQT P10 850W...

Page 2: ...11 Zubeh r 12 Entsorgungshinweise 12 Garantie 13 Herstellerangaben 14 Copyright 14 Technische Daten 47 Introduction 15 Safety instructions 15 Benefits and special features of your new power supply 16...

Page 3: ...es fr quents 29 Accessoires 29 Consignes d limination 29 Garantie 30 Identification du constructeur 31 Droits d auteur 31 Donn es technique 47 POLSKI Wprowadzenie 32 Wskaz wki dotycz ce bezpiecze stwa...

Page 4: ...plitS 55 ESPA OL Introducci n 41 Indicaciones de seguridad 41 Ventajas y particularidades de su nuevo bloque de alimentaci n 42 Ventajas t cnicas 44 Compatibilidad 44 Instalaci n de su nuevo bloque de...

Page 5: ...ist ein ordnungsgem er Betrieb des Netzteils sichergestellt und Sie werden lange Freude an Ihrem DARK POWER PRO10 haben Achtung Verwenden Sie nur den mitgelieferten Kabelsatz Das verwenden von nicht...

Page 6: ......

Page 7: ...useentkopplung optimierte Drehzahl im gesamten Arbeitsbereich Minimierung der elektrischen und mechanischen Ger usche mittels FDB Lager mit Kupferkern str mungsoptimierter L fterbl tter und hochwertig...

Page 8: ...dstecker Mit dem von 20 Pins auf 24 Pins erweiterbaren Hauptstecker ist die Dark Power Serie zus tzlich mit allen g ngigen Mainboardspezifikationen abw rts kompatibel Mainboards welche die 5V Leitung...

Page 9: ...nten verfangen und diese besch digen Der Einbau Ihres neuen be quiet DARK POWER PRO10 Netzteils Setzen Sie das neue Netzteil nun an den vorgesehenen Platz im PC Geh use und schrauben es an der R cksei...

Page 10: ...nnung auf den Leitungen unter ein bestimmtes Limit f llt Das Netzteil wird in diesem Fall automatisch abgeschaltet OVP berspannungsschutz Die berspannungssicherung l st bei zu hoher Spannung auf den L...

Page 11: ...r am Geh use bet tigen Falls das Netzteil sich weiterhin nicht einschalten l sst fahren Sie mit dem n chsten Punkt fort berpr fen Sie Ihr System auf m gliche Kurzschl sse oder defekte Hardware in dem...

Page 12: ...mweltschutz und sorgen daf r dieses Ger t wenn Sie es nicht mehr weiter nutzen wollen in die hierf r vorgesehenen Systeme der Getrenntsammlung zu geben In Deutschland sind Sie gesetzlich verpflichtet...

Page 13: ...er des Netzteils Ihre Lieferanschrift Nach Eingang der Unterlagen wird Ihnen durch einen DHL Mitarbeiter mittels einer Postbox ein Austauschnetzteil zugestellt Bitte h ndigen Sie abschlie end dem DHL...

Page 14: ...ndig weiter Listan beh lt sich deshalb das Recht vor ohne vorherige Ank ndigungen jedem der in dieser Dokumentation beschriebenen Produkte nderungen und Verbesserungen vorzunehmen Listan ist unter ke...

Page 15: ...POWER PRO10 product Caution Only use the supplied cable set Using cables that were not included e g cables of older power supply unit series may lead to defects Never open the power supply case The el...

Page 16: ...ed by the European Union An environmentally conscious production process and use of materials that avoid environmentally harmful substances environment are guaranteed for be quiet products In this way...

Page 17: ...slot a LED lights on the slot cover switch Important Only press the Overclocking Key when the power supply is switched off Only connect the overclocking key or the jumper provided to the Overclocking...

Page 18: ...components such as FDDs HDDs or optical drives Make sure that there are no plugs from the old power supply connected to any of the components Now remove the screws at the rear of the power supply and...

Page 19: ...supply and the components connected to it OTP Temperature safeguard In the case of excessive heat build up in the power supply the power supply immediately and automatically switches off You cannot s...

Page 20: ...lected voltages via BIOS are to low high If you check the power supply voltages via the BIOS on the motherboard or the operating system note that they may be displayed incorrectly This typically resul...

Page 21: ...03 on waste electrical and electronic equipment WEEE Law on market introduction return and treatment of electrical and electronic equipment Electrical and Electronic Equipment Act ElektroG Germany of...

Page 22: ...lator www be quiet de 14 COPYRIGHT You are not allowed to reproduce disclose publish or store the contents of this documentation or excerpts of it without the prior written consent of Listan be quiet...

Page 23: ...gnes de ce guide d utilisation C est la condition sine qua non pour garantir toutes les sp cifications de fonctionnement du bloc d alimentation DARK POWER PRO 10 et pour qu il vous donne enti re satis...

Page 24: ...ns de d perditions de chaleur se produisent ce qui en retour favorise le refroidissement de l alimentation Les blocs d alimentation haut rendement comme c est notamment le cas de la gamme DARK POWER P...

Page 25: ...entWings Tr s silencieux gr ce au d couplage du bo tier et la vitesse de rotation optimis e sur toute la plage de fonctionnement R duction des bruits lectriques et m caniques au moyen de paliers FDB c...

Page 26: ...ket A 462 ne sont malheureusement plus prises en charge Connecteurs Serial ATA S ATA Lesblocsd alimentationdelagammeDARKPOWERPRO10sont quip sdetr snombreuxconnecteursSATA 5 COMPATIBILIT Les blocs d al...

Page 27: ...r vu cet effet sur la carte m re Si la carte m re peut accueillir plusieurs processeurs il faut utiliser un connecteur 12V P9 broches suppl mentaire Il suffit de le brancher sur le connecteur femelle...

Page 28: ...sous tension comporte un risque de blessures graves voire mortelles Si vous constatez des traces de fum e des c bles endommag s ou des d g ts provoqu s par des liquides il faut d brancher imm diatemen...

Page 29: ...arge L alimentation n est pas assez puissante pour votre carte graphique Avant votre achat veuillez consulter notre configurateur Watts sur www be quiet net Le programme vous recommandera alors le blo...

Page 30: ...our l achat initial aupr s d un distributeur be quiet agr change sur site au cours des 12 premiers mois compter de la date d achat aupr s d un distributeur be quiet agr L application de la garantie es...

Page 31: ...21509 Glinde Allemagne Si vous avez besoin d assistance vous pouvez nous joindre en France sur notre Hotline d assistance gratuite du lundi au vendredi de 09h00 17h30 T l 0800 0736736 Fax 040 7367686...

Page 32: ...K POWER PRO10 Uwaga Nale y u ywa wy cznie dostarczonego zestawu kabli U ywanie kabli innych ni dostarczone np kabli starszych serii zasilaczy mo e doprowadzi do usterki Nigdy nie nale y otwiera obudow...

Page 33: ...turalnego proces produkcji oraz wykorzystanie materia w kt re nie zawieraj szkodliwych dla rodowiska substancji W ten spos b my jako producent oraz Pa stwo jako konsumenci mamy wa ny wk ad w ochron na...

Page 34: ...ne Uruchamia prze cznik overclocking tylko wtedy gdy zasilacz jest wy czony Pod cza tylko do czony prze cznik overclocking lub do czony jumper do przewidzianego na prze cznik overclocking gniazda w z...

Page 35: ...r t Nale y u y rub dostarczonych wraz z zasilaczem gdy posiadaj one odpowiednie gwinty Uwaga Nale y u ywa wy cznie dostarczonego zestawu kabli U ywanie kabli innych ni dostarczone np kabli starszych s...

Page 36: ...ych b d w Pomoc w wyszukiwaniu b d w znajduje si w rozdziale Usuwanie usterek Seria DARK POWER PRO10dysponuje nast puj cymi funkcjami bezpiecze stwa OCP Zabezpieczenie nadmiarowo pr dowe Zasilacz wy c...

Page 37: ...cznika wy cznika na obudowie Je eli zasilacz w dalszym ci gu nie zosta w czony prosz przej do nast pnych punkt w Prosz sprawdzi czy w systemie nie wyst puj ewentualne zwarcia lub uszkodzony sprz t W...

Page 38: ...aby urz dzenie kt rego nie chc Pa stwo ju u ywa trafi o na specjalne wysypisko odpowiednie dla takich odpad w W Niemczech s Pa stwo ustawowo zobowi zani do przekazywania starych urz dze na specjalne...

Page 39: ...64 80 22 664 20 58 Fax 48 22 666 30 41 e mail serwis listan pl Kupuj cy mo e skorzysta z roszczenia gwarancyjnego w punkcie zakupu produktu lub bezpo rednio w Listan Poland Sp z o o za wyj tkiem ostat...

Page 40: ...ci lub cz ciowo bez uprzedniego pisemnego zezwolenia frmy Listan be quiet jest zarejestrowan mark frmy Listan GmbH Co KG Inne wymienione w niniejszej dokumentacji produkty oraz nazwy firm mog stanowi...

Page 41: ...conjunto de cables suministrado El uso de otro tipo de cables como por ejemplo el una fuente de alimentaci n m s antig a puede da ar la unidad No abra nunca la cubierta del bloque de alimentaci n las...

Page 42: ...cnol gico es una gran reducci n del ruido Ecol gico Los bloques de alimentaci n de la serie DARK POWER PRO 10 cumplen las Directivas actuales 2002 95 CE RoHS y RAEE de la Uni n Europea En los producto...

Page 43: ...ciones el ctricos y mec nicos para garantizar el buen funcionamiento un flujo de aire ptimo y un ruido muy bajo Con el apoyo de be quiet SilentWings es un ventilador fabricado con material de alta cal...

Page 44: ...o se pueden usar con este bloque de alimentaci n Conector Serial ATA S ATA Los bloques de alimentaci n de la serie DARK POWER PRO 10 est n equipados con numerosos conectores S ATA 5 COMPATIBILIDAD Los...

Page 45: ...arios procesadores necesitar un conector adicional de 12 V P8 Simplemente conecte este con la toma correspondiente de la placa base En el pack de entrega tiene el cable de conexi n pertinente Utilizac...

Page 46: ...incluso tras un largo per odo de inactividad Encargue las reparaciones s lo a personal especializado autorizado Abrir el aparato conlleva la anulaci n de la garant a Si el sistema no funciona correct...

Page 47: ...mente con nuestro servicio de atenci n al cliente 10 ACCESORIOS En el pack de entrega del bloque de alimentaci n se incluyen los siguientes accesorios Juego de cables para gesti n de cables Placa de r...

Page 48: ...viar al cliente Asimismo nos reservamos el derecho de aplicar una tarifa por los costes derivados de analizar el dispositivo En caso de que aparezca un fallo en el bloque de alimentaci n de be quiet e...

Page 49: ...sente documento no se puede reproducir transmitir publicar ni guardar de ninguna forma ya sea total o parcialmente sin la autorizaci n previa por escrito de Listan be quiet es una marca registrada de...

Page 50: ...Max Current Max Combined Power 1000W 12 6A 100 240Vac 50 60Hz AC Input DC Output BQT P10 1000W 1000W 3 3V 5V 12V1 12V2 12V3 12V4 70A 30A 30A 35A 35A 12V 0 5A 6W 5VSB 3A 15W 25A 140W 840W 25A 850W 10...

Page 51: ...5V 12V1 12V2 12V3 12V4 12V 5VSB 1200W 0 0 5 0 1 0 0 0 0 0 1000W 0 0 5 0 1 0 0 0 0 0 850W 0 0 5 0 1 0 0 0 0 0 Environment Temperature Rel Humidity Operation 10 40 C up to 85 non condensing Storage 20...

Page 52: ...ATA S ATA HDD S ATA S ATA HDD 20 Pin 4 Pin 24 Pin PCIe 1 6 2 Pin PCIe 1 6 2 Pin PCIe 2 6 2 Pin PCIe 2 6 2 Pin PCIe 3 6 2 Pin PCIe 3 6 2 Pin PCIe 4 6 2 Pin PCIe 4 6 2 Pin PCIe MB 6 Pin P8 connector MB...

Page 53: ...TA S ATA S ATA S ATA HDD S ATA S ATA HDD 20 Pin 4 Pin 24 Pin PCIe 1 6 2 Pin PCIe 1 6 2 Pin PCIe 2 6 2 Pin PCIe 2 6 2 Pin PCIe 3 6 2 Pin PCIe 3 6 2 Pin PCIe MB 6 Pin P8 connector MB connector P8 connec...

Page 54: ...54 8 DISTRIBUTION AND PIN ASSIGNMENT GPU1 GPU2 GPU3 GPU4 Dual GPU Card 1 Dual GPU Card 1 Dual GPU Card 2 Dual GPU Card 2 12V3 12V4 12V3 12V4 7 PCI E WIRING DIAGRAM...

Page 55: ...gnal Pin Color Signal 1 Black COM 4 2 Black COM 5 3 Black COM 6 Black COM 7 Black COM 8 P C I E X P R E S S V G A C O N N E C T O R 2 3 1 5 6 4 2 3 1 5 6 4 8 7 Yellow 12VDC Yellow 12VDC Yellow Yellow...

Page 56: ...be quiet net...
Reviews: