background image

3

E N G L I S H

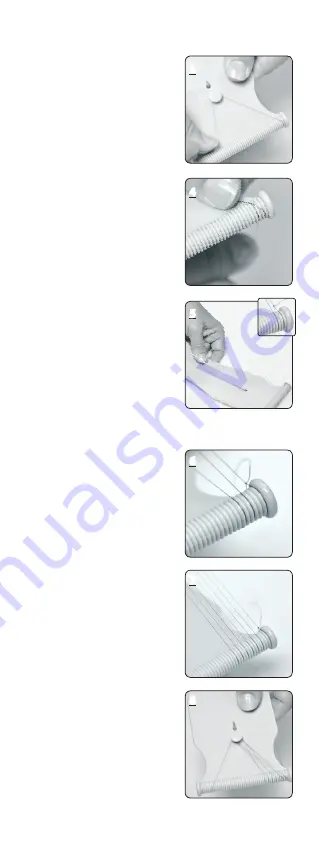
Bring thread down and around 

back post...

3

...and back up, inserting thread in 

the #3 bottom groove counting 

from the left .

4

Bring thread to top of the 

opposite side of the loom and 

place thread in top #3 groove 

counting from the left.

5

Tie off end around back post and 

secure tightly with knots.

8

Continue to warp threads 

following the above directions 

and skipping a groove in-between 

each warp. You will have 7 warp 

threads when completed. Add 

more threads if you wish to create 

a wider design.

7

Bring thread down around top 

post and back up placing thread 

in groove #5 counting from the 

left.

6

Summary of Contents for Jewel Loom

Page 1: ...INSTRUCTION BOOKLET MANUEL D INSTRUCTIONS MANUAL DE INSTRUCCIONES Jewel Loom by par por Julianna C Avelar Patent Brevet Patente D676 879...

Page 2: ...s now ready for thread 3 Bring thread to the lower left end and insert into groove 1 2 The warp threads are lengthwise and form the foundation to all of your bead loom projects Determine the width of...

Page 3: ...in top 3 groove counting from the left 5 Tie off end around back post and secure tightly with knots 8 Continue to warp threads following the above directions and skipping a groove in between each warp...

Page 4: ...of fit Step 3 Adding Bead Base Bring Needle over the first warp thread and repeat under over process until you weave needle back to left side of loom 2 Cut a piece of thread 2 yards long and thread it...

Page 5: ...ss needle back under warp threads and pick up 6 beads repeating steps above until your bracelet has reached desired length making sure to keep rows straight and tension tight Weave excess thread back...

Page 6: ...ds close to the base beads and cut off excess threads 2 Count 3 rows down on the right side of base Insert a needle and thread through row 3 and back through rows 2 and 1 Your needle will end up on le...

Page 7: ...ead weave needle and thread through rows 1 2 and 3 or through entire base for added security Cut off excess thread and secure end with Beadalon Adhesive 11 Pick up 3 size 8 0 beads and repeat Step 2 t...

Page 8: ...m tier est maintenant pr t pour l enfilage 3 Passez le fil jusqu l extr mit inf rieure gauche et ins rez le dans la premi re rainure 2 Les fils de cha ne sont plac s dans le sens de la longueur ils c...

Page 9: ...e rainure sup rieure partir de la gauche 5 Attachez l extr mit autour du bouton arri re et fixez la bien en la nouant 8 Continuez enfiler les fils en suivant les instructions ci dessus et en sautant u...

Page 10: ...Ajouter une base de perles Ins rez l aiguille au dessus du premier fil de cha ne et r p tez le proc d en passant le fil en dessous et par dessus jusqu ce que l aiguille atteigne encore une fois la par...

Page 11: ...tres perles puis r p tez les tapes mentionn es ci dessus jusqu ce que votre bracelet atteigne la longueur souhait e en vous assurant de garder les rang es droites et serr es Tissez l exc s de fil dans...

Page 12: ...coupez l exc s de fil 2 Comptez 3 rang es partir de la partie inf rieure droite de la base Ins rez une aiguille et enfilez travers la troisi me rang e puis retournez travers la deuxi me et la premi re...

Page 13: ...e fil travers la premi re la deuxi me et la troisi me rang e ou travers la base enti re pour accro tre la solidit Coupez l exc s de fil et fixez bien l extr mit l aide de la colle Beadalon 11 Prenez 3...

Page 14: ...2 1 El telar est listo para enhebrar 3 Lleve el hilo hasta el extremo inferior izquierdo e ins rtelo en la primera ranura 2 Los hilos de urdimbre son longitudinales y tambi n b sicos para todos sus p...

Page 15: ...a ranura superior de izquierda a derecha 5 Ate la punta alrededor del bot n trasero y sujete el hilo firmemente anud ndolo 8 Contin e enredando los hilos siguiendo las instrucciones mencionadas y salt...

Page 16: ...ntas Inserte la aguja sobre el primer hilo de urdimbre y repita el proceso arriba y abajo hasta que la aguja llegue otra vez a la parte izquierda del telar 2 Corte un trozo de hilo de 1 8 m de largo y...

Page 17: ...mbre y recoja 6 cuentas m s repitiendo los pasos mencionados arriba hasta que su pulsera alcance la longitud deseada asegur ndose de mantener las hileras rectas y apretadas Entrelace el sobrante de hi...

Page 18: ...leras a partir de la parte inferior derecha de la base Inserte una aguja y enhebre a trav s de la tercera hilera luego regrese para enhebrar a trav s de la segunda y la primera hilera Su aguja debe te...

Page 19: ...lo a trav s de la primera la segunda y la tercera hilera o a trav s de toda la base para mayor seguridad Corte el excedente de hilo y sujete el extremo con pegamento Beadalon 11 Recoja 3 cuentas tama...

Page 20: ...www beadalon com Beadalon Valley Twp PA 19320...

Reviews: