PRECAUTIONS
Location
Using the unit in the following locations
can result in a malfunction.
• In direct sunlight
• Locations of extreme temperature
or humidity
• Excessively dusty or dirty locations
• Locations of excessive vibration
• Close to magnetic fields
Power Supply
Please connect the designated AC adapter
to an AC outlet of the correct voltage. Do
not connect it to an AC outlet of voltage
other than that for which your unit is
intended.
Interference with other
electrical devices
Radios and televisions placed nearby
may experience reception interference.
Operate this unit at a suitable distance
from radios and televisions.
Care
If the exterior becomes dirty, wipe it with a
clean, dry cloth. Do not use liquid cleaners
such as benzene or thinner, or cleaning
compounds or flammable polishes.
Handling
To avoid breakage, do not apply excessive
force to the switches or controls.
Keep foreign matter out of your
equipment
Never set any container with liquid in
it near the unit. If liquid gets into the
equipment, it could cause a breakdown,
fire, or electrical shock.
Be careful not to let metal objects
get into the unit.
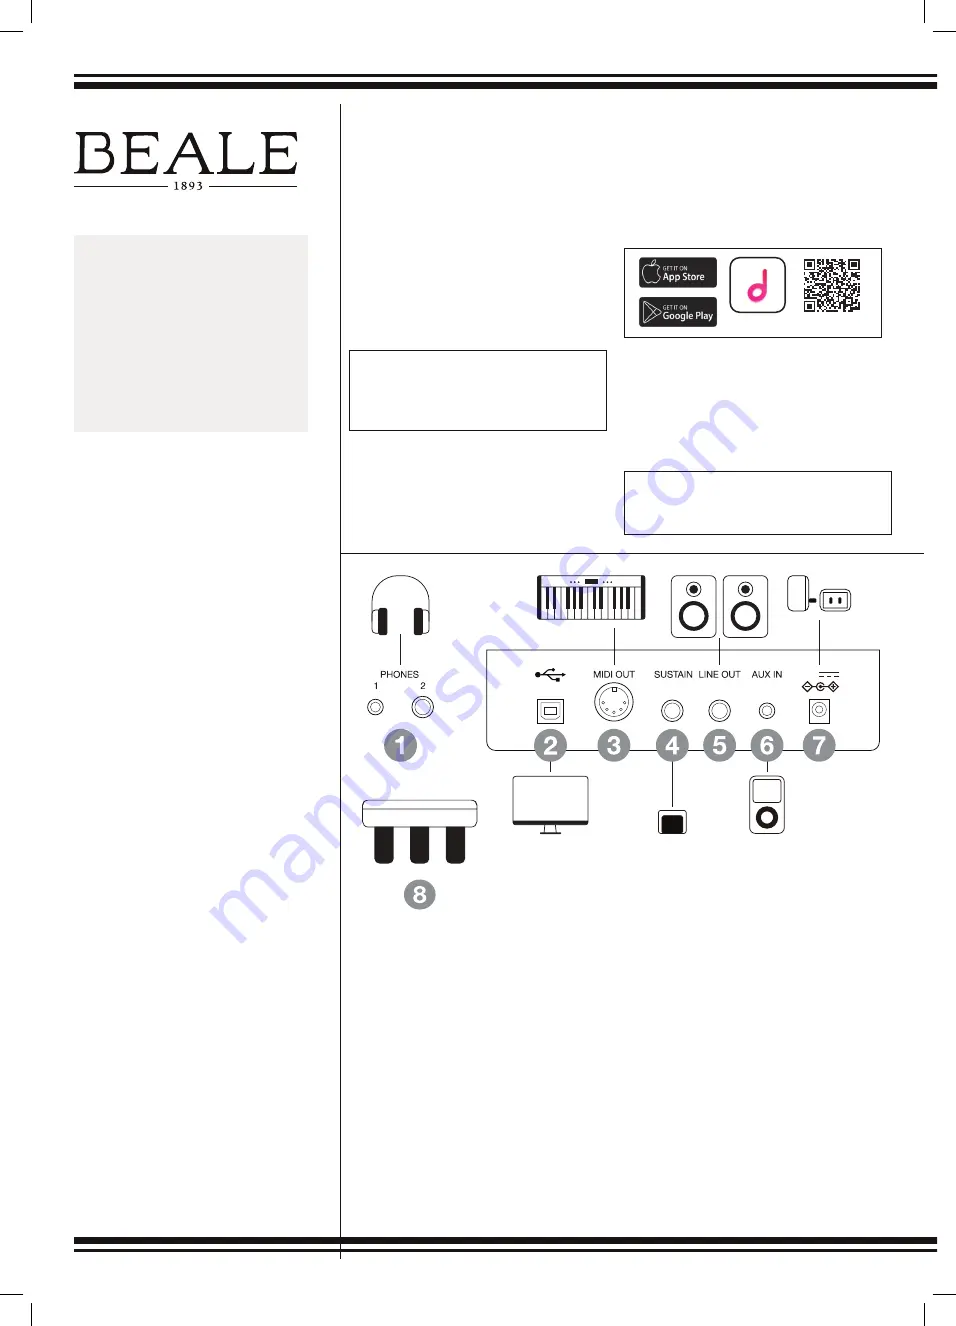
1. PHONE JACKS
For connecting to head-hones. When
headphones are connected, the internal
speakers will be muted. The sound can
only be heard from the headphones.
2. USB JACKS
For connecting to a computer or a
mobile device via cable. An additional
adapter may be needed to connect to
mobile devices.
3. MIDI OUT JACK
For connecting to an external MIDI device.
4. SUSTAIN JACK
For connecting to a sustain pedal.
5. LINE OUT JACK
For connecting to the
INPUT jack of
external audio equipment such as a
sound system or PA speaker.
6. AUX IN JACK
For connecting to the
OUTPUT jack of
external audio source such as an MP3
player.
7. DC IN JACK
For connecting to the specified power
adapter.
8. UNIT PEDAL JACK (OPTIONAL)
For connecting an optional Pedal Stand,
DPSTAND (Soft Pedal, Sostenuto Pedal and
Sustain Pedal) to the pedal jack located on
the bottom of the instrument.
CAUTION
The normal function of this product
may be disturbed by strong electro
magnetic Interference. If so, simply
reset the product to resume normal
operation, or use the product in an
alternate location.
KEEP THIS MANUAL
After reading this manual,
please keep it for later reference.
TURNING THE POWER ON OR OFF
1.
Make sure the instrument is properly
connected to the power supply.
2. Press the [POWER] switch. The panel
LED’s light up - the power is turned on.
3. Rotate the [VOLUME] knob to set the
volume to the desired level.
4. To turn off the power, press [POWER]
switch for a second. The panel LED’s
will turn off.
CONNECTING THE “PIANO TOOLBOX”
APP VIA BLUETOOTH MIDI
1. Turn on the instrument and ensure
the instrument and the smart device
are in range of each other.
NOTE :
You can use a keyboard command to disconnect
Bluetooth MIDI, hold
SHIFT and press A#0 and B0 at the
same time. You can also connect the app through camera
connection kit on iOS and through USB on Android devices.
NOTE
: In order to save power, the instrument will
automatically shut down after 30 minutes of not being
used. You can turn off the power protection by using a
keyboard command; hold
SHIFT and press C1, C#1 at
the same time. Please unplug the instrument when it is
not in use or during an electrical storm.
12V
12V
2. On the smart device, open “Settings”,
then turn on Bluetooth.
3. Download and install the ‘Piano Toolbox’
app from the Apple App Store for IOS
devices, or Google Play Store for Android
Devices.
PIANO TOOLBOX APP
4. Open Bluetooth MIDI function in the
app and select “Piano BT MIDI xxxx” to
establish Bluetooth connection. When
the connection is established, the power
button will turn blue.
NOW YOU CAN CONTROL THE
INSTRUMENT REMOTELY FROM THE APP.
Summary of Contents for DP600BT
Page 8: ...bealepianos com au...


