- 5 -
Disconnect the power cord before replacing a fuse and always replace with the
same type fuse.
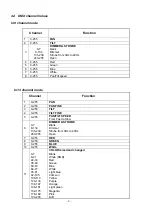
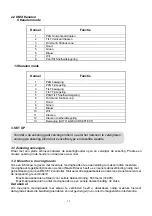
2.2 DMX Channel
In 8 channel mode
Channel Function
1
PAN
2 TILT
3
DIMMER & STROBE
4 Red
5 Green
6 Blue
7 White
8 Pan/Tilt
SPEED
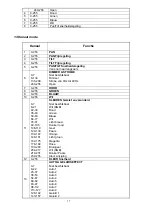
In 13 channel mode
Channel Function
1
PAN
2 PAN
FINE
3
TILT
4 TILT
FINE
5 PAN/TILT
SPEED
6 DIMMER
&
STROBE
7 RED
8 GREEN
9 BLUE
10 WHITE
11
COLOR mixed and changed
12 COLOR
SPEED
13
MOVEMENT(AUTO & SOUND EFFECT)
3. Set up
Power Supply: Before plugging your unit in, be sure the source voltage in your area matches
the required voltage for your. The Light is available in a 110v to 250v version. Because line
voltage may vary from venue to venue, you should be sure your unit voltage matches the wall
outlet voltage before attempting to operate you fixture.
3.1 Fuse replacement
With a flat head screwdriver wedge the fuse hold out of its housing. Remove the damaged
fuse from its holder and replace with exact same type fuse. Insert the fuse holder back in its
place and reconnect power.
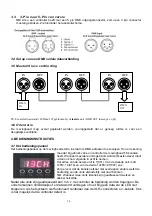
3.2 Fixture linking
You will need a serial data link to run light show of one or more fixtures using a DMX-512
controller or to run synchronized on two or more fixtures set to a master/slave operating
mode. The combined number of channels required by all the fixtures on a serial data link
determines the number of fixtures the data link can support.


