background image


press down, afterwards press OK 2x. You get the option to quit, press and hold OK button to confirm.  


Geomagnetic calibration 


When the number of satellite signals is more than 8, press OK, then press DOWN to choose the 
geomagnetic calibration and press OK again. This will start the horizontal calibration; turn the remote 
control in a 360 degree horizontal circle. 
 

When the 4 parameters on the interface become stable, press OK. This will start the vertical 
calibration; turn the remote control in a 360 degree vertical circle. 


Press OK again and the calibration will be complete. 


Press ESC to go back to the main menu. 


Note: It is better to set the starting point once the number of satellites is 15+ if possible. When the 
satellite signal is strong, accuracy of fishing points can be <1m. 


Saving starting point and fishing points 
 

Choose the starting point; take the boat onto the bank; press DOWN and enter the menu. By pressing 
UP/DOWN, the starting point can be chosen. Hold down OK, to confirm YES or NO. If you confirm 
YES, press OK again, and the starting point will be saved. 
 

After saving the starting point, press ESC to return to the main menu. You will see the boat’s direction, 
number of satellite signals, voltage of the remote, power warning and the actual voltage of the boat.  
 
Note: You should set the starting point well before the boat is in the water. If not, the GPS cannot be 
found; the range between the remote control and the boat cannot be calculated and also saved fishing 
points cannot be called in future. When the range between the starting point and fishing point is out of 
the effective range of the remote control, the boat cannot travel to the fishing point automatically and 
will return to the starting point. 
 

Place the boat in the water and direct it to where you want to go. You can save fishing points from 
numbers 1 to 20 and release bait & hooks accordingly. To save fishing points, follow the same process 
as for the starting point. 
 

By pressing UP, you can see the longitude and latitude of the boat. If you press UP again, you will see 

Summary of Contents for Navimate

Page 1: ...BearCreeks Navimate User Guide 5 8GHz BearCreeks GmbH Marie Curie Str 6 85055 Ingolstadt Germany Tel 49 841 Fax www bearcreeks com Email sales bearcreeks com...

Page 2: ...then recharge the batteries every 2 3 months Never overcharge the batteries Turn chargers off when they indicate the battery is fully charged Store your bait boat in a dry environment It is not recom...

Page 3: ...able battery for the bait boat 2pc 4 Rechargeable batteries for the remote control handset 4pcs 5 Home charger for bait boat 1pc 6 Home charger for handset 1pc 7 Rubber antenna for bait boat 1pc For o...

Page 4: ...nce and prolong battery life 9 Weed guards ensure that weed line and detritus do not foul the propellers or impede performance 10 Waterproof rocker switches All switches and charging sockets are water...

Page 5: ...chargeable may be used in the handset Warning Please do not attempt to charge the handset with non chargeable batteries in use Charging the handset batteries Charging the handset batteries with home c...

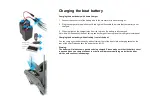
Page 6: ...ed Note As with the handset the boat battery can be charged via our optional car charger or solar panel Charging the boat battery without taking it out of the boat You can charge your battery directly...

Page 7: ...ft hand joystick right H I Turn Lights on off Push the left hand joystick up or down to turn the lights on and off from range Exact information about the status of the boat is displayed when the light...

Page 8: ...voltage the buzzer will sound and the boat should be returned to the bank Battery Warning Voltage Lead acid battery 9 8V Lithium Battery 9 8V NOTE It is worth considering purchasing a replacement set...

Page 9: ...of your bait Loading and releasing your rig The left hand joystick operates the hook rig release system 1 Insert your line rig or hook on the hook release system pin situated on the back of the boat 2...

Page 10: ...k 1 Do not stop or pick up the boat by the aerial as damage will occur 2 Switch off the boat first and then the handset Notes Always turn the handset on first and then the boat To turn off turn off th...

Page 11: ...environmental disturbance If the signal is lost for more than 10 seconds the boat will automatically go back to the starting point 6 During the whole Autopilot process if the boat is low on power red...

Page 12: ...DOWN the starting point can be chosen Hold down OK to confirm YES or NO If you confirm YES press OK again and the starting point will be saved 2 After saving the starting point press ESC to return to...

Page 13: ...d to stop the boat press ESC and go back to the main menu Press DOWN and the display will show SAVE CALL and EXIT Press EXIT and then hold down OK again Hold down OK and confirm YES or NO If you confi...

Page 14: ...536 color Multi Language KEY FEATURES Sonar Depth Capability m ft Sonar Frequency 5Khz Sonar Beam Angle 6 deg 10db Sonar Alarms Fish Shallow Low Battery Water Temperature RF RC Distance field test Max...

Page 15: ...charge your devices quickly even on overcast days Its compact size and light weight make the Cult Solar Panel easily transportable It will comfortably fit inside your carryall or boat bag Its durable...

Page 16: ...set Lanyard Our handset lanyard means your handset is always conveniently to hand when you need both hands free during usage A quick release clip ensures swift attachment and detachment Spare Lithium...

Page 17: ...consequential losses due to bait boat failure By signing this warranty form you are agreeing to all terms stated Please note no confirmation will be sent back when warranty form is received Exclusion...

Page 18: ...SIGNED...

Reviews: