14
English
5. Initial use
Take the device out of the package and remove all the packaging material. Insert a
"CR2032" battery (not included in the scope of supply) into the battery compart
-
ment at the back, which is located at the bottom. Pay attention to the correct po
-
larity of the contacts. This battery is used for saving a backup of the time and alarm.
6. Setting the time
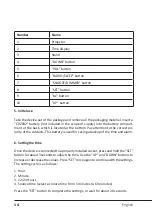
Once the device is connected to a properly installed socket, press and hold the "SET"
button for about 3 seconds to adjust the time. Use the "UP" and "DOWN" buttons to
increase or decrease the values. Press "SET" once again to continue with the settings.
The setting cycle is as follows:
1. Hour
2. Minute
3. 12/24 Hours
4. Snooze time (select a snooze time from 5 minutes to 60 minutes)
Press the "SET" button to complete the settings, or wait for about 20 seconds.
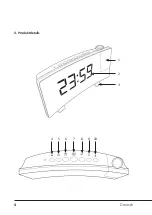
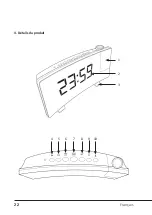
Number
Name
1
Projector
2
Time display
3
Stand
4
"DOWN” button
5
"VOL” button
6
"RADIO/SLEEP" button
7
"SNOOZE/DIMMER" button
8
"SET" button
9
"AL” button
10
"UP” button
Summary of Contents for 304474
Page 1: ...Projection Clock Mod Nr 304474 ...
Page 2: ...2 Deutsch Table of contents 1 Deutsch 3 2 English 12 3 Français 21 4 Italiano 30 5 Español 39 ...
Page 4: ...4 Deutsch 4 Produktdetails 1 2 3 4 5 6 7 8 9 10 ...
Page 13: ...13 English 4 Product details 1 2 3 4 5 6 7 8 9 10 ...
Page 22: ...22 Français 4 Détails du produit 1 2 3 4 5 6 7 8 9 10 ...
Page 31: ...31 Italiano 4 Dettagli del prodotto 1 2 3 4 5 6 7 8 9 10 ...
Page 40: ...40 Español 4 Detalles del producto 1 2 3 4 5 6 7 8 9 10 ...
Page 48: ...DOWNLOADS MANUALS WD Plus GmbH Wohlenbergstraße 16 D 30179 Hannover V1 0 ...


