background image

15

• Turn the hair clippers on for a few seconds and clean the excess oil off with a cloth.

PRECISION CUT

• Using the cutting knob (6) you will get an accurate cut of 0,5-1,2-1,9 and 2,5 mm. Slide the knob to select 

the desired cutting length.

CUTTING GUIDES

• The hair clipper is equipped with four cutting guides which allow for an accurate height of cut in four 

different lengths (3-6-9 and 12 mm).

• To insert the chosen guide, place it in the blade and press it to adjust in both sides of the appliance.

BEGINNING THE CUT

• Relax and work slowly. Make short cuts. Do not go on to the final cut of one side or the back straight 

away. Work gradually and all over the head.

• It is better to cut a little each time to be able to cut some more later on.
• While you are working and before you begin, comb the hair frequently to the chosen style.
• It is better to cut the hair when it is dry, not wet. It is easier to see and control the amount of hair you 

are cutting.

• The first time you use the appliance it is advisable to cut a small portion of hair until you get used to 

the different lengths of the guides. At first use the guide which allows the longer cutting length (guide 
of 12 mm). With a little practice you will soon choose the most adequate guide for the length you wish 
to have.

• After combing your hair following its natural direction, proceed as follows to obtain a perfect hair cut.

First step: NAPE 

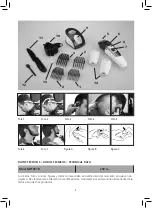
• Place the guide in around 3 mm cutting position. Start cutting at the centre of the nape and at the 

bottom of the neck. Hold the hair clippers softly against the head with the teeth of the guide pointing 
upwards.

• Go up gradually, working your way upwards and outwards, just cutting a little hair at a time. When 

cutting raise the head of the clippers towards you little by little. Continue cutting at the back of the 
head from the base of nape to the area just above the ears (Zone 

“A”

 of the photo 1).

Second step: THE BACK OF THE HEAD

• Put in one of the two guides corresponding to the desired length of 6 or 9 mm and cut the area at the 

back of the head, identified as zone 

“B”

 in the photo 2.

Third step: SIDES

• Using the 3 or 6 mm cutting guides, start cutting the side burns and the area close to the ears. Next, use 

the guide corresponding to the cutting length 9 or 12 mm to go on cutting the hair at the top of the 
head (photo 3).

Fourth step: The top of the head

• Put in the guide corresponding to the longest cutting length (12 mm) and start cutting from the crown 

forwards against the growth of the hair (photo 4). In some cases you will have to cut from the front 
backwards.

• To leave your hair longer use a comb to lift the hair at the back of the head and cut above the comb; or 

else hold the lock of hair between your fingers and cut off the to the desired length.

• Always  working  your  way  from  the  back  of  the  head  gradually  cut  the  hair,  shorter  each  time  by 

reducing the space between the comb or your fingers, to the hair. Frequently comb your hair to check 
for any differences in its length and to eliminate the hair which has already been cut.

Fifth step: THE FINAL TOUCHES

• Do not use any guides for the final touches.
• To get an exact hair cut and the side burns, nape and the area around the ears with straight lines, turn 

the hair clippers round and place them at a straight angle with your head so the blade is in slight contact 
with the skin, and shave downwards (photo 5). This way you will get a perfect finish, as if shaving.

BEARD

• Before placing a smaller cutting guide, remember you always must begin with the higher cutting guide 

(12 mm).

Summary of Contents for MP1031B

Page 1: ...om sticos JATA S A ESPA A Zubibitarte 8 48220 ABADIANO Bizkaia Tel 902 100 110 94 621 55 40 Fax 902 100 111 94 681 44 44 PORTUGAL Avenida Engenheiro Duarte Pacheco Torre 2 3 Sala 3 1070 102 Lisboa Tel...

Page 2: ...datos corresponden al nivel t cnico del momento en que se han impreso Nos reservamos el derecho a modificaciones motivadas por el desarrollo permanente de la t cnica en nuestros productos 2 10 6 4 12...

Page 3: ...di carica 9 Base ricarica 10 Adattatore 11 Pettine 12 Spazzola 13 Olio lubrificante 14 Batterie PRINCIPAIS COMPONENTES 1 Guia de corte 3 mm 2 Guia de corte 6 mm 3 Guia de corte 9 mm 4 Guia de corte 12...

Page 4: ...stico o elementos del embalaje Pueden ser fuentes potenciales de peligro No la conecte sin asegurarse de que el voltaje indicado en el adaptador y el de su casa coinciden No la utilice ni la recargue...

Page 5: ...n otro l quido Si se usa en un cuarto de ba o es aconsejable la instalaci n en el circuito el ctrico de un dispositivo de corriente diferencial residual DDR de corriente diferencial de funcionamiento...

Page 6: ...inar en color rojo y se mantendr as siempre que la bater a est colocada en la base Para optimizar la durabilidad de la bater a tenga en cuenta los siguientes consejos No exceda nunca los tiempos indic...

Page 7: ...la hacia delante en direcci n contraria al nacimiento del pelo Foto 4 En determinados casos se deber cortar de adelante hacia atr s Para obtener una longitud de cabello mayor utilice un peine levantan...

Page 8: ...y mejora del medio ambiente PORTUGU S ATEN O Leia atentamente estas instru es antes de colocar a aparelho em funcionamento e guarde as para futuras consultas Este aparelho pode ser usado por crian as...

Page 9: ...a m quina ligada rede utilize sempre o adaptador fornecido N o utilize qualquer outro tipo de adaptador Este aparato foi concebido para utiliza o exclusivamente dom stica MUITO IMPORTANTE A m quina o...

Page 10: ...adaptador 10 base da m quina e o adaptador rede A primeira carga da bateria dever ser efectuada durante um per odo de 5 6 horas Para as recargas seguintes suficiente mant la a carregar durante 2 3 ho...

Page 11: ...a direc o Continue a cortar a parte de tr s desde a base da nuca at acima das orelhas Zona A da foto 1 Segundo passo PARTE POSTERIOR DA CABEZA Coloque uma das duas guias na posi o correspondente ao co...

Page 12: ...mpeza n o utilize produtos qu micos ou abrasivos esfreg es met licos etc que possam deteriorar a superf cie PROTEC O DO MEIO AMBIENTE Na sua qualidade de consumidor quando desejar deitar o aparelho fo...

Page 13: ...eft connected on flat surfaces such as tables or counter tops as the vibration of the appliance may cause it to slide off and break Do not use on injured skin or if you have any skin diseases To recha...

Page 14: ...ion over the base The pilot light 8 will go on red colour The charging of the battery may also be carried out without the base 9 It is enough to put the adapter plug 10 into the base of the hair clipp...

Page 15: ...utting a little hair at a time When cutting raise the head of the clippers towards you little by little Continue cutting at the back of the head from the base of nape to the area just above the ears Z...

Page 16: ...lean chemical products or abrasives metallic scourers and similar which may deteriorate the surfaces ENVIRONMENT PROTECTION Dispose the appliance according to the local garbage regulations Dispose the...

Page 17: ...ments ou tout autre objet afin d viter tout risque de blocage De m me ne pas faire fonctionner sur des superficies planes tables plans de travail etc car la vibration de l appareil peut le d placer et...

Page 18: ...la premi re mise en service il faut charger la batterie La charge des batteries peut se faire de deux fa ons sur l appareil ou sur la base 1 CHARGE SUR L APPAREIL A cet effet l interrupteur 7 sur la...

Page 19: ...une petite part de cheveux jusqu vous habituer la longueur des diff rents guides Au d but utilisez le guide qui permet une longueur de coupe plus grande guide de 12 mm Avec la pratique vous choisirez...

Page 20: ...upe plus courte MAINTENANCE ET NETTOYAGE Avant toute op ration assurez vous que l appareil est d branch du r seau Pour un bon nettoyage devrait enlever le bloc sur la lame Pour ce faire appuyez sur la...

Reviews: