background image


BeaverPad BP-100  

User Manual 

16 

|


P a g e


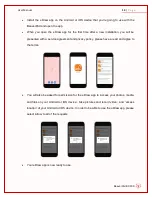
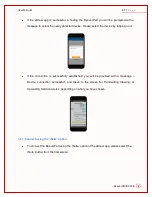
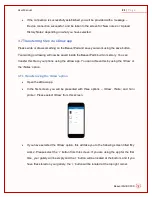
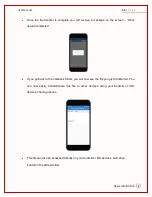
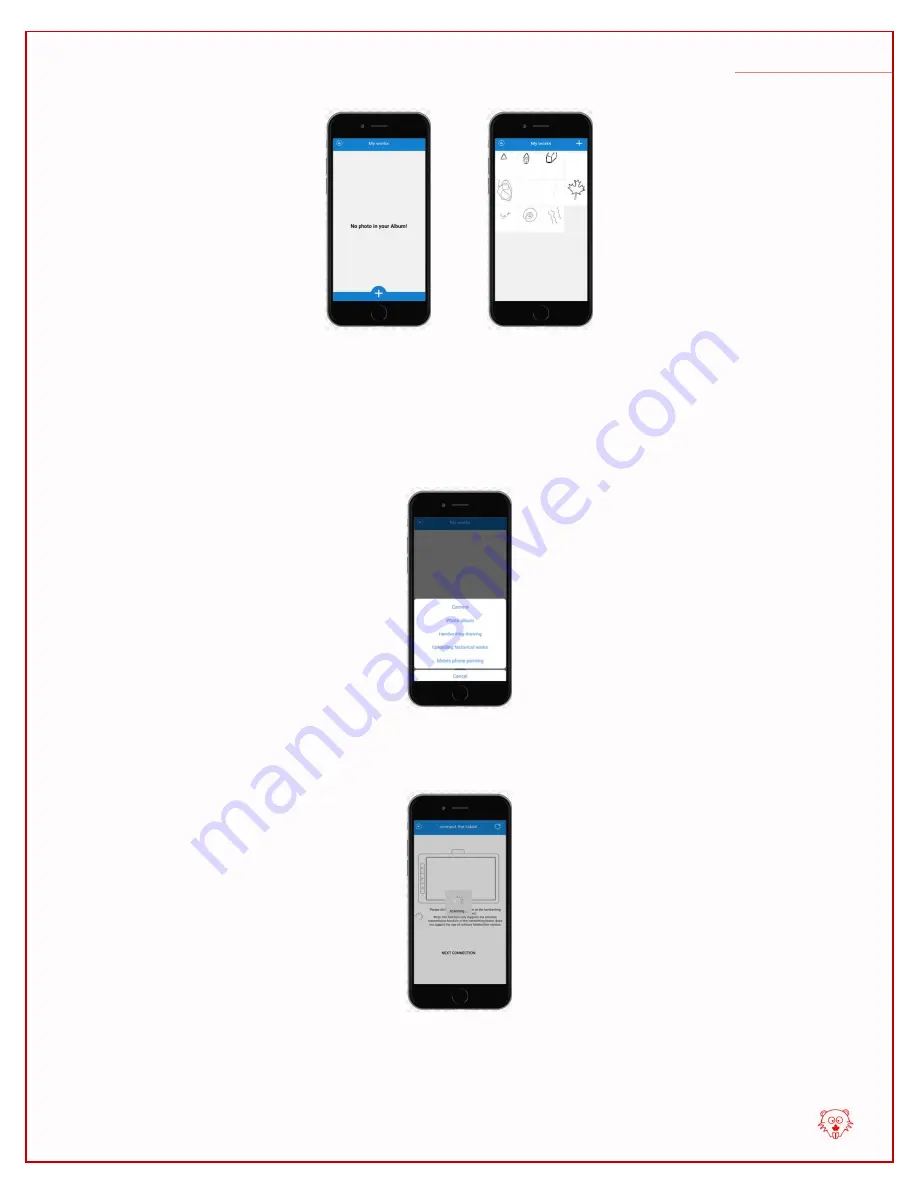
  This  will  open  up  a  new  menu  with  a  number  of  options  for  you 

–  ‘Camera’,  ‘Photo 

album’, ‘Handwriting drawing’, ‘Uploading historical Works’, and ‘Mobile phone painting’. 

Please select, either ‘Handwriting drawing’ or ‘Uploading historical Works’. 


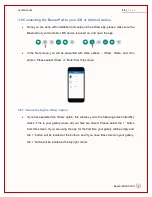
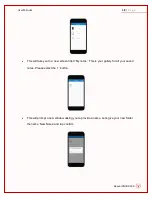
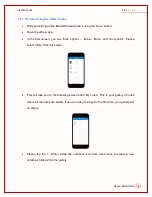
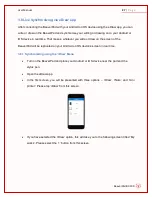
  The eDraw app will now begin scanning for the BeaverPad. 


Summary of Contents for BP-1000

Page 1: ...BeaverPad BeaverPad BP 1000 User Manual ...

Page 2: ...rs artists and teachers when used as a graphic tablet Its lightweight and compact design makes it very easy to carry and use on the go It is one of the few devices in the market that includes several special features such as write erase erase lock save built in memory Bluetooth connectivity live synchronization and file transfer The BeaverPad comes with its own dedicated stylus pen with a special ...

Page 3: ... 3 Erase 10 3 3 1 Erasing 10 3 3 2 Erase Lock Mode 10 3 3 3 Partial Erase 11 3 4 Save 11 3 4 1 Built in Memory 11 3 4 2 Save Button 11 3 4 3 File Format 11 3 4 4 File Resolutions 11 3 4 5 File Sizes 12 3 4 6 Saving Capacity 12 3 5 Bluetooth Connectivity 12 3 5 1 How to use Bluetooth 12 3 5 2 The eDraw App 13 3 5 3 Installing the eDraw app 13 3 6 Connecting the BeaverPad to your iOS or Android devi...

Page 4: ...rPad from eDraw app 36 4 How to Use as a Graphics Tablet Windows MacOS 38 4 1 Getting started 38 4 2 Connecting to a Windows or Mac computer 38 4 2 1 Using as a Mouse 39 4 2 2 Using as a Graphics tablet Drawing Device 39 4 3 Installing the driver 40 4 3 1 Windows 40 4 3 2 MacOS 41 4 4 Driver Configuration 41 4 4 1 Press Keys configuring the tablet keys 42 4 4 2 Pen configuring the stylus pen 44 4 ...

Page 5: ...User Manual 4 P a g e 1 Package Contents The BP 1000 package contains the following contents 1 x LCD Writing Tablet 1 x Charging Cable 1 x Stylus Pen 3 x Replacement tips 1 x Replacement toolkit 1 x English User Manual ...

Page 6: ...BeaverPad BP 100 User Manual 5 P a g e 2 Product Introduction 2 1 Product View ...

Page 7: ... Upgrade Not Upgradable Saving Capacity Notes Approximately 500 pages on the tablet Saving Capacity Drawing Approximately 200 pages on the tablet Saved File Format PNG Connectivity Android Devices Bluetooth and Micro USB iOS Devices Bluetooth and Micro USB Windows Computers Micro USB only macOS Computers Micro USB only Charging Micro USB to USB cable Wi Fi Not Available Input 5V 1A Supported Platf...

Page 8: ...nches Diameter 1 cm 0 4 inches Weight 5g Induction Method Electromagnetism Induction Height 5 14mm Pen Function Method Forced induction Total Buttons Switches 2 Button 1 Thickess up only usable in the eDraw App Button 2 Thickess down only usable in the eDraw App Connecting to the Tablet Bluetooth Charging Charging Micro USB only Input Input 5V 1A Compatibility Only functions with the BeaverPad or ...

Page 9: ...rging cable provided or any generic Micro USB cable to connect one end to the tablet and another end to any generic power adapter or any other source of USB power supply While charging the red light will be on Once fully charged the red light will automatically go off It takes 3 4 hours for the tablet to be fully charged Stylus Pen To charge the pen open the silicon USB cover and connect one end o...

Page 10: ...green light will turn off to indicate the tablet being shut down To wake the tablet from automatic shutdown press any of the three keys Power Off To manually shut down your tablet press the Power button for 3 seconds To turn the tablet back on press the Power button for 3 seconds Stylus Pen The stylus pen will always stay on if it has minimum power on its battery if left unused for 30 minutes it w...

Page 11: ...e stylus pen 3 2 2 Writing without power You may write on the tablet without having the tablet or the pen powered on However if you write without power you won t be able to save your work inside the tablet s memory or use any other features such as Bluetooth or USB connectivity 3 3 Erase 3 3 1 Erasing If you are not satisfied with something you have written on the screen you may erase the page and...

Page 12: ... Bluetooth connection 3 4 2 Save Button Once you are happy with your work you may press and hold the save button for 3 5 seconds This will immediately save your work inside the tablet s built in memory and give you a fresh blank page to work with 3 4 3 File Format When you press the Save button your work is saved inside the tablet s memory Later when you transfer the file to an Android or iOS devi...

Page 13: ... on the size details of each file saved You can save roughly up 200 pages of drawings sketches with heavy details and approximately 500 pages of notes When the maximum capacity of the memory storage is reached the indicator light will switch from green to red and you will no longer be able to save anything inside the memory You will still be able to write and erase on new pages 3 5 Bluetooth Conne...

Page 14: ...ng it allows users to draw and save their work from the BeaverPad to their Android or iOS device via Bluetooth file transferring or live synchronization Files transferred or saved using the iDraw option are all stored in one folder within the eDraw app The iNote option on the other hand is intended for saving notes This option will allow users to save and store their notes into different folders w...

Page 15: ... will be presented with a service agreement and privacy policy please have a read and agree to the terms You will also be asked for permission for the eDraw app to access your photos media and files on your Android or iOS device take pictures and record video and access location of your Android or iOS device In order to be able to use the eDraw app please select allow to all of the requests Your e...

Page 16: ...iDraw iNote and mini printer Please select iDraw or iNote from this screen 3 6 1 Connect using the iDraw option If you have selected the iDraw option this will take you to the following screen titled My works This is your gallery where all your files are stored Please select the button from this screen If you are using the app for the first time your gallery will be empty and the button will be lo...

Page 17: ... new menu with a number of options for you Camera Photo album Handwriting drawing Uploading historical Works and Mobile phone painting Please select either Handwriting drawing or Uploading historical Works The eDraw app will now begin scanning for the BeaverPad ...

Page 18: ...by tapping on it If the connection is successfully established you will be provided with a message Device connection successful and taken to the screen for Handwriting drawing or Uploading historical works depending on what you have chosen 3 6 1 Connect using the iNote option To connect the BeaverPad using the iNote option of the eDraw app please select the iNote button from the first screen ...

Page 19: ...This will take you to a new screen titled My notes This is your gallery for all your saved notes Please select the button This will prompt a new window asking you to provide a name Let s give your new folder the name New Notes and tap confirm ...

Page 20: ...an see the new folder you just created named New Notes Please tap to select this folder This will take you inside the folder New notes Please select the button on the top right corner of this screen You will now be prompted with the options New notes and Upload History Notes Please select any one of those two options ...

Page 21: ...l 20 P a g e The eDraw app will now begin scanning for the BeaverPad If the eDraw app is successful in finding the BeaverPad you will be prompted with a message to select the newly detected device Please tap to select the device ...

Page 22: ...y You can transfer this file to your phone using the eDraw app You can achieve this by using the iDraw or the iNotes option 3 7 1 Transfer using the iDraw option Open the eDraw app In the first screen you will be presented with three options iDraw iNote and mini printer Please select iDraw from this screen If you have selected the iDraw option this will take you to the following screen titled My w...

Page 23: ...s you need You can select or deselect the files by clicking the circled tick button located to the left of every file Now tap the Save icon at the top right corner of the screen next to the Bluetooth icon This will save all your selected files inside your Android or iOS device When the task of saving is completed you will be automatically taken to the gallery titled My works Here you will see the ...

Page 24: ... see three options iDraw iNote and mini printer Please select iNote from this screen This will take you to the following screen titled My notes This is your gallery of notes where all the notes are saved If you are using the app for the first time your gallery will be empty Please tap the button inside the notebook icon from this screen to create a new notebook folder within the gallery ...

Page 25: ...folder Choose any name of you prefer and tap confirm For this example we are going to name our folder New notes You will now notice that a new notebook folder named New notes has been created in the gallery Tap the folder s icon to enter the folder Inside the folder please tap the icon at the top right corner ...

Page 26: ...00 User Manual 25 P a g e This will bring up the following options New notes and Upload history notes Please tap Upload history notes to transfer any files saved on the BeaverPad tablet to your Android or iOS device ...

Page 27: ...pload completed If you go back to the notebook folder you will now see the file you just transferred You can now easily transfer share this file to other devices using your Android or iOS device s sharing options This file can also be accessed directly on your Android or iOS device s hard drive located in the eDraw folder ...

Page 28: ...draw on the screen of the BeaverPad will be replicated on your Android or iOS device s screen in real time 3 8 1 Synchronizing using the iDraw Menu Turn on the BeaverPad and place your Android or iOS device near the pad and the stylus pen Open the eDraw app In the first screen you will be presented with three options iDraw iNote and mini printer Please tap iDraw from this screen If you have select...

Page 29: ...new menu with a number of options for you Camera Photo album Handwriting drawing Uploading historical Works and Mobile phone painting Please select Handwriting drawing The eDraw app will connect automatically with the BeaverPad and open up a blank drawing canvas ...

Page 30: ...t touching the screen You will soon see a cursor appear on the canvas of the eDraw app with the shape of a plus sign This means your Stylus pen has been recognized and calibrated and you are ready to write in synchronization Now if you write or draw something on the screen of the BeaverPad you will see it being syncrhonized on the screen of the eDraw app ...

Page 31: ...nds This will save your drawing directly on the eDraw app s gallery and give you a fresh blank canvas on the eDraw app and a fresh blank page on the BeaverPad s screen You may also save your work by tapping the save save icon on the eDraw app s canvas But with this method the drawing will not be erased from the BeaverPad s screen ...

Page 32: ...Now if you go back to the gallery of the iDraw menu you will see the drawing you just saved 3 8 2 Synchronizing using the iNote Menu Turn on the BeaverPad and place your Android or iOS device near the pad and the stylus pen Open the eDraw app ...

Page 33: ...is will take you to the gallery titled My notes If you are using the app for the first time your gallery will be empty Please create a new notebook folder and tap to enter the folder Or if you have any existent folders tap to enter any one of them Now you will be taken inside the folder you have chosen From here tap on the icon at the top right corner of the screen ...

Page 34: ...ll then be prompted with 2 options New notes and Upload history notes Please tap on New notes This will cause the eDraw app to connect with the BeaverPad and open up a blank sheet for you There is also an option to give this page a name at the top ...

Page 35: ...t touching the screen You will soon see a cursor appear on the canvas of the eDraw app with the shape of a plus sign This means your Stylus pen has been recognized and calibrated and you are ready to write in synchronization Now if you write or draw something on the screen of the BeaverPad you will see it being syncrhonized on the screen of the eDraw app ...

Page 36: ... the eDraw app and a fresh blank page on the BeaverPad s screen If you haven t given this sheet a name you will be prompted to give it a name or allow the app to produce one for you You may also save your work by tapping the save save icon on the eDraw app s screen But with this method the drawing will not be erased from the BeaverPad s screen Now if you go back to the folder of the iNotes menu yo...

Page 37: ... 9 Deleting the BeaverPad from eDraw app To delete the BeaverPad from the eDraw app for troubleshooting or any other purposes open the eDraw app and tap on About button on bottom right corner of the screen From here please tap on My equipment ...

Page 38: ...anual 37 P a g e This will take you to a page that will show all the devices connected to your Android or iOS device on the eDraw app You can delete a device here by tapping the delete icon to the right of each device listed ...

Page 39: ...gin using your new device you should always charge the tablet and the stylus pen Once you have made sure that your tablet and the pen are both sufficiently charged you may proceed to using the device 4 2 Connecting to a Windows or Mac computer To connect the BeaverPad to your windows or Mac Computer please connect the micro USB plug to the port allocated on the BeaverPad and the USB plug to any av...

Page 40: ...ter screen in response to your stylus pen s movement across the BeaverPad s screen Shortcuts for using as a Mouse Single Click Press Button 1 once or tap the screen with the tip of the pen once Double Click Press Button 1 or tap the screen with the tip of the pen twice Right Click Press Button 2 once 4 2 2 Using as a Graphics tablet Drawing Device The BeaverPad will work as a Graphics Tablet with ...

Page 41: ...lled to be used as a Graphics Tablet but the driver will provide more options for customization and enhance your user experience 4 3 1 Windows To download the windows driver program please visit https beaverpad ca downloads html Once downloaded please install the driver from the downloaded file Restart your computer if you are prompted If your installation is successful you will see an icon in the...

Page 42: ...MacOS To download the MacOS driver app please visit https beaverpad ca downloads html Once downloaded please install the driver from the downloaded file Restart your computer if you are prompted If your installation is successful you will be able to see the driver app in your launch folder If it isn t already connected please connect the BeaverPad to configure your driver settings When your Beaver...

Page 43: ...ack to default setting 4 4 1 Press Keys configuring the tablet keys The first tab is called Press Keys In this tab you can customize the keys on the BeaverPad assign your preferred keyboard or mouse shortcuts to use it on your Windows or Mac OS as well as any applications such as MS Word Photoshop etc This driver application supports customization of up to 5 keys but since the BeaverPad only has 3...

Page 44: ...BeaverPad BP 100 User Manual 43 P a g e To customize a key with your own shortcut click on the key On a new installation the key will be Undefined Please click on the Undefined button ...

Page 45: ...ction as a shortcut for E Now if you open Photoshop draw a few lines using the pen and press the save button on the BeaverPad This will enable the Eraser function immediately and your stylus pen will function like an eraser To go back to drawing select a pencil or brush to stop erasing and return to your drawing 4 4 2 Pen configuring the stylus pen To configure the pen please select the Pen tab Yo...

Page 46: ... computer you can choose one or both to use the BeaverPad You can achieve this by choosing the display from Select Current Display menu You can also adjust the rotation of the BeaverPad by selecting one of the options in the Rotate Set section Lastly you can customize the area where you want the BeaverPad to remain active by adjusting the work area displayed at the bottom that looks like a graphic...

Page 47: ...l allow you to go back to default setting and all your customization will be removed To go initiate default setting please click on the Default setting button and this will prompt up a message asking you to confirm If you want to proceed please click Yes otherwise click No Export this option lets you save your configurations and customized shortcut keys To use this feature click on the Export butt...

Page 48: ...lus pen are adequately charged Remove the device from the eDraw app and close the eDraw app Delete all the data from the eDraw app uninstall and reinstall the eDraw app if necessary Connect the BeaverPad to the eDraw app again and everything should function normally 6 User Guidelines To maximize the longevity of your BeaverPad we recommend the following standard of practices Always use and store t...

Page 49: ...BeaverPad BP 100 User Manual 48 P a g e ...

Reviews: