background image

www.bebecar.com

instructions
instrucciones
instruções
gebrauchsanleitung
gebruiksaanwijzing
istruzione

инструкции

pokyny
instrukcja obsługi

інструкція

használati utasítás

15 - 36 Kg

GROUP

 2 & 3

Summary of Contents for multibob fix

Page 1: ...www bebecar com instructions instrucciones instruções gebrauchsanleitung gebruiksaanwijzing istruzione инструкции pokyny instrukcja obsługi інструкція használati utasítás 15 36 Kg GROUP 2 3 ...

Page 2: ......

Page 3: ...C D B A E F G I H J MULTIBOB FIX ...

Page 4: ...1 2 4 3 4 1 MULTIBOB FIX ...

Page 5: ...5 6 MULTIBOB FIX ...

Page 6: ...7 9 9 2 9 1 8 MULTIBOB FIX ...

Page 7: ...10 11 12 13 1 2 MULTIBOB FIX ...

Page 8: ...15 16 17 15 1 14 MULTIBOB FIX ...

Page 9: ...18 19 20 21 MULTIBOB FIX ...

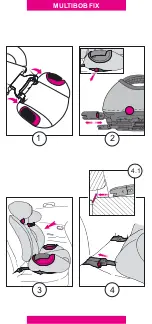
Page 10: ...d when not using ISOFIX car device Unfasten the seat belt ensuring that it is still fed through the guide on the headrest The child can now be placed in the seat The safety belt is fed under the black armrest as indicated figure 7 Make sure that the safety belt restraining the child should be adjusted to the child s body and that belts should not be twisted The horizontal section of the safety bel...

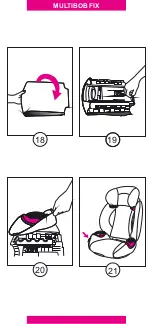
Page 11: ...d Check that the side support is secure both below and above Hook the net to the hooks on the backrest figure 12 Hook the upholstery of the backrest over the polystyrene The polystyrene is the narrowest at the top Hook all the flaps to the protrusions in the polystyrene on the rear Position the backrest plus upholstery and attach first the top 2 and then bottom 1 of the upholstery figure 11 First ...

Page 12: ...sobre la guía roja del cinturón figura 7 Abroche el cinturón del coche Mantenga siempre el cinturón abrochado durante la conducción incluso cuando no se use Desabroche el cinturón del coche El cinturón se queda metido en la guía del cinturón situada en el apoyacabezas Ahora podrá sentar al niño en la sillita Pase ahora el cinturón a través de las guías del cinturón del asiento fig 7 Asegúrese de q...

Page 13: ...a El apoyo lateral queda bien fijado cuando oiga un clic Controle si ambos puntos del apoyo lateral quedan bien fijados Enganche la redecilla en las ganchos del respaldo figura 12 Coloque el tapizado del cojín del respaldo sobre el cojín de poliestireno La parte superior del poliestireno es la parte más estrecha En la parte trasera enganche todas las solapas en los dedos del poliestireno Coloque e...

Page 14: ...a do cinto figura 7 Aperte o cinto de segurança Quando o veículo estiver em andamento mantenha o cinto de segurança sempre apertado mesmo que a criança não esteja a utilizar o Multibob Desaperte o cinto de segurança O cinto continua a passar pela guia vermelha no suporte para a cabeça A criança pode então ser colocada no assento O cinto de segurança é novamente colocado por baixo do suporte preto ...

Page 15: ...r um clique Certifique se que o suporte lateral está bem fixo nos lados superior e inferior Fixe a rede nos ganchos do encosto figura 12 Coloque o estofo à volta da almofada de enchimento para as costas O lado mais estreito do enchimento encontra se no lado superior Fixe todas as saliências do enchimento à parte de trás Volte a colocar no encosto as almofadas e os estofos para as costas e fixe ao ...

Page 16: ...e dans le siège Détachez la ceinture de sécurité La ceinture doit rester maintenue par les guide ceinture de l appuie tête L enfant peut maintenant prendre place dans le siège Repositionnez la ceinture de sécurité en la faisant passer sous l accoudoir noir comme indiqué schéma 7 Pendant cette opération veillez à ce que la ceinture ne se vrille pas La partie horizontale de la ceinture doit toujours...

Page 17: ...atéral soit bien fixé en haut et en dessous Crochetez le filet sur les attaches situées dans le dossier schéma 12 Crochetez le revêtement du coussin du dossier sur le polystyrène Le haut du coussin en polystyrène est la partie la plus étroite Crochetez tous les rabats sur les attaches du polystyrène Replacez le coussin ainsi revêtu dans le dossier et crochetez ensuite les pans de tissu sur la part...

Page 18: ...d ook als het kind niet in het zitje zit Open de autogordel De gordel blijft hierbij door de gordelgeleiding aan de hoofdsteun lopen Het kind kan nu plaatsnemen in de stoel De gordel wordt nu weer onder de zwarte armleuning doorgevoerd zoals aangegeven afbeelding 7 Let er hierbij op dat de gordel nergens gedraaid zit De heupriem moet altijd laag over de benen lopen en nooit over de buik van het ki...

Page 19: ...t hoort u een klik Controleer of de zijsteun aan boven en onderzijde goed vastzit Haak het netje om de haakjes in de rugleuning afbeelding 12 Haak de bekleding om het piepschuimen rugkussen Het piepschuim heeft de smalste kant aan de bovenzijde Haak aan de achterzijde alle flapjes om de torentjes in het piepschuim Plaats het beklede rugkussen terug in de rugleuning en haak eerst de bovenste 2 weer...

Page 20: ... figura 7 Agganciare la cintura di sicurezza Tenerla agganciata durante la guida anche se il bambino non è nel seggiolino Sganciare la cintura di sicurezza La cintura scorre attraverso la guida del poggiatesta Aquesto punto il bambino può prendere posto nel seggiolino Adesso la cintura viene fatta passare di nuovo sotto il bracciolo nero secondo come esposto nel disegno figura 7 Fare attenzione la...

Page 21: ...no in corrispondenza delle posizioni previste sul seggiolino Uno scatto udibile indica che le alette laterali sono state montate correttamente Assicurarsi che le alette di sostegno siano fissato in modo appropriato sia nella parte superiore sia in quella inferiore Fissare la retina agli agganci predisposti nello schienale figura 12 Fissare la fodera intorno al cuscino di poliestere Questo supporto...

Page 22: ...apiąć pasy Podczas jazdy samochodu fotelik powinien być zawsze zamocowany nawet jeżeli nie siedzi na nim dziecko Odpiąć pasy zwracając uwagę na to że są one nadal poprowadzone w prowadnicy pasa u dołu zagłówka Dziecko może teraz usiąść w foteliku Pasy bezpieczeństwa należy poprowadzić pod czarnym oparciem ramion rysunek 7 Sprawdzić czy pasy nie są skręcone Odcinek poziomy pasów bezpieczeństwa nie ...

Page 23: ...na oparciu pleców rysunek 12 Nałożyć tapicerkę oparcia pleców na piankę Pianka polistyrenowa jest węższa u góry Zaczepić klapki na występy w polistyrenie z tyłu Ustawić oparcie pleców z założoną tapicerką i podłączyć najpierw górę 2 a następnie dół 1 tapicerki rysunek 11 Najpierw wsunąć tapicerkę zagłówka przez polistyren a potem zabezpieczyć klapki w pobliżu prowadnic pasów Obie końcówki powinny ...

Page 24: ...m H Diagonalni cast pasu by mela byt vedena rovnez pod cernou operkou rukou a cervenym voditkem obr 7 Sedacku pasem upevnete Sedacka by mela zustat pripevnena vzdy pokud vozidlo jede bez ohledu zda je obsazena Rozepnete pas ujistete se ze je stale veden voditky operky hlavy Dite muze nyni byt umisteno v sedacce Bezpecnostni pas je veden pod cernou operko rukou jak naznaceno obr 7 Ujistete se ze pa...

Page 25: ...edcte se ze oznaceni souhlasi s polohou sedacky Uslysite zaklapnuti v pripade ze bocni podpera je spravne pripevnena Proverte zda obe bocni podpery jsou dobre pripevneny Pripevnete sitku k operce zad obr 12 Pripevnete potah operky zad k polystyrenu Polystyren je nejuzsi ve vrchni casti Upnete vsechny chlopne k polystyrenu vzadu Pripevnete nejprve vrchni cast potahu 2 a pak spodni 1 obr 11 Nejprve ...

Page 26: ...nyabb értékkel ami a mérőszalagon látható Ellenőrizze hogy a biztonsági öv vállpántja valóban a gyermek vállánál halad e el Az ülő részt akkor kell állítani ha a gyermek magasabb mint kb 125cm Az ülés az alábbi módon állítható nyomja össze az ülés alatt található zárat mialatt a kezével megfogja az ülés első részén D található fekete részt 9 kép A gyermek magassága kb meg kell hogy egyezzen a lega...

Page 27: ...llenőrizze hogy a jelek megfelelnek az ülésen feltüntetettekkel Amikor helyesen illeszti vissza az oldal védő részeket akkor egy klikk et fog hallani Ellenőrizze hogy alul és felül is biztonságosak e az oldalsó védők Akassza vissza a hálót az akasztókra a háttámlán 12 kép Akassza a háttámla huzatát a polisztirolon át A polisztirol a legszűkebb rész a tetejénél Akassza be a füleket a polisztirol há...

Page 28: ...25 241474 FAX 925 241633 E mail bebecar bebecarespanola es FABRICADO EN PORTUGAL FRANCE BÉBÉCAR FRANCE S A R L ZA LES PORTES DE LA FORÊT 3 ALLÉE DES PORTES DE LA FORÊT 77090 COLLEGIEN FRANCE TELEF 01 64628400 FAX 01 60376998 E mail service france bebecar com FABRIQUÉ AU PORTUGAL PORTUGAL BÉBÉCAR UTILIDADES PARA CRIANÇA S A RUA DOMINGOS OLIVEIRA SANTOS 62 APARTADO 8 4509 903 CALDAS DE S JORGE PORTU...

Reviews: