background image

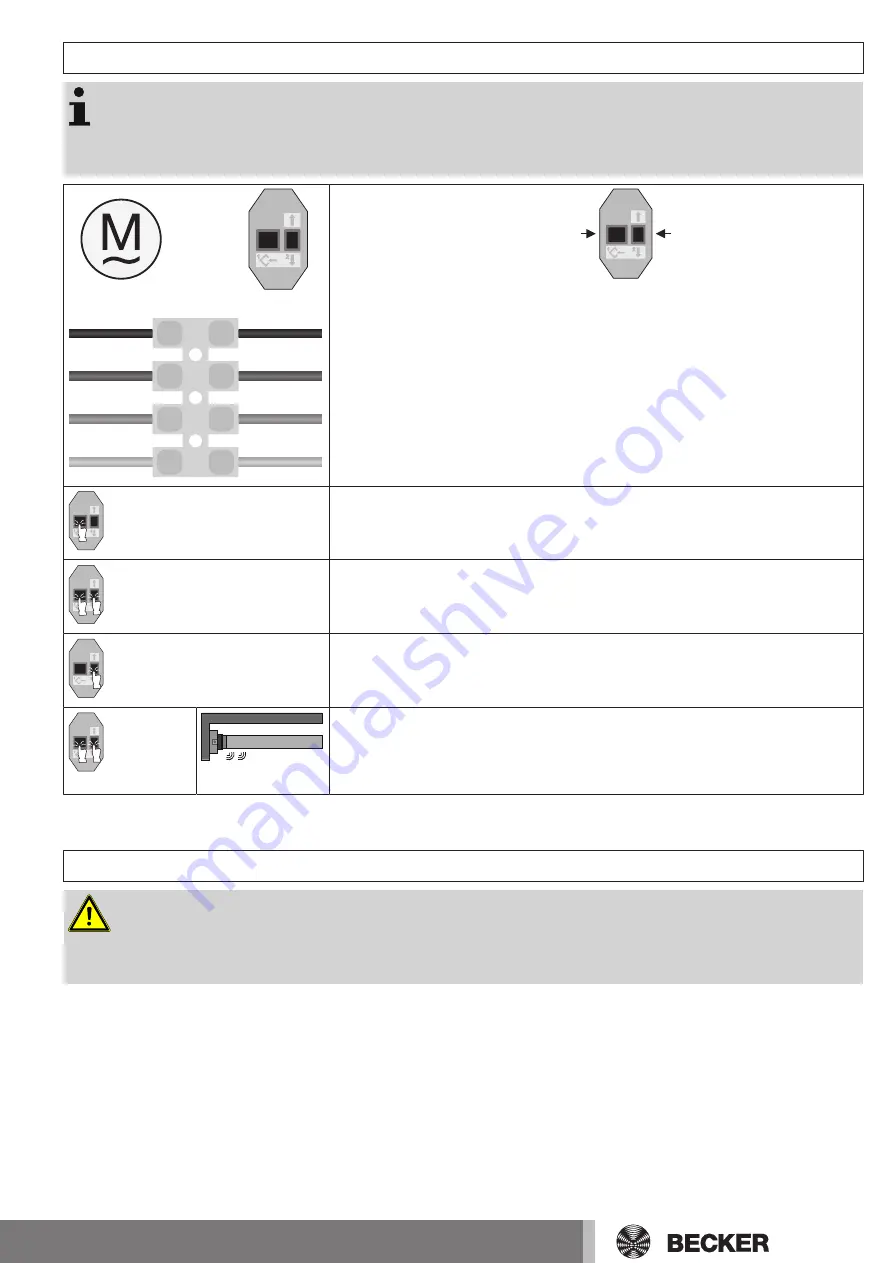
Deleting the limit positions using the programming unit

Connect the wires of the tubular drive to those of the same colour in the programming unit

and switch on the power supply.

Please pause for 1 sec after the last drive command before beginning the deletion se-

quence. Also leave a pause of 1 sec between the individual steps of the deletion sequence.

black

brown

blue

green-yellow

black

brown

blue

green-yellow

Programming button

Travel button

Press the programming button and keep it pressed.

Then press down the travel button and keep it pressed.

Now release the programming button, but continue to keep the travel button pressed.

Next press the programming button again.

The tubular drive makes a "click click" sound to confirm.

Both limit positions are deleted.

Obstruction detection / Blockage detection

Caution

Use of the drive’s obstacle detection system as personal protection is not permitted. It has

been designed exclusively to protect the roller shutters or sun protection system from be-

ing damaged.

If the drive is correctly installed, it switches off when it detects obstructions or shutter faults.
The following are detected both when using attachment springs and when using anti-lifting devices:

In the DOWN direction (Obstruction detection)

A curtain jam when closing due to objects on the window sill or sticking of the lateral guide tracks.

In the UP direction (Blockage detection)

Extremely large increase in the load (e.g., frozen end strip on the window sill)

To avoid overly sudden deactivation during closing, the drive only responds to an obstruction one or two revolutions after the im-
pact.

13

Summary of Contents for R12/17RO+

Page 1: ...s for roller shutters Important information for Fitters Electricians Users Please forward accordingly These instructions must be kept safe for future reference Becker Antriebe GmbH Friedrich Ebert Straße 2 4 35764 Sinn Germany www becker antriebe com 2010 300 443 0f 25 08 2016 ...

Page 2: ...ssembling the drive adapter with separate drive adapter safety catch 9 Assembling and disassembling the drive adapter with screw connection 9 Securing the drive against axial displacement 9 Fixing the drive adapter to the barrel dia 45 10 Mounting the drive in the tube 10 Setting the limit positions 12 Deleting the limit positions with a rotary switch or a locking button 12 Deleting the limit posi...

Page 3: ...lling and setting the equipment The date of manufacture comes from the first four digits of the serial number The numbers 1 and 2 indicate the year and the numbers 3 and 4 indicate the calendar week Example 24th calendar week in 2012 Ser No 1224XXXXX Explanation of pictograms CAUTION CAUTION indicates a hazardous situation which if not avoided could result in injury ATTENTION ATTENTION indicates m...

Page 4: ...nstructions in EN 60335 2 97 Please note that this list of safety instructions is not exhaustive since it would be impossible for the standard to include all sources of danger For example the design of the operated product the way the drive works in the situation it is installed in or even the way the end product is mounted in the end user s place of use cannot be taken into consideration by the d...

Page 5: ...trical or electronic equipment and units are operated certain components e g the power supply unit are live Physical injuries or damage to property can result in the event of unauthorised interventions or failure to heed warnings Be careful when touching the tubular drive as it heats up during operation for technolo gical reasons Before installation shut down all lines and control devices that are...

Page 6: ...order to protect the safety of the users and others since these ac tions can impair the system s safety and carry the risk of personal injury and property damage The drive manufacturer does not accept liability for damages or injury arising from such actions Always observe the information in these instructions when operating or repairing the system The drive manufacturer does not ac cept liability...

Page 7: ...bly the power supply to the connecting cable must be disconnected Insert a suitable flathead screwdriver right into the recess of the locating latch so that the latch releases the locating lug from the plug Now you can pull out the connecting cable along with the flathead screwdriver A A locating latch 7 ...

Page 8: ... L of the barrel L X M G The space required at the side M varies depending on the combination of drive and wall bracket Then mount the wall bracket and idler Ensure that the barrel is aligned at right angles to the wall and that sufficient axial play is al lowed for the mounted system Attention When using rigid shaft connectors closed brackets must be fitted The tubular drive presses the closed cu...

Page 9: ... disassembling the drive adapter with separate drive adapter safety catch Assembling and disassembling the drive adapter with screw connection Securing the drive against axial displacement 10 mm In order to secure the drive against axial displacement we recommend screwing the drive adapter to the tube Attention When drilling into the barrel never drill near the tubular drive 9 ...

Page 10: ...ugs which are used to assist fitting on the thrust ring the bar rel must be connected to the thrust ring by a 4 8 x 9 5 mm self tapping screw Assemble the tubular drive with the relevant thrust ring 1 and drive adapter 2 In sert the tubular drive with the pre assembled thrust ring and drive adapter into the tube to achieve a form fit Ensure that the thrust ring and drive adapter are secure in the ...

Page 11: ...t three for longer tubes use three springs anti lifting devices per meter of barrel Lay the connecting cable Lay the connecting cable up to the tubular drive and fix The connecting cable and any antennae must not project into the winding chamber Cover any sharp edges 11 ...

Page 12: ... tubular drive has turned off automatically in the desired position three times Note on roller shutter use If the tubular drive switches off prematurely while opening or closing due to an obstruc tion the obstruction can be cleared by reversing a short way and removing the obstruc tion The desired limit position can be set by opening closing again Attention Compliance with the following order for ...

Page 13: ...lick click sound to confirm Both limit positions are deleted Obstruction detection Blockage detection Caution Use of the drive s obstacle detection system as personal protection is not permitted It has been designed exclusively to protect the roller shutters or sun protection system from be ing damaged If the drive is correctly installed it switches off when it detects obstructions or shutter faul...

Page 14: ...in the same system The changeover time for switching the running direction must be at least 0 5 s The switch and control must not execute simultaneous UP and DOWN com mands Protect the electrical connections from damp Once you have finished wiring everything to the control ALWAYS check the right direction assignment of the drive to the control buttons UP and DOWN EXTEND and RETRACT If the drive is...

Page 15: ...he tubular drive Check electrical installation remove any external devices re programme limit po sitions Due to long cable L1 and N connection have been reversed Change around L1 and N N blue L1 black brown re programme limit posi tions Tubular drive stops arbitrarily cannot be restarted in the same direction Tubular drive is overloaded Use a more powerful tubular drive Roller shutter curtain keep...

Page 16: ...ck and brown wires according to the direction of travel is de pendant on how the drive is installed mounted to the right or to the left Controlling one several drive s via a single switch button Electronic black brown blue green yellow Electronic 16 ...

Page 17: ...dual control using Centronic UnitControl UC42 Mains 230 V 50 Hz Central Group Individual Individual 230 V 50 Hz Central cable connection to further control units 230 V 50 Hz 230 V 50 Hz Electronics 230 V 50 Hz Control unit 17 ...

Page 18: ...Declaration of conformity 18 ...

Page 19: ...19 ...

Page 20: ......

Reviews: