background image

Summary of Contents for KL2535

Page 1: ...Documentation KL2535 KL2545 Pulse width current terminals 2 0 0 2016 02 29 Version Date...

Page 2: ......

Page 3: ...Prescribed installation position 20 3 3 Connection system 21 3 4 KL2535 Connection 25 3 5 KL2545 Connection 26 4 Configuration software KS2000 28 4 1 KS2000 Introduction 28 4 2 Parameterization with...

Page 4: ...this documentation Trademarks Beckhoff TwinCAT EtherCAT Safety over EtherCAT TwinSAFE XFC and XTS are registered trademarks of and licensed by Beckhoff Automation GmbH Co KG Other designations used in...

Page 5: ...national standards Description of symbols In this documentation the following symbols are used with an accompanying safety instruction or note The safety instructions must be read carefully and follow...

Page 6: ...versions Documentation version KL2535 KL2545 Firmware Hardware Firmware Hardware 1 5 0 1B 04 2B 08 1 4 0 1B 01 1B 05 1 3 0 1B 01 1B 05 1 2 0 1B 01 1B 05 1 1 0 1B 00 1A 02 1 0 1B 00 1A 02 0 1 1B 00 1A...

Page 7: ...rent value 0 A to 1 A is specified with 16 bit resolution by the automation device The output stage is protected against overload and short circuit and is electrically isolated from the K bus Both cha...

Page 8: ...K bus typically 60 mA Current consumption from the power contacts typically 10 mA Bit width in the input process image 2 x 16 bit data 2 x 8 bit status Bit width in the output process image 2 x 16 bi...

Page 9: ...d Error A red on There is an error at channel 1 Power green off The power supply voltage is absent less than 7 V on The power supply voltage is present more than 8 V Enable B green off Channel 2 is ei...

Page 10: ...n device The output stage is protected against overload and short circuit and is electrically isolated from the K bus Both channels indicate their state by LEDs enabling fast on the spot diagnosis An...

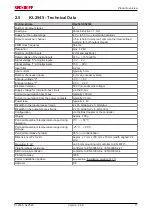
Page 11: ...e for internal E bus circuit via the K bus Current consumption from K bus typically 100 mA Current consumption from the power contacts typically 20 mA Power loss typically 4 W Bit width in the input p...

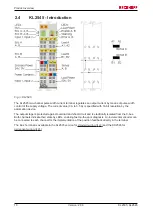
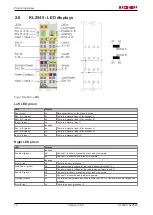
Page 12: ...2 Right LED prism LED Display reserved Enable A green off Channel 1 is either not enabled or not ready to operate on Channel 1 is enabled and is ready to operate reserved Error A red on There is an e...

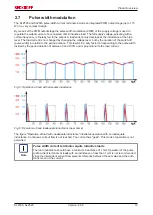
Page 13: ...ults in a duty factor corresponding to the pulse width divided by the period duration of between 0 and 100 and is proportional to the load current Fig 5 Operation at load with adequate inductance Fig...

Page 14: ...ital input highest priority Setting the control bit CB1 3 38 activates the falling edge at the digital input second highest priority Once the user has enabled the function during the next latch event...

Page 15: ...modulating a rectangular signal on top of the actual output value The configuration required for this depends a lot on the particular application It must be determined with the aid of the characteris...

Page 16: ...in register R36 43 Bend compensation threshold value x2 R42 44 0 to 1000 The bend compensation range ends at this process data value the resolution is 0 1 as a fraction of 32767 Bend compensation outp...

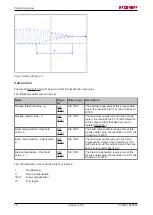
Page 17: ...amp The values of registers R45 and R46 here are related to the entire process data range i e from 0 to 32767 The following parameters can be set Name Register Value range Description Rising ramp t1 R...

Page 18: ...mponents with tongue and groove and push the terminals against the mounting rail until the lock clicks onto the mounting rail If the Terminals are clipped onto the mounting rail first and then pushed...

Page 19: ...f the K Bus E Bus deal with the transfer of the data and the supply of the Bus Terminal electronics The power contacts deal with the supply for the field electronics and thus represent a supply rail w...

Page 20: ...of terminals WARNING Risk of electric shock The PE power contact must not be used for other potentials 3 2 Prescribed installation position Attention Constraints regarding installation position and o...

Page 21: ...ssembly or wiring of the Bus Terminals Overview The Bus Terminal system offers different connection options for optimum adaptation to the respective application The terminals of KLxxxx and ELxxxx seri...

Page 22: ...up The familiar dimensions of the terminal only had to be changed slightly The new connector adds about 3 mm The maximum height of the terminal remains unchanged A tab for strain relief of the cable s...

Page 23: ...ESxxxx KSxxxx Fig 18 Mounting a cable on a terminal connection Up to eight connections enable the connection of solid or finely stranded cables to the Bus Terminals The terminals are implemented in s...

Page 24: ...id of a screwdriver See the following table for the suitable wire size width Terminal housing High Density Housing Wire size width conductors with a wire end sleeve 0 14 0 75 mm2 Wire size width singl...

Page 25: ...te before starting mounting disassembly or wiring of the Bus Terminals Fig 19 KL2535 Connection Terminal point No Connection A1 1 Load A connection A1 B1 2 Load B connection B1 Sense A 3 Load A sense...

Page 26: ...er Power 24 V 3 Encoder supply from positive power contact Input 1 4 Digital input 1 24 VDC The current counter value is saved as a reference mark in the latch register if bit CW 1 is set in the contr...

Page 27: ...te Order of switch on of the supply voltages The voltage Up must already be present at the power contacts when the K bus voltage is switched on so that the internal circuits output stage drivers can b...

Page 28: ...d before the commissioning phase Later on this configuration can be transferred to the terminal station in the commissioning phase by means of a download For documentation purposes you are provided wi...

Page 29: ...by monitoring Process values can be specified in the output image for commissioning of the output modules All possibilities in the online mode can be used in parallel with the actual fieldbus mode of...

Page 30: ...terminals In the tree structure of the left hand window click on the plus sign next to the terminal whose parameters you wish to change item 2 in the example Fig 23 KS2000 tree branches for channel 1...

Page 31: ...terminal fails to receive any process data from the controller for 100 ms while the watchdog is active the watchdog triggers and the valve is switched off User scaling R32 0 43 You can activate user...

Page 32: ...s 0 Max output current R36 43 You can specify the maximum output current here KL2535 The default is 1000 mA KL2545 The default is 3 500 mA Dithering frequency R37 44 You can specify the frequency of t...

Page 33: ...specifies the value from which the attenuation is activated Area compensation threshold value R44 44 You can specify the threshold value of the area compensation region 16 here the default is 1000dec...

Page 34: ...S2000 4 4 Register Under Register you can directly access the registers of the KL2535 KL2545 The meaning of the register is explained in the register overview 40 Fig 25 Register view in KS2000 KL2535...

Page 35: ...ProcData Fig 26 ProcData The reading glasses mark the data that are currently graphically displayed in the History field Fig 27 History field The current input values are displayed numerically in the...

Page 36: ...fect on your automation application Only modify these initial values if you are certain that the state of your equipment permits it and that there will be no risk to people or to the machine After pre...

Page 37: ...gn ment Format Input data Output data 0 0 Byte CB1 38 1 2 Word DataOUT1 3 4 Byte CB2 39 4 6 Word DataOUT2 Word alignment The Bus Coupler places values on even byte addresses Legend SB n status byte ch...

Page 38: ...tion value is set with register R1 41 rising edge CB1 0 enDithering 1bin Dithering is active when R32 5 43 1 Status byte 1 for process data mode The status byte 1 SB1 is located in the input image 37...

Page 39: ...egister 40 that you wish to read with input data word DataIn 37 or to write with output data word DataOut 37 Status byte 1 in register communication The status byte 1 SB1 is located in the input image...

Page 40: ...c R ROM R14 reserved R15 Alignment register 0x7F80 32640dec R W RAM R16 42 Hardware version number e g 0x0000 e g 0dec R W EEPROM R17 reserved R30 reserved R31 43 Code word register 0x0000 0dec R W RA...

Page 41: ...n the KL2545 R0 10 reserved R0 9 LowVoltage 1bin The supply voltage is 10 V less than the switch on voltage only on the KL2545 R0 8 OverTemperature 1bin The internal temperature of the terminal is gre...

Page 42: ...ng 0x8000 in register R7 initiates a full software reset for the terminal All internal variables positions latched values errors etc are cleared or are set to defined values that are read from the EEP...

Page 43: ...44 bit CB1 0 38 1 must be set in addition 0bin R32 4 enValveCurve 1bin Valve curve 16 is active see R40 44 R41 44 R42 44 R43 44 R44 44 0bin R32 3 enAverageNotati on 0bin Two s complement representatio...

Page 44: ...on The configured value refers to the set output current in register R36 43 The unit is 0 1 for example 100dec 10 R42 Bend compensation Threshold value valve curve When the valve curve 16 is active R3...

Page 45: ...0 Status byte Byte 1 DataIN1 high byte Byte 2 DataIN1 low byte 0x89 0x33 0x41 Explanation The terminal returns the value of the control byte as a receipt in the status byte The terminal returns the fi...

Page 46: ...taIN1 high byte Byte 2 DataIN1 low byte 0x9F 1001 1111bin 0x12 0x35 Explanation The terminal returns the value of the control byte as a receipt in the status byte The terminal returns the current valu...

Page 47: ...planation The terminal returns the value of the control byte as a receipt in the status byte The terminal returns the current value of the feature register in the input data word byte 1 and byte 2 V W...

Page 48: ...Headquarters Beckhoff Automation GmbH Co KG Huelshorstweg 20 33415 Verl Germany Phone 49 0 5246 963 0 Fax 49 0 5246 963 198 e mail info beckhoff com Beckhoff Support Support offers you comprehensive t...

Page 49: ...t on left side 20 Fig 14 Recommended distances for standard installation position 21 Fig 15 Standard wiring 22 Fig 16 Pluggable wiring 22 Fig 17 High Density Terminals 22 Fig 18 Mounting a cable on a...

Reviews: