background image

Foreword

PS1111-2403-0002

8

Version: 1.0

Safety instructions and installation requirements for the PS1111-2403-0002 power supply

 DANGER

Danger of electric shock, fire, injuries, injuries resulting in death!

• Do not use the power supply without proper grounding (protective conductor). Use the terminal at the in-

put terminal strip for the earth connection, not one of the screws on the housing.

• Switch off the power supply before working on the device. Provide protection against unintentional re-

connection.

• Ensure proper wiring by following all local and national regulations.

• Do not modify or attempt to repair the device.

• Do not open the device, as high voltages are present inside.

• Avoid foreign bodies entering the housing.

• Do not use the device in damp locations or in areas where moisture or condensation is likely to occur.

• Do not touch the device when it is switched on or immediately after it has been switched off. Hot sur-

faces can cause burns.

Further notes on installation requirements

• This device contains no parts that require maintenance. If an internal fuse trips, this is due to an

internal defect.

• If any damage or malfunction occurs during installation or operation, turn off the power supply

immediately and return the device to the factory for inspection.

• Install the device in a housing that provides protection against electrical, mechanical and fire

hazards

• Install the device on a DIN rail according to EN 60715, with the input terminals at the bottom of

the device.

• The device is designed for areas with a degree of pollution 2 in controlled environments. No con-

densation or frost is allowed.

• The device housing offers IP20 protection. The housing offers no protection against spilled liq-

uids.

• The device insulation is designed to withstand pulse voltages of overvoltage category III accord-

ing to IEC 60664-1.

• The device is designed to meet the requirements of protection class II according to IEC 61140.

• The device is suitable for supply from TN, TT or IT networks. The continuous voltage between

the input terminal and the PE potential must not exceed 300Vac.

• An isolating device must be provided for the device input.

• The device is designed for convection cooling and does not require an external fan. The air flow

must not be obstructed, and the ventilation grille must not be covered!

• The device is designed for altitudes up to 5000m (16400ft). Above 2000m (6560ft) the overvolt-

age category is reduced to level II, and a reduction of the output current is required.

• Observe the following minimum installation distances: 40 mm at the top, 20 mm at the bottom, 0

mm left and right. Increase the distance from 0 to 15 mm if the adjacent device is a heat source.

• The device is designed, tested and approved for junction circuits up to 20A without an additional

protective device. If an external fuse is used, do not use circuit breakers with lower characteristic
than 6A B or 4A C in order to avoid unwanted tripping of the circuit breaker.

• The maximum ambient air temperature is +70°C (+158°F). The operating temperature corre-

sponds to the ambient or ambient air temperature, per definition at 2 cm below the device.

• The device is designed for operation in the relative humidity range between 5% and 95%.

Summary of Contents for PS1111-2403-0002

Page 1: ...Documentation EN PS1111 2403 0002 Power supply 24 V DC 3 8 A 1 phase 2020 11 10 Version 1 0...

Page 2: ......

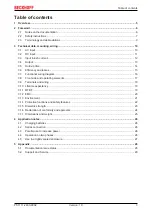
Page 3: ...diagram 16 3 8 Front side and operating elements 17 3 9 Terminals and wiring 18 3 10 Lifetime expectancy 19 3 11 MTBF 19 3 12 EMC 20 3 13 Environment 21 3 14 Protective functions and safety features...

Page 4: ...Table of contents PS1111 2403 0002 4 Version 1 0...

Page 5: ...th of 36 mm A DC OK LED monitors the status of the output voltage The power supply unit is designed in protection class II and does not require a protective conductor on the primary side Overview of t...

Page 6: ...are registered trademarks of and licensed by Beckhoff Automation GmbH Other designations used in this publication may be trademarks whose use by third parties for their own purposes could violate the...

Page 7: ...device is designed for installation in a housing and is intended for general professional use for example in industrial control systems or office communication and measuring equipment Do not use this...

Page 8: ...ed for areas with a degree of pollution 2 in controlled environments No con densation or frost is allowed The device housing offers IP20 protection The housing offers no protection against spilled liq...

Page 9: ...ith tolerances e g AC 230 V 10 The calculated total range then indicates the working range of the device Example DC 12 V refers to a 12 V battery regardless of whether it is fully charged 13 7 Vdc or...

Page 10: ...ty and installation requirements 8 AC input AC100V AC120V AC230V Input current Typ 1 69A 1 45A 0 95A At 24V 3 8A see Fig Input current over output current Power factor Typ 0 6 0 58 0 45 At 24V 3 8A se...

Page 11: ...Technical data mounting wiring PS1111 2403 0002 11 Version 1 0 3 2 DC input Do not operate this power supply with DC input voltage...

Page 12: ...suppression capacitors during the first few microseconds after switching on is not taken into account AC 100V AC 120V AC 230V Input inrush current Typ 14Apeak 18Apeak 40Apeak At 40 C cold start Typ 12...

Page 13: ...pple voltage Max 100mVss Bandwidth 20 Hz to 20 MHz 50 Ohm Output current Nom 3 8A At 24 V and ambient temperature below 60 C Nom 3 2A At 24V and 70 C ambient temperature Nom 2 8A At 28 V and ambient t...

Page 14: ...of input power The hold up time depends on the output load At no load the hold up time can be up to several seconds During this time the green DC OK lamp also lights up AC 100V AC 120V AC 230V Hold up...

Page 15: ...4 3W 3 8W At 24V 1 9A half load Typ 9 5W 7 9W 6 0W At 24V 3 8A full load The average efficiency is based on assumptions for a typical application with the power supply unit operating at 25 of the nom...

Page 16: ...Technical data mounting wiring PS1111 2403 0002 16 Version 1 0 3 7 Functional wiring diagram Fig 9 Functional wiring diagram...

Page 17: ...ription N Mains input N L Mains input L Output terminals push in terminals Designation B Description two identical positive poles positive output two identical negative poles negative output Potentiom...

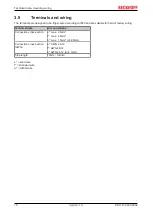
Page 18: ...e finger safe according to IP20 and are suitable for field or factory wiring Technical data All connections Connection cross section e max 2 5mm f max 2 5mm a max 1 5mm d 2 3mm Connection cross sectio...

Page 19: ...hich is calculated from the statistical failure rate of the components and indicates the reliability of a device It is a statistical representation of the probability of equipment failure and does not...

Page 20: ...y with a load of more than 2 9A if the application is sensitive to a short circuit at the output even with voltage drops during mains interruptions of less than 20ms EMC interference immunity Strong t...

Page 21: ...60664 1 for altitudes up to 5000m Surge voltage strength 4kV according to overvoltage category III Input to PE According to IEC 60664 1 for altitudes up to 2000m Degree of pollution 2 According to IE...

Page 22: ...turn off the input voltage for at least 90 seconds Protection class II According to EN IEC 61140 Protection class IP 20 According to EN IEC 60529 Overtemperature protection Protection against input t...

Page 23: ...the voltage with a slow ramp 2s rising and 2s falling Connect all input terminals and all output poles to each other before performing the tests During the test set the cut off current to the value sh...

Page 24: ...Technical data mounting wiring PS1111 2403 0002 24 Version 1 0 3 16 Declaration of conformity and approvals EU declaration of conformity UL Certificate UL 61010 1 2 201 Applicable for US and Canada...

Page 25: ...l installation depth required DIN rail Use 35 mm DIN rails according to EN 60715 or EN 50022 with a height of 7 5 or 15mm Weight 270g Housing material High quality polycarbonate ABS blend material Ins...

Page 26: ...with a contact hazard protection Avoid application of return voltage e g from a braking motor or battery to the output terminals Restrictions Keep a mounting distance of 15mm left right between two po...

Page 27: ...ter of the housing There are no other heat generating elements in the housing The temperature sensor in the housing is positioned at the center on the right side of the power supply with a distance of...

Page 28: ...Appendix PS1111 2403 0002 28 Version 1 0 5 Appendix 5 1 Documentation issue status Version Comment 1 0 First public issue 0 1 Preliminary documentation for PS1111 2403 0002...

Page 29: ...khoff components there Beckhoff Support Support offers you comprehensive technical assistance helping you not only with the application of individual Beckhoff products but also with other wide ranging...

Page 30: ......

Page 31: ...Beckhoff Automation GmbH Co KG H lshorstweg 20 33415 Verl Germany Phone 49 5246 9630 info beckhoff com www beckhoff com More Information www beckhoff com ps1111 2403 0002...

Reviews: