1
3
A
B
C
4–13
Remote Operation – 4
The Set Date/Time command (see Figure 4-11)
allows the system date and time to be set, or
system clock to be stopped. This dialog box also
displays an LED mimic to identify when the Time
Sync is in use (preventing date/time from being
changed by user).
SET UNIT DATE/TIME
TIME SYNC
.
Stop Clock
Date:
Time:
12 / 25 / 98
20 / 01 / 01
Save
Cancel
Figure 4-11
Unit Date/Time Dialog Box
Path: Relay menu/ Setup submenu/ Set Date/Time
Command
There is a blue Time Sync LED mimic on this dialog
box (the LED is displayed as different shading on a
monochrome monitor). When this LED is blue, the
relay is synchronized with the IRIG-B signal and the
Time field is grayed out, indicating that this field
can’t be changed. But the Date field can be changed
(by editing and pressing Save).
When the LED is
not blue, the relay is not time-
synchronized and therefore, both the Date and Time
fields can be changed.
The time field in the dialog box is not updated
continuously. The time at which the dialog box was
opened is the time that is displayed and remains as
such. This is true whether the relay is synchronized
with the IRIG-B signal or not.
COMMAND BUTTONS
Stop Clock
This toggles between start/stop, the relay
clock. ‘Stop’ pauses, ‘Start’ resumes.
Cancel
Returns you to the IPScom
®
main
window. Any changes to the displayed
information is lost.
The Monitor submenu provides access for reviewing
the present status of the relay's measured and
calculated values, other real-time parameters and
conditions as well as examining real-time and
historical demand metering information (see Section
4.4 Checkout Status/Metering). A cascading menu
appears, providing several command options as
shown below.
Setup
4
Monitor
4
Targets
4
Oscillograph
4
Profile
4
Write File to Relay
Read Data from Relay
Relay
Primary Status
Secondary Status
Secondary Status (II)
Phase Distance
Loss of Field
Out of Step
Phasor Diagram
Demand
Function Status
The Targets submenu provides three command
options: Display, Reset LED, and Clear History.
The Display command displays the Target Dialog.
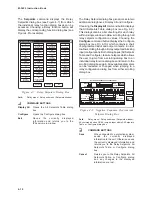
This dialog box (see Figure 4-12) provides detailed
data on target events, including time, date, function
status, phase current values, and IN/OUT contact
status at the time of trip. Individually recorded
events may be selected within the dialog box and
saved into a text file, or be printed out with optional
added comments. The Reset LED is similar to
pushing the Target Reset button on the relay’s front
panel, resetting current target(s) displayed on the
relay. This command does not reset any target
history.
Setup
4
Monitor
4
Targets
4
Oscillograph
4
Profile
4
Write File to Relay
Read Data from Relay
Relay
Display
Reset LED
Clear History
The Clear History command clears all stored target
data.
Summary of Contents for M-3425
Page 1: ...Instruction Book M 3425 Generator Protection ...
Page 14: ... 13 M 3425 Generator Protection Relay Figure 1 External Connections ...
Page 33: ...x M 3425 Instruction Book This Page Left Intentionally Blank ...
Page 89: ...M 3425 Instruction Book 2 52 This Page Left Intentionally Blank ...
Page 125: ...1 3 A B C M 3425 Instruction Book 4 26 This Page Left Intentionally Blank ...
Page 187: ...M 3425 Instruction Book 6 50 This Page Left Intentionally Blank ...
Page 207: ...M 3425 Instruction Book C 4 This Page Left Intentionally Blank ...
Page 209: ...D 2 M 3425 Instruction Book Figure D 1 Volts Hz 24 Inverse Curve Family 1 Inverse Square ...
Page 210: ...Inverse Time Curves Appendix D D 3 Figure D 2 Volts Hz 24 Inverse Family Curve 2 ...
Page 211: ...D 4 M 3425 Instruction Book Figure D 3 Volts Hz 24IT Inverse Curve Family 3 ...
Page 212: ...Inverse Time Curves Appendix D D 5 Figure D 4 Volts Hz 24IT Inverse Curve Family 4 ...
Page 215: ...D 8 M 3425 Instruction Book Figure D 5 Definite Time Overcurrent Curve ...
Page 216: ...Inverse Time Curves Appendix D D 9 Figure D 6 Inverse Time Overcurrent Curve ...
Page 217: ...D 10 M 3425 Instruction Book Figure D 7 Very Inverse Time Overcurrent Curve ...
Page 218: ...Inverse Time Curves Appendix D D 11 Figure D 8 Extremely Inverse Time Overcurrent Curve ...
Page 223: ...D 16 M 3425 Instruction Book This Page Intentionally Left Blank ...

