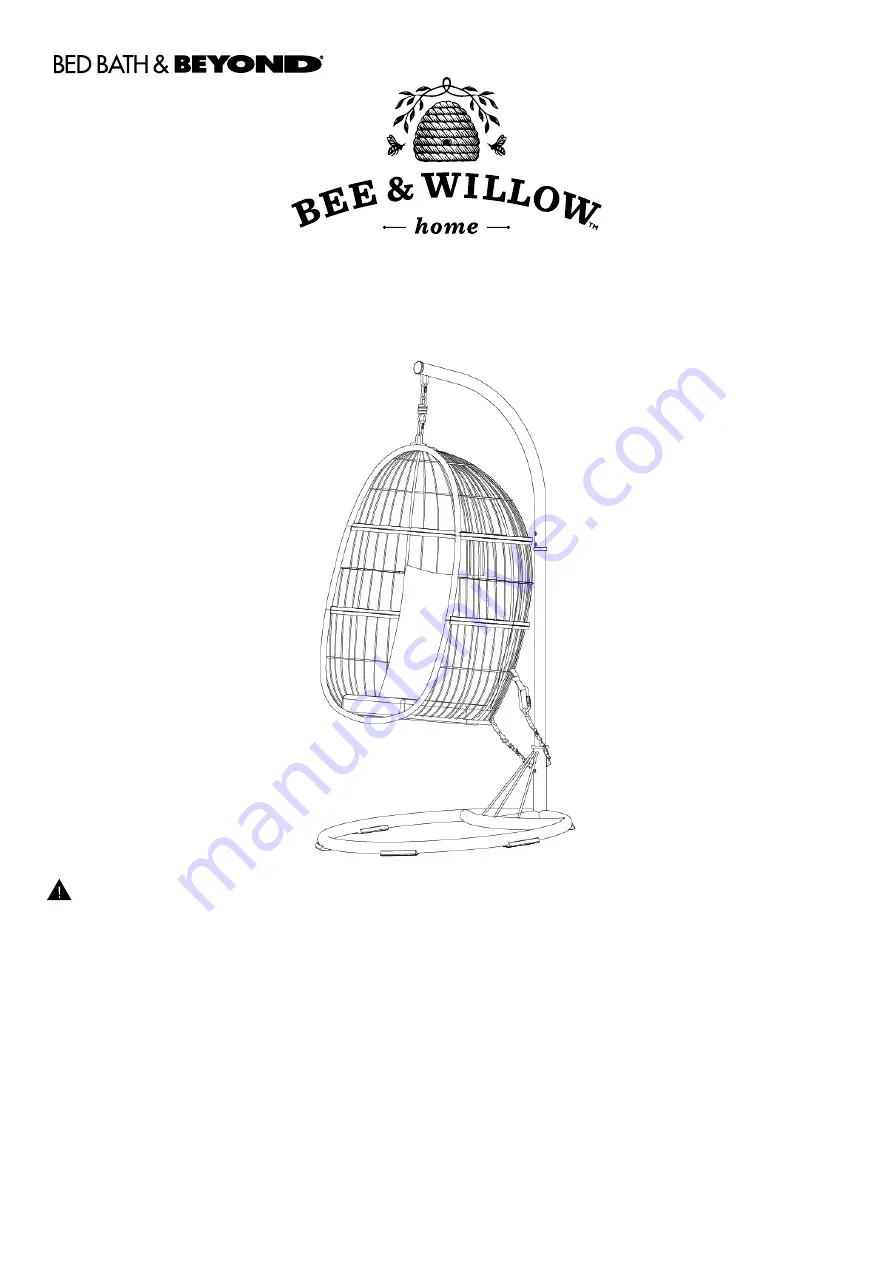
background image


  1 


Hanging Egg Chair 

Assembly Instructions 


    WARNING


Do not let any sharp objects touch or rub the surface of the product. 


When assembling, do not let children play around the working area. 


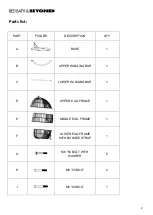
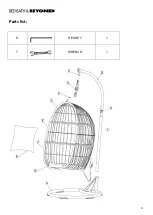
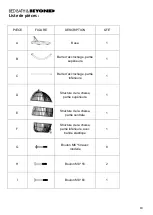
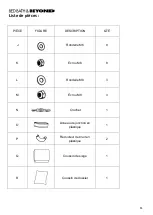
Please confirm all parts are correct before starting the assembly process. 


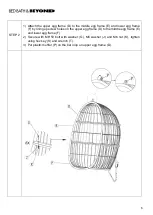
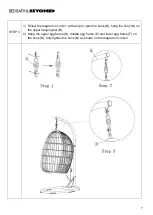
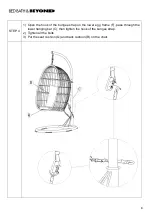
Do not tighten bolts and screws completely until the entire unit has been assembled and set up. 


DO NOT USE POWER TOOLS.

 Power tools can overtighten screws and strip threads. 


For each screw: 

1.


Tighten each screw until you meet resistance. 

2.


Tighten one additional full rotation. 

DO NOT OVERTIGHTEN.


This chair is not intended for use during inclement weather. Weather-related damage, or damage as a 
result of the chair not being stored properly when not in use, is not the responsibility of the manufacturer. 
During extended periods of non-usage, off season, inclement weather, freezing conditions and extreme 
heat the chair needs to be stored in a dry, sheltered place to prolong the life and to avoid damage. 

Summary of Contents for BEE & WILLOW home

Page 1: ... Power tools can overtighten screws and strip threads For each screw 1 Tighten each screw until you meet resistance 2 Tighten one additional full rotation DO NOT OVERTIGHTEN This chair is not intended for use during inclement weather Weather related damage or damage as a result of the chair not being stored properly when not in use is not the responsibility of the manufacturer During extended peri...

Page 2: ...ART FIGURE DESCRIPTION QTY A BASE 1 B UPPER HANGING BAR 1 C LOWER HANGING BAR 1 D UPPER EGG FRAME 1 E MIDDLE EGG FRAME 1 F LOWER EGG FRAME WITH BUNGEE STRAP 1 G M6 50 BOLT WITH WASHER 8 H M8 55 BOLT 2 I M8 60 BOLT 1 ...

Page 3: ...3 Parts list PART FIGURE DESCRIPTION QTY J M6 WASHER 8 K M6 NUT 8 L M8 WASHER 3 M M8 NUT 3 N HOOK 1 O PLASTIC CONNECTION RING 1 P PLASTIC MUFFLER 2 Q SEAT CUSHION 1 R BACK CUSHION 1 ...

Page 4: ...4 Parts list S HEX KEY 1 T WRENCH 1 ...

Page 5: ...M8 washer L M8 nut M 2 Put plastic connection ring O on lower hanging bar C and Insert upper hanging bar B into the lower hanging bar C secure with M8 55 bolt H and M8 washer L M8 nut M tighten using hex key S and wrench T 3 Put plastic muffler P on the bar loop on upper hanging bar B ...

Page 6: ...er egg frame F by lining up screw holes on the upper egg frame D to the middle egg frame E and lower egg frame F 2 Secure with M6 50 bolt with washer G M6 washer J and M6 nut K tighten using hex key S and wrench T 3 Put plastic muffler P on the bar loop on upper egg frame D ...

Page 7: ... in circle 1 at the top to open the hook N hang the hook N on the upper hanging bar B 2 Hang the upper egg frame D middle egg frame E and lower egg frame F on the hook N fully tighten the hook N as shown on the diagram in circle 3 ...

Page 8: ...n the hook of the bungee strap on the lower egg frame F pass through the lower hanging bar C then tighten the hook of the bungee strap 2 Tighten all the bolts 3 Put the seat cushion Q and back cushion R on the chair ...

Page 9: ...S Les outils motorisés peuvent trop serrer les vis et user les filets Pour chaque vis 1 Serrer chaque vis jusqu à la résistance 2 Serrer une autre rotation complète NE PAS TROP SERRER Cette chaise n est pas conçue pour être utilisée lors de mauvais temps Tous dommages causés par des intempéries ou parce que la chaise n a pas été correctement rangée alors qu elle n était pas utilisée sont exclus de...

Page 10: ...partie supérieure 1 C Barre d accrochage partie inférieure 1 D Structure de la chaise partie supérieure 1 E Structure de la chaise partie centrale 1 F Structure de la chaise partie inférieure avec bande élastique 1 G Boulon M6 50 avec rondelle 8 H Boulon M8 55 2 I Boulon M8 60 1 ...

Page 11: ...es PIÈCE FIGURE DESCRIPTION QTÉ J Rondelle M6 8 K Écrou M6 8 L Rondelle M8 3 M Écrou M8 3 N Crochet 1 O Anneau de jonction en plastique 1 P Réducteur de bruit en plastique 2 Q Coussin de siège 1 R Coussin de dossier 1 ...

Page 12: ...12 Liste de pièces S Cléhexagonale 1 T Cléàfourches 1 ...

Page 13: ...que O sur la partie inférieure de la barre d accrochage C insérer la partie supérieure de la barre d accrochage B dans la partie inférieure C bien fixer le tout avec deux écrous M8 55 H et les rondelles M8 L et les écrous M8 M puis serrer avec la cléhexagonale S et la cléà fourches T 3 Installer un réducteur de bruit en plastique P sur la boucle de la partie supérieure de la barre d accrochage B ...

Page 14: ...en alignant les trous de vis des trois parties de la chaise D E F 2 Bien fixer avec les boulons M6 50 avec rondelle G les rondelles M6 J et les écrous M6 K serrer avec la cléhexagonale S et la cléàfourches T 3 Installer un réducteur de bruit en plastique P sur la boucle de la partie supérieure de la structure de la chaise D ...

Page 15: ...Bien suivre les instructions dans le cercle 1 pour ouvrir le crochet N Accrocher le crochet N à la barre d accrochage B 2 Accrocher la chaise D E F au crochet N Bien serrer le crochet N comme décrit dans le cercle 3 ...

Page 16: ... élastique de la partie inférieure de la chaise F passer la bande dans la partie inférieure de la barre d accrochage C serrer le crochet de la bande élastique 2 Serrer tous les boulons 3 Déposer le coussin de siège Q et le coussin de dossier R ...

Page 17: ...ELÉCTRICAS Las herramientas eléctricas pueden apretar demasiado los tornillos y raspar las roscas Para cada tornillo 1 Apriete cada tornillo hasta que encuentre resistencia 2 Apriete una vuelta completa NO APRIETE DEMASIADO La silla no está hecha para resistir las inclemencias del clima Los daños a raí z del clima o como resultado de su mal almacenamiento cuando no se encuentra en uso no es respon...

Page 18: ...CIÓN CANTIDAD A BASE 1 B BARRA SUPERIOR DEL COLGANTE 1 C BARRA INFERIOR DEL COLGANTE 1 D MARCO SUPERIOR 1 E MARCO INTERMEDIO 1 F MARCO INFERIOR CON TIRA ELÁSTICA 1 G TORNILLO CON ARANDELAS M6 X 50 8 H TORNILLO M8 X 55 2 I TORNILLO M8 X 60 1 ...

Page 19: ... PARTE FIGURA DESCRIPCIÓN CANTIDAD J ARANDELA M6 8 K TUERCA M6 8 L ARANDELA M8 3 M TUERCA M8 3 N GANCHO 1 O ANILLO DE PLÁSTICO PARA CONEXIÓN 1 P SILENCIADOR DE PLÁSTICO 2 Q COJÍ N PARA ASIENTO 1 R COJÍ N PARA RESPALDO 1 ...

Page 20: ...20 Lista de partes S LLAVE HEXAGONAL 1 T LLAVE INGLESA 1 ...

Page 21: ... de plá stico para conexión O en la barra inferior del colgante C e insertar la barra superior del colgante B en la barra inferior del colgante C Asegurar con un tornillo M8 X 55 H una arandela L y una tuerca M8 M Apretar con la llave hexagonal S y la llave inglesa T 6 Colocar el silenciador de plástico P en el gancho de la barra superior del colgante B ...

Page 22: ...arco superior D el marco intermedio E y el marco inferior F 5 Asegurar con el tornillo con arandela M6 X 50 G una arandela M6 J y una tuerca M6 K Apretar con la llave hexagonal S y la llave inglesa T 6 Colocar el silenciador de plástico P en la barra en el gancho del marco superior D ...

Page 23: ...de la parte superior para abrir el gancho N Colgar el gancho N en la barra superior del colgante B 4 Colgar el marco superior D intermedio E e inferior F en el gancho N Apretar completamente el gancho N como se muestra en el diagrama del cí rculo 3 ...

Page 24: ...gancho de la tira elástica del marco inferior F Pasar por la barra inferior del colgante C Apretar el gancho de la tira elástica 5 Apretar todos los tornillos 6 Colocar el cojí n para asiento Q y para respaldo R en la silla ...

Reviews: