background image


                                           info@bee-solutions.tech I www.bee-solutions.tech 
                                                By Arrow Engineering 

 Bulgaria LTD @2020 


   KNX SWITCH 

 IBKSW

BEE-XYZZ

                                                                                                                                               3


MOUNTING: 


iBeeSwitch’s

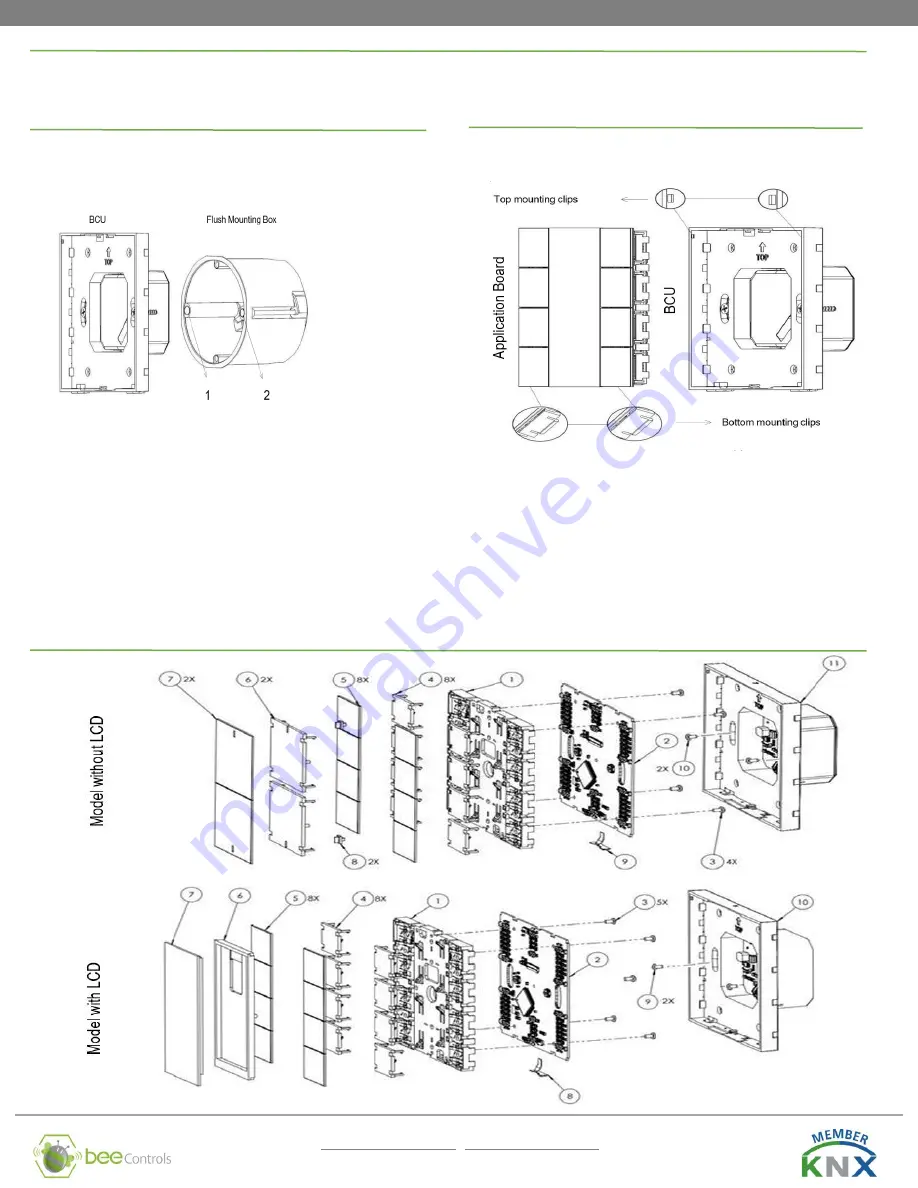
 mounting steps are described below. The procedures are described in 2 main sections: Mounting of BCU and Mounting of Application board.


Mounting the BCU 

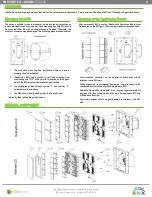
The device is suitable for use in dry interior rooms and can only mounted on 

a standard sized round or square wall flush mounting box. The BCU should 

be  mounted  after  the  wall  painting  process  is  finished.  Otherwise,  the 
product's cosmetics may be damaged. The mounting steps are shown below. 


1.


The  wall  flush  mounting  box  installation  whether  is  done 

properly should be checked. 

2.


iBeeSwitch’s  BCU  part  is  placed  to  wall  flush  mounting  box


considering the “TOP” writing which is located on the upper 

side of the BCU must be demonstrated up direction. 

3.


T

he screws are guided through number “1” and number “2”


holes that are shown above. 

4.


The BCU should be aligned by scales that is positioned 

decently, then tighten the guided screws. 


Mounting of the Application Board: 

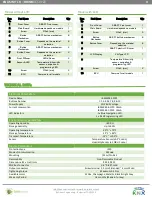
After a successful BCU mounting, iBeeSwitch’s

 Application Board must 

be mounted on the BCU part. The mounting steps are described below. 


Communication  connector  on  the  Application  board  that  will  be 
attached to the BCU part. 

When  connection  is  succeeded,  Application  board  is  ready  to  be 

connected and it must be slightly approached to BCU. 

Application Board should be held  at an  angle of approximately 45 

degrees, after that its top side notches must be inserted to BCU top 

hidden mounting clips. 

Lower side notches should be gently seated in the slot of the BCU 

side. 

INTERNAL COMPONENT: 


Summary of Contents for iBeeSwitch iBKSW-BEE YZZ Series

Page 1: ...evice and result in fire and other hazards Do not connect the main voltage 230 VAC or any other external voltages to any point of the KNX bus Ensure that there is enough insulation and space between the 230 VAC voltage cables and KNX bus Installation only in dry locations and on a 35 mm DIN rail 35 mm and do not expose this device to direct sunlight rain or high humidity Do not use aerosol sprays ...

Page 2: ...ols on LCD display are explained below LCD backlight can be automatically switch down while not using the device or changeable from the bus Temperature values humidity and CO2 values can be switch between them with defined time to see all different values in LCD Also there are 2 buttons located on up and down of the frame of LCD display Each button has 2 different pushbutton functions which are un...

Page 3: ...unting box considering the TOP writing which is located on the upper side of the BCU must be demonstrated up direction 3 The screws are guided through number 1 and number 2 holes that are shown above 4 The BCU should be aligned by scales that is positioned decently then tighten the guided screws Mounting of the Application Board After a successful BCU mounting iBeeSwitch s Application Board must b...

Page 4: ...aterial selection 8 6 ABS PC plastic LCD cover 1 7 LCD Display VA Type LCD 1 8 Temperature humidity sensor navigation programming LED 1 9 Screw M2x4 mm 2 10 BCU Common for all models 1 Electrical Parameters Device Name IBKSWBEE XYZZ Buttons Number 1 2 3 4 5 6 7 8 9 10 Power Supply KNX BUS Voltage Current consumption iBKSW B08 1YZZ 18mA iBKSW B01 0YZZ 10mA LED Indicators 1 x Blue Navigation LED 1 x...

Page 5: ...dels Customized switch for GRMS Customized switch for GRMS Customized switch for GRMS 8 button with LCD metalic gray plastic 8 button with LCD natural stainless steel 8 button with LCD glossy white plastic 10 buttons champagne Aluminum 8 buttons with LCD Anthracite Matt plastic 6 buttons mat unbrushed natural Eloxal aluminum ...

Reviews: