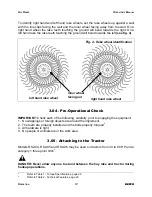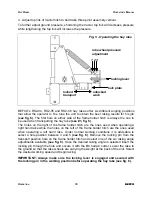
To attach the hay rake to the tractor proceed as follows:
1. Back up the tractor to the hay rake until the draft links align with the lower hitch pins.
2. Stop engine, engage parking brakes and remove key before dismounting tractor.
3. Secure the draft links to the hitch pins and secure them in place with cotter pins.
4. Raise foot stand all the way up and secure with hairpin cotter.
5. Attach top link to the top hitch of the hay rake using a top link pin.
6. Adjust the tractor sway chains/bars to center the hay rake behind the tractor and
control the side sway.
7. Ensure rake is level by adjusting draft links and top link.
8. Slowly operate tractor controls up and down to ensure that the drawbar, tires and
other equipment on the tractor does not touch the rake frame and wheels. If
necessary adjust or remove tractor drawbar to eliminate interference with rake.
Ensure rake is at least 6” from tractor tires throughout the complete range of three
point movement.
DANGER: Never attempt to attach the implement to the tractor or make any
adjustments to it without first turning the tractor off.
DANGER: Failure to ensure a secure coupling of the implement to the tractor can
cause injury and damage to the implement or tractor.
3.06 - Startup
DANGER: Never allow anyone around the implement when it is in operation.
CAUTION: For emergency reasons, learn how to stop the tractor and implement
quickly.
Before starting to work, never forget that the
operator is responsible
for the following:
1. Safe and correct driving of the tractor and implement.
2. To learn precise safe operating procedures for both the tractor and the implement.
3. To ensure all maintenance and lubrication has been performed on the implement.
4. To have read and understood all safety aspects for the implement in the operator’s
manual.
5. To have read and understood all safety decals on the implement.
6. To have contacted the local utility companies to make certain there are no bundled
gas lines, electrical cables, etc., in the work area.
7. Checking the overall condition of the machine.
O
PERATION
14
BEFCO
H
AY
R
AKES
O
PERATOR
’
S
M
ANUAL
Summary of Contents for RS2-04L
Page 36: ...HAY RAKES FRAME OPERATOR S MANUAL RS2 04 PARTS MANUAL 36 BEFCO 08 2013...
Page 38: ...HAY RAKES FRAME OPERATOR S MANUAL RS2 05 PARTS MANUAL 38 BEFCO 08 2013...
Page 40: ...HAY RAKES FRAME OPERATOR S MANUAL RS2 06 PARTS MANUAL 40 BEFCO 12 2013...
Page 44: ...HAY RAKES DECALS OPERATOR S MANUAL RS2 04 RS2 05 RS2 06 PARTS MANUAL 44 BEFCO 08 2013...
Page 46: ......


