background image

8

86

10

7 B

A

-en

/0

1

English 

 Fornax

®

 T

en

Repair work

Repairs may be carried out solely by BEGO 
customer service personnel or by persons 
authorized by the BEGO customer service 
department.

Metallic housings

 must be grounded properly so 

as to prevent them from carrying current. Otherwise 
they are extremely dangerous because the 
housings may be live due to damage to the 
machine! Since a check to ensure a de-energized 
state is mandatory after every intervention in the 
machine (Germany: check in accordance with DIN 
VDE 0701-1), only qualified electricians may open 
the machine!
Only BEGO replacement and wearing parts may be 
used.

Installation

The device is categorised under protection class I 
and may only be connected to properly earthed 
power sources (earth contact sockets).
When laying cables and hoses, make sure that they 
are protected from hot components (e.g., moulds).
The cooling water temperature must never drop 
below 10°C (50°F). If not observed, condensation 
forming on the coil may have an adverse effect on 
the heat output. If condensed water get onto the hot 
mould, it may vaporized explosively.
Danger of burns when draining the cooling water! 
The water can reach temperatures up to 70° C if the 
unit was used for casting beforehand.

Care and maintenance

Switch off the machine and pull out the mains plug 
before performing any care, cleaning or mainte-
nance work.
Only use dry or slightly moist cloths for cleaning. Do 
not spray the machine with water or immerse it in 
water.

Maintenance of safety-relevant compo-
nents

The unit has been designed for a service life of 10 
years from the date of manufacture. No liability is 
accepted for damages arising from operation of the 
unit after this period.
Safety-relevant components must be checked 
regularly and replaced as required. This work must 
be carried out solely by BEGO customer service 
personnel or by repair centres authorised by the 
BEGO customer service department. For that 
purpose, regular maintenance, including annual 
inspections and an inspection after five years, 
carried out by personnel authorized by BEGO is 
recommended.

Summary of Contents for 26480

Page 1: ...Translation of the original operating instructions Fornax T en English Fornax T ...

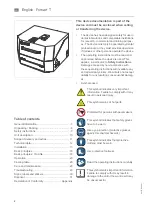
Page 2: ...ion if trainees or other persons operate the device The operating instructions must be read and understood before the device is used This applies in particular to Safety Instructions Damages caused by non compliance with these operating instructions will invalidate any and all warranty claims We will also not accept liability for any resulting consequential damag es Symbols used This symbol indica...

Page 3: ...come any suggestions or contributions please feel free to contact us Your effort will help us make the operating instructions more user friendly and respond more effectively to your wishes and needs Target group This document is directed toward everyone who works with this device or performs service tasks that are described in this document Contact information BEGO Bremer Goldschlägerei Wilh Herbs...

Page 4: ... not followed properly WARNING This reference identifies hazards that can cause bodily injury or property damage if the relevant hazard instruc tions are not followed or not followed properly CAUTION This reference identifies only those hazards that are potential damaging to property and the environment NOTICE This symbol identifies user tips and particularly useful information It helps you optima...

Page 5: ...ined in these operating instructions regarding the transport storage installation commissioning operation service and maintenance of this device Unauthorized structural modifications to this device Inadequate monitoring inspection of device parts that are subject to wear Improperly performed repairs Disastrous situations emergencies caused by foreign objects or force majeure Exclusion of liability...

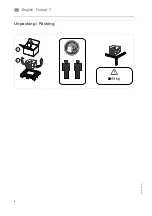
Page 6: ...6 86107 BA en 01 English Fornax T en Unpacking Packing ...

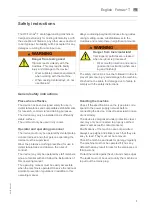
Page 7: ...y staff members who are familiar with and follow the instructions of this operating manual The operating manual must be easily accessible when the machine is operated Observe the national accident prevention regulations in addition to this operating manual Handling the machine Check if the specifications on the type plate corre spond to the power supply network before connecting the device Consult...

Page 8: ...erved condensation forming on the coil may have an adverse effect on the heat output If condensed water get onto the hot mould it may vaporized explosively Danger of burns when draining the cooling water The water can reach temperatures up to 70 C if the unit was used for casting beforehand Care and maintenance Switch off the machine and pull out the mains plug before performing any care cleaning ...

Page 9: ...he same room in which the ready to operate machine is located The warning signs provided sym bol pacemaker are to be placed at the entrances to the room in which the ready to operate machine is located WARNING Burn hazard from hot parts Wear protective clothing protective apron safety shoes safety gog gles and protective gloves Always use mould tongs to move moulds and hot crucibles Touch hot cruc...

Page 10: ...isms for different mould sizes weights provide for a fast economic operation Functions 1 Setting starting the timer 2 Setting the IR sensor temperature limits 3 Opening the cover 4 Adjusting the crucible inserts for precious metals 5 Cooling water indicator 6 Heater indicator 7 Cover 8 Casting arm slider and counter weight 9 Main switch 10 Raising lowering the crucible coil releasing the cast 11 S...

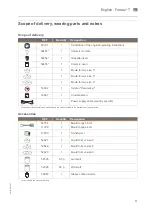
Page 11: ...inal operating instructions 52483 1 Ceramic crucible 52454 1 Graphite insert 52455 1 Ceramic insert 1 Mould former size 3 1 Mould former size 6 1 Mould former size 9 16092 1 Symbol Pacemaker 16647 1 Crucible stand 1 Power supply cable country specific REF Quantity Designation 39754 1 Mould tongs 55 cm 11599 1 Mould tongs 64 cm 17800 1 Transformer 52627 1 Mould former size 3 52628 1 Mould former si...

Page 12: ... 710 mm Depth 615 mm Weight 79 4 kg Nominal voltage 230 V AC 50 60 Hz Nominal output 3680 VA Heating output 3 6 kVA 65 kHz Noise emission 80 dB A Ambient temperature 10 30 C 50 86 F 230 V AC 50 60 Hz 3680 VA REF 26480 For special voltage 200 210 240 V AC REF 26481 consisting of REF 26480 and REF 17800 ...

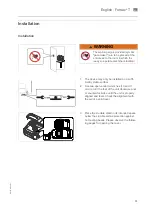
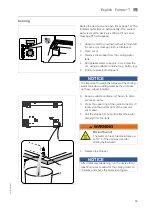
Page 13: ...nterclockwise until the unit is properly aligned and level Check the alignment with the aid of a spirit level 3 Place the crucible stand in its intended space below the crucible coil as protection against hot casting beads Please observe the follow ing pages for opening the cover WARNING The warning signs provided symbol pacemaker are to be placed at the entrances to the room in which the ready to...

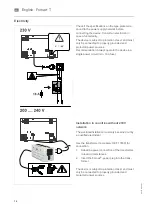
Page 14: ...ower sources Recommendation Always operate the device in a single power circuit min 16A fuse Installation in countries without 230 V network The electrical installation must only be carried out by a qualified electrician Use the transformer accessory REF 17800 for connection 1 Adapt the power connection of the transformer to local circumstances 2 Insert the Fornax power plug into the trans former ...

Page 15: ...tainer 2 handy to drain excessive water 7 Press the upper ring of the quick connector 1 located on the bottom right of the rear unit cover down 8 Pull the stopper 3 out and collect the water draining from the tank 9 Replace the stopper NOTICE It is important to watch the fill level of the cooling water tank when adding water as the unit does not have a level indicator Model No S N 26425 359001 230...

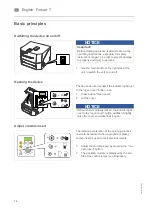
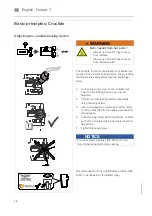
Page 16: ...eeds to be reduced when a graphite or glassy carbon insert is used to melt precious metals 1 Adjust the crucible insert by pressing the cru cible insert button 2 The adjusted crucible is displayed by the sta tus of the control lamps see illustration NOTICE Important Before starting up please read and observe the operating instructions especially the safety instructions page 7 in order to prevent d...

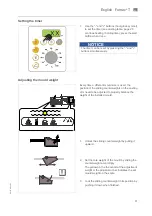
Page 17: ...weights on the casting arm need to be adjusted to properly balance the weight of the installed mould 1 Unlock the sliding counterweight by pulling it upward 2 Set the tare weight of the mould by sliding the counterweight accordingly The yellow pin the the center of the adjustment weight or the adjustment bar indicates the set mould weight on the scale 3 Lock the sliding counterweight in its positi...

Page 18: ...g device backwards using the wing screw 3 Insert and align the crucible so that the outlet of the crucible fits into the opening provided for that purpose 4 Push the wing screw back towards the crucible so that the crucible locking device is locked in its position 5 Tighten the wing screw Recommendation Only use BEGO crucibles REF 52483 identifiable by the BEGO logo WARNING Burn hazard from hot pa...

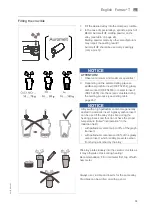
Page 19: ...g table page 26 Pile alloy plates loosely into the ceramic crucible as it may otherwise crack during heating Recommendation Fill in old metal first top off with new metal Always use crucible and inserts for the same alloy Crucibles can be written on with a pencil NOTICE ATTENTION Observe minimum and maximum quantities NOTICE Alloys with a high palladium content are generally casted in a ceramic in...

Page 20: ...is started by closing the cover The heating button will light up to indicate that the heating process is in progress 5 Open the cover to stop the premelting process The heating process will be interrupted WARNING Never look into the melt without protective glass and protective eyewear NOTICE ATTENTION Do not premelt the alloy for too long as this may result in uncharacteristic behaviour of the all...

Page 21: ...tightening the mounting screws WARNING Burn hazard from hot parts Always use mould tongs to move moulds Wear suitable protective equipment when operating the device CAUTION Mould temperatures above 1050 C may cause the device to overheat Never use damaged or cracked moulds NOTICE Ideally the setup should be carried out with a cold mould before it is placed into the preheating oven A dummy may be u...

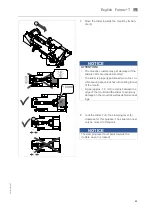
Page 22: ...h of the ingot mould must be aligned with the center of the crucible outlet The specified mould size can be seen on the toothed bar NOTICE If necessary raise the clamping lever first 1 1 and then rotate it 1 2 NOTICE Caution If the mould is not properly installed the alloy may splash into the unit instead of flowing into the mould after melting and releasing the cast Note The rotation direction is...

Page 23: ...TICE ATTENTION The ceramic crucible may get damaged if the slide is not moved back smoothly The slider is properly positioned when the cru cible pouring spout reaches into casting funnel of the mould A gap approx 1 3 mm remains between the edge of the mould and the slider to avoid any damage on the mould as well as defective cast ings NOTICE The clamping lever must point towards the crucible when ...

Page 24: ...arm and moving the the slider back and forth 2 Lift the crucible coil Pull the handle located on the right exterior side of the device forward for this purpose 3 Insert the preheated mould into the mould holder The pouring spout of the mould must face towards the crucible page 21 22 4 The melting process is started by closing the cover The heating button will light up to indicate that the heating ...

Page 25: ...tically when the spinning process is completed after approx 35 seconds audible click The indicator lamp Open cover blinks 11 Lift cover 12 Remove the mould 13 Repeat the steps described above starting with the selection of the proper crucible insert for additional casting processes see 16 14 When all casting processes are completed turn the unit off with the main switch located on the right side o...

Page 26: ...F Eco BegoStar ECO 07 11 sec 850 C 1530 F Auromelt NiCr Wirocer plus 06 12 sec 900 950 C 1650 1740 F Wiron 99 07 10 sec 900 950 C 1650 1740 F Wiron light 03 07 sec 800 C 1472 F CoCr Wirobond C 07 10 sec 900 1000 C 1650 1830 F LFC Wirobond LFC 04 08 sec 900 1000 C 1650 1830 F Wirobond SG 280 02 04 sec 900 1000 C 1650 1830 F Wironit 07 10 sec 950 1050 C 1740 1920 F Wironit LA 06 08 sec 950 1050 C 17...

Page 27: ...English Fornax T 27 86107 BA en 01 en Au Au Pd Ag NiCr CoCr Alloys Continuous heating holding time Preheating temperatures Crucible and insert Melting powder ...

Page 28: ...ains plug before performing any care or maintenance work For power connection without mains plug remove fuses secure the devices against restart and make sure that it is not live WARNING Burn hazard from hot parts Carry out maintenance and cleaning work before working or only after the machine has cooled down NOTICE ATTENTION Do not use compressed air for cleaning as residues casting beads may get...

Page 29: ...ill make an audible sound when it is unlocked 3 Lift the cover using the handle 2 DANGER Warning of electric shock Danger to life Switch off the machine and pull out the mains plug before eliminating any malfunctions For power connection without mains plug remove fuses secure the devices against restart and make sure that it is not live WARNING Risk of injury Eliminate malfunctions only when weari...

Page 30: ...30 86107 BA en 01 English Fornax T en Signs labels and stickers ...

Page 31: ...ste As a customer you contribute to the protection of the environment when you dispose of the device correctly Disposal in Germany BEGO offers you a disposal solution for all BEGO devices sold and put into operation in Germany subsequent to August 13 2005 Please contact us when it is time to dispose of the device Disposal in other countries of the European Union Please contact the company from whi...

Page 32: ......

Page 33: ......

Reviews: